While a blue screen of death In fact, (BSoD) or a black screen death is a common error known to all Windows users, red, white, green, orange, brown, purple, and even yellow screen of death are also a reality. Today, in this post, we will be talking of how to fix the yellow screen of death in Windows 10 systems. One of the major reasons why you may see this error is due to hardware failure and the yellow color for the error helps the Microsoft team to understand the urgency and assist users based on the priority. While you can sometimes resolve the issue by waiting for some time till the computer boots to the desktop, most of the times it may not work. For such situations, we have a few solutions for you, that can help you fix the error. Let’s see how.
Method 1 – Using Color management
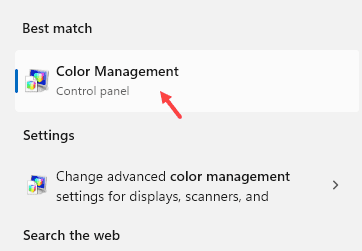
1: Search Color management in Windows search and then click on it

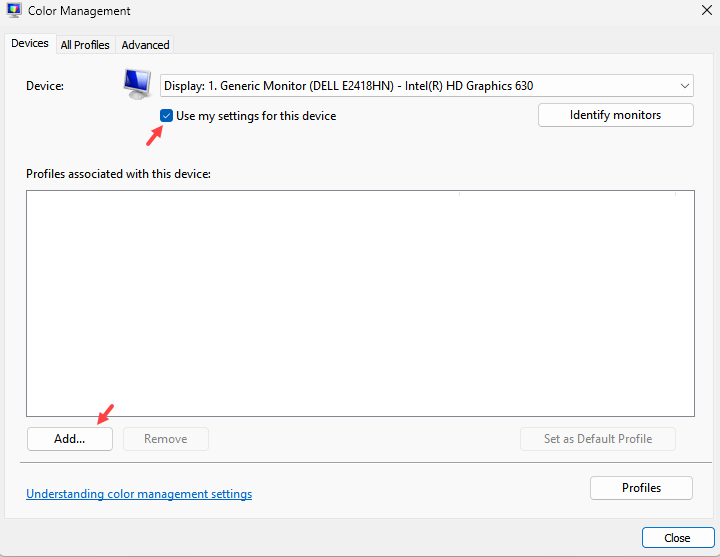
2: Now, Select Use settings for the device.
3 – Click on Add

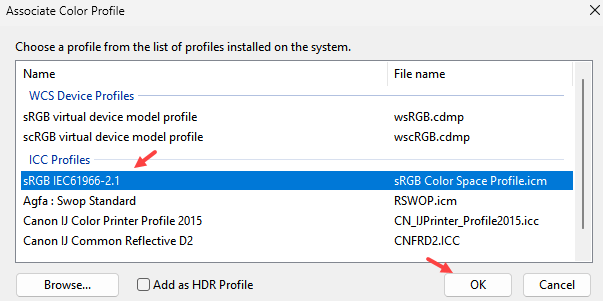
4: Now, select sRGB IEC61966 and Click OK

Method 2: Reinstall the Graphics Card Driver
Step 1: Right-click on Start menu and select Run to launch the Run command window.

Step 2: In the Run command window, type appwiz.cpl and press OK to open the Programs and Features window in Control Panel.

Step 3: In the Programs and Features window, go to the right side of the pane.
Now, under Uninstall or change a program, right-click on the graphics card driver and select Uninstall.

Step 4: Click Yes to confirm the uninstallation. You will then see a prompt asking whether you want to delete all saved profiles.
If you click Yes, it will delete all the related software and saved profiles.
If you click No, it will delete just the software, but all the saved profiles will remain intact on the hard disk.
Once the uninstallation is complete, reboot your PC and freshly install your graphics card driver again and the problem should be solved.
Method 3: Update your Drivers
Solution 1: Using Device Manager
Step 1: Press the Win + R keys together on your keyboard to open the Run command window.
Step 2: In the Run command search box, write devmgmt.msc and press OK to open the Device Manager window.

Step 3: In the Device Manager window, expand the Display adapters section.
Now, right-click on the graphics card driver and select Update driver.

Step 4: In the next window that pops up, click on Search automatically for drivers and it will start looking up for any latest drivers.
If any latest drivers available, Windows will update the graphics card driver to the latest version automatically.

*Note – If there are no updates available for the driver, right-click on the graphics card driver and select Uninstall device.

Then restart your PC and the driver will be re-installed automatically.
Once, the graphics card driver is updated or re-installed, you should not see the yellow screen of death anymore.
Alternatively, you can also update the graphics card driver (if available) under the Sound, video and game controllers section in the device manager. Let’s see how.
Step 1: Right-click on Start menu and select Device Manager.

Step 3: In the Device Manager window, expand the Sound, video and game controllers section.
Right-click on the graphics card driver (if available) and select Update driver.

Step 4: Next, click on Search automatically for drivers and it will start looking up for any latest drivers.
If available, it will update the driver to the latest version automatically.

Once the update is complete, reboot your PC and you should not see the Yellow scree of death anymore.
Solution 2: Using Windows Update
Step 1: Navigate to Start menu, click on it and select Settings (gear icon).

Step 2: In the Settings window, click on Update & Security.

Step 3: It will take you directly to the Windows Update section.
Now, go to the right side of the pane and click on Check for Updates.
If any updates available, Windows will download and install the updates automatically.

Once your PC reboots, you should notice that the yellow screen of death error is gone.
Method 4: Boot your PC into Safe Mode
Step 1: Press the Win + I keys together on your keyboard to open the Settings window.
Step 2: In the Settings window, click on Update & Security.

Step 3: Next, on the left side of the pane, click on Recovery.

Step 4: Now, go to the right side of the pane, scroll down and under Advanced startup, click on Restart now.

Step 5: As it restarts, you will be directed to the Choose an option screen.
Click on Troubleshoot.

Step 6: In the next screen, click on Advanced options and then click on Startup Settings.

Step 7: Now, click on Restart.
Once the PC restarts, you will see a list of options to choose from.
Press 4 or F4 on your keyboard to boot your computer in Safe Mode.
Try to uninstall any problematic software which you may have installed in past during this safe mode. Now, start your computer normally.
Method 5: Run a Clean Boot
Step 1: Press the Win + R hotkey on your keyboard to open the Run command.
Step 2: In the Run command window, type msconfig in the search box and hit Enter to open the System Configuration window.

Step 3: In the System Configuration window, go to the Services tab.
Now, check the box next to Hide all Microsoft services option.
Click on Disable all.

Step 4: Now, select the Startup tab and click on Open Task Manager.

Step 5: Now, close the Task Manager window and then press OK in the System Configuration, under the Startup tab.
Restart your PC and the Yellow screen of death should be gone.
Method 6: Run an Automatic Repair
Before you proceed with the method, make sure that you download the Windows 10 ISO and create a Windows Installation Media using another PC.
Step 1: Insert the Windows installation media or the pen drive, and restart your PC.
You would see a message saying – Press any key to boot from DVD.
Do the needful.
Step 2: You will now see the Install Windows screen where you need to click on the Repair your computer option.
This will initiate the Windows recovery Environment.
Step 2: Go to the Choose an option screen and click on Troubleshoot.

Step 3: Next, click on Advanced Options.

Step 4: In the next screen, select Automatic Repair.
Now, wait for the process to complete and as your system restarts, you should not see the Yellow screen of death anymore.
Method 7: Update BIOS
However, if you do not see the message saying – Press any key to boot from DVD, you would need to modify the boot order in your BIOS settings to boot from the disk or the pen drive. Just be extremely careful while modifying the BIOS settings as the BIOS interface is specially designed for the experienced users and if any critical settings is changed accidentally, your computer may not boot properly. Therefore, proceed with the below method only if you are very sure and when you want to solve a compatibility issue. Proceed with the below steps as it is:
Step 1: During the restart process, carefully see if there are instructions on the screen on how to prevent the normal startup.
Step 2: Press either the F2, F10, ESC, or DELETE key (based on your The bcomputer brand) to enter the BIOS setup utility.
Step 3: You should now see either Boot Order, Boot Options, or Boot tabs in the BIOS setup.
Step 4: Navigate to Boot Order using the arrow keys.
Step 5: Find the USB or the Windows installation media in the Boot list.
Step 6: The boot order has now changed from DVD, CD, or USB flash drive to boot.
Press the F10 key to save the changes and close the BIOS Setup Utility.
Step 7: Now, click on Yes in the prompt to restart your PC normally.
Wait for the scan to complete and remove any threats that may infect your computer.
Step 8: You can now select the language, currency, time, keyboard, or another input method of your choice.
Next, click on Next and then press the Repair option.
Step 9: Select the operating system you want to repair.
Then, in the Choose an option section, click on Next.
Step 10: Now, click on Troubleshoot.

Step 11: In the next screen, select Advanced Options.

Step 11: Under the Advanced Options section, click on Startup Settings.

Now, let the repair process complete. Once it’s done, you should not see the Yellow screen of death anymore with the system startup.