Windows Security provides built-in protection to Windows PCs that helps to keep your system and documents safe and secure. However, many users have reported that when they open the Windows Security app it either doesn’t respond or shows a blank Security at a glance screen. The presence of third-party antivirus software on your system can affect the working of Windows Security. Also, system file corruption or disabled Windows Security Service can raise this issue.
If you are confronting this problem wherein you are seeing a blank page when you launch the Windows Security app on your Windows 11/10 PC, then go ahead and read this article. Here, you will find some troubleshooting methods that can help resolve this issue for you. Before moving ahead with the fixes, if you are using any third-party antivirus then you need to uninstall and completely remove it from your PC.
Fix 1 – Re-register some DLL Files in the Command Prompt
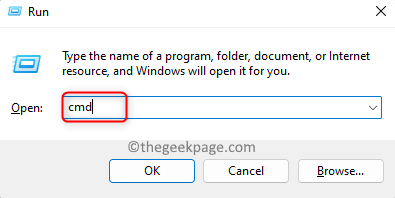
Step 1. Press Windows + R to open the Run dialog.
Step 2. Type cmd and press Ctrl + Shift + Enter to run the Command Prompt as administrator.
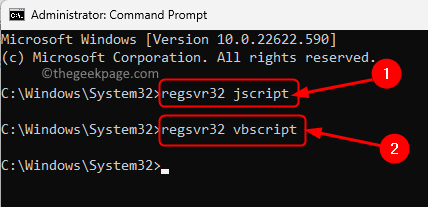
Step 3. In the Command Prompt, type the commands one after the other and hit Enter after each to execute them.
regsvr32 jscript
regsvr32 vbscript
Step 4. Close the Command Prompt.
Restart your computer.
After startup, check if the Blank Security at a Glance screen problem in Windows Security is resolved.
Fix 2 – Use the Windows Update Troubleshooter
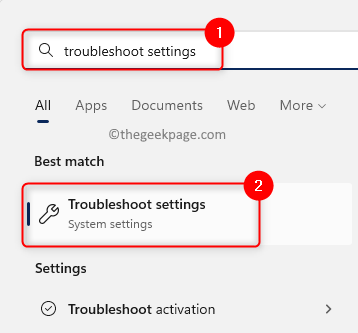
Step 1. Tap on the Windows button on your taskbar and type troubleshoot settings in the Windows search bar.
Step 2. In the search results displayed, click on Troubleshoot settings.
Step 3. On this page, click on Other troubleshooters.
Step 4. The Other troubleshooter’s page opens and you can see a list of all the troubleshooters.
Here, click on the Run button next to Windows Update to open the troubleshooter.
Step 5. Wait for the troubleshooter to run, detect and fix any issues that are found.
Once the troubleshooting process is completed, check for a Windows update.
After you have updated Windows, check if the problem with Windows Security is fixed.
Fix 3 – Perform a System File Checker (SFC) Scan
Step 1. Click on the Windows start button on your taskbar and type command prompt in the search box.
Step 2. Once Command Prompt is highlighted in the search result, click on Run as administrator in the right panel.
Step 3. Type the below command and hit Enter to execute it.
sfc /scannow
Step 4. Wait till the SFC tool runs and checks for any corruption.
If any corruptions are found, they will be repaired at system reboot.
Step 5. After the system restarts, check if the blank screen issue in the Security at a Glance page has been overcome.
Fix 4 – Repair and Reset Windows Security App
Step 1. Hit the Windows key on your keyboard and type installed apps in the search box.
Step 2. Click on Installed apps in the Best match search result.
Step 3. On the Settings page for Installed apps, search for the Windows Security app using the search box.
Step 4. Now, click on the three-dot menu associated with Windows Security and choose Advanced options.
Step 5. On the Advanced options page, scroll down to the Reset section.
Here, click on the Repair button to repair the app without affecting its data.
Step 6. Check if the problem is resolved after repairing the app.
Step 7. If the problem persists even after repair, then go back to the Advanced options page for Windows Security as mentioned above.
Now, click on the Reset button to reset the app.
On the confirmation prompt that pops up, click on Reset again to confirm.
Step 8. After resetting, reboot your PC.
Now, check if the problem faced in the Security at a Glance page in Windows security is resolved.
Fix 5 – Restart Windows Security Service
Step 1. Open the Run box using the Windows and R key combination.
Step 2. Type services.msc and hit Enter to open the Services app.
Step 3. Scroll down and locate the Windows Security Service in the list of services.
Step 4. Double-click on Windows Security Service to open the Properties window.
Step 5. In the Properties window, make sure that the service is in the Running state.
Step 6. If it is not started, then click on Start to start the service.
Step 7. Exit the Services app and check if the issue is resolved.
Fix 6 – Modify the Registry
Step 1. Tap on the Windows key on your keyboard and type registry editor in the search box.
Step 2. Click on Registry Editor in the search results.
Step 3. Navigate to the location below using the folders in the left pane or copy-paste the path into the navigation bar.
HKEY_LOCAL_MACHINE\SYSTEM\CurrentControlSet\Services\SecurityHealthService
Step 4. Once SecurityHealthService key is selected, move to the right side and look for the Start DWORD.
Step 5. Double-click on Start to change its value.
Step 6. In the Edit window, change the Value Data field to either 1 or 2.
Then, click on OK.
Step 7. Close the Registry Editor.
Reboot your system.
After the system startup, try accessing Windows security to see if the problem is fixed.
Fix 7 – Check for Pending Windows Updates
Step 1. Press the Windows and R keys together to open Run.
Step 2. Type ms-settings:windowsupdate and hit Enter.
Step 3. On the Windows Update page in the Settings app, click on the Check for updates button.
Step 4. Windows will check for any updates to the version of Windows installed on your PC.
Step 5. If there is any Cumulative Update available, click on the Download & Install button to start the update.
Step 6. Restart your system once the update completes.
Check if the problem with Windows Security has been solved.
Fix 8 – Reinstall the Windows Security App Via the Terminal
Step 1. Press Windows + X to open the Start button menu.
Step 2. In the menu, click on Terminal (Admin).
When prompted by User Account Control, click on Yes.
Step 3. Type the command and hit Enter.
Get-AppxPackage Microsoft.SecHealthUI -AllUsers | Reset-AppxPackage
Step 4. Check if the problem is fixed after the Security app is reinstalled.
Fix 9 – Redeploy all Windows Apps Via Powershell
Step 1. Press Windows + X to open the Start menu.
Here, click on Terminal (Admin) to open PowerShell as an administrator.
Step 2. Type the below commands one after the other and press Enter after each.
Set-ExecutionPolicy Unrestricted
Get-AppXPackage -AllUsers | Foreach {Add-AppxPackage -DisableDevelopmentMode -Register "$($_.InstallLocation)\AppXManifest.xml"}
Step 3. After the command executes, check if you are able to open the Windows Security app without the blank Security at a glance page.
Fix 10 – Make Use of Reset This PC
Step 1. Press Windows + R to open Run.
Step 2. Type ms-settings:recovery to open the Recovery Settings page.
Step 3. In the Recovery options section, click on the Reset PC button associated with Reset this PC.
Step 4. Now, click on Keep my files in the window that opens.
Using this option will remove all the system apps and settings but will keep your personal data intact.
If you want to delete all the personal data, settings, and applications then you can select the option Remove everything.
Step 5. Next, click on the option Local Reinstall to continue.
Step 6. Click on Next in the Additional settings window.
Step 7. Finally, click on the Reset button to start the resetting process.
Wait till the reset completes.
After the system restarts, check if the issue with the blank screen in Windows Security is resolved.
Fix 11 – Reinstall Windows 11 Using Downloaded ISO
Step 1. Click here to go to the Microsoft website to download the Windows 11 ISO.
Step 2. On this page, scroll down and choose the download version from the dropdown below Download Windows 11 Disk Image (ISO) section.
Then, click on the Download button.
Step 3. After confirming the download, choose the Product Language and click on Confirm.
Step 4. Lastly, click on the 64-bit Download button to start the download of the Windows 11 ISO.
Step 5. Navigate to the folder where the ISO is downloaded.
Now, mount the ISO by double-clicking on it.
Step 6. This will create a new drive letter (F in our case) for this downloaded ISO.
Now, create a new folder in any location or desktop. Right-click on the desktop and choose New –> Folder. Name this folder Win11.
Select all (Ctrl + A) the files from the newly created DVD drive and tap on the Copy icon at the top.
Paste (Ctrl + V) them to the new folder Win11.
Step 7. Right-click on the drive letter and select Eject to unmount the ISO.
Note: If you are running Windows 11 on unsupported hardware like an unsupported CPU, without TPM or secure boot.
For this download an old version of appraiserres.dll.
Open the downloaded zip file and copy (Ctrl + C) the appraiserres.dll from there.
Go to the Win11 folder that you created previously and open the sources folder in that.
Tap on the Paste icon at the top to paste the copied dll in the sources folder. When prompted to overwrite the file click on Replace the file in the destination.
Step 8. Go to the Win11 folder and double-click on the setup.exe file to run the installer for Windows 11 for the same version we have.
Step 9. On the first screen, click on Change how setup downloads updates.
Then, select the option Not right now and click on Next.
Step 10. On the next screen, click on Accept to accept the license.
Then, click on Install.
Step 11. You will see a blue screen and it will take some time to complete the installation with restarting a few times in between.
Step 12. You can log in and have your desktop again.
Check if the issue is fixed by opening the Windows Security app.
That’s it!
Thanks for reading.
We hope at least one of the fixes mentioned in this article has helped you overcome the Security at a glance blank screen when you access Windows Security on your Windows 11/10 PC. Did you find this article informative enough in resolving the issue? Please let us know your thoughts and the fix that worked for you in the comments below.


