Many Windows users have recently reported being stuck at the restart screen in Windows 11. It is still stuck at the restart screen after more than 30 minutes of waiting. Users who are unable to restart their systems for unclear reasons find it extremely annoying.
Therefore, we have listed down the possible reasons behind this.
- Not updating Windows.
- Disabled Secure Boot.
- Outdated Driver of External hardware connected to the system.
- Corrupted system files.
- Malware / Virus Attack.
We’ve included a few fixes in this article to assist users in quickly resolving this issue.
Fix 1: Shutdown Manually using Keyboard Shortcut
Whenever users get stuck at the restart screen for more than 30 minutes or longer, they can shut down the system manually using a keyboard shortcut. Here are some simple steps below on how the user can get the system back on track.
Step 1: If the system is stuck at the restart screen, Press and hold Windows + X together and press the Power button continuously for few seconds till the system shuts down.
Step 2: Release all the keys that were pressed and wait for a minute or so, then press the power button once to start the system.
Step 3: Check to see if the system boots up properly.
Fix 2: Update the Windows System
The windows system when it is not updated triggers various problems such as application sign-in error or internal hardware issue whose driver is not updated, etc. So updating the windows system is the first and foremost solution if something like this happens on any system.
We have listed a few steps below on how to update windows.
Step 1: Open the Settings app on your system by pressing Windows + I keys together.
Step 2: In the Settings app window, Click Windows Update at the bottom of the left menu as shown below.
![How to Fix Stuck at Restart Screen in Windows 11 1 Settings Windowsupdate Min[1]](https://thegeekpage.com/wp-content/plugins/wp-fastest-cache-premium/pro/images/blank.gif)
Step 3: On the Windows update page, click the Check for updates button at the top right side as shown.

Step 4: If there are any updates available, then please download and install them.
Step 5: After updating the windows system, please restart the system once.
Step 6: Now check if the issue has been solved.
Hope it is solved. Otherwise, try our other fixes given below in this post.
Fix 3: Enable Secure Boot on the system
The most important and foremost purpose of secure boot in any windows system is to protect and prevent the malware software from loading while the system boots up. By any chance, if the secure boot is disabled or turned off on the system, this type of error or problem might trigger.
Therefore, we recommend that the users enable the secure boot on their system. After enabling the secure boot on the system, restart the system and check if the problem still occurs.
Hope this fixes the issue.
Fix 4: Uninstall any recent Windows Updates
Sometimes, the recently done windows updates might interfere with the system settings or configuration in some unusual way. This can be the reason behind this problem. So it is better to uninstall any recent windows updates on the system.
We have listed down simple steps below on how to uninstall the recent windows updates.
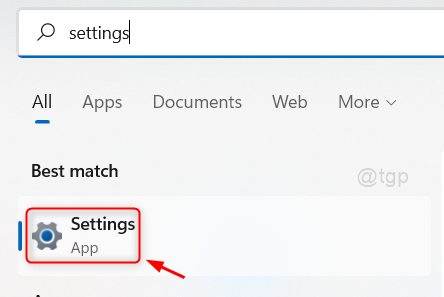
Step 1: Press the Windows key on your keyboard and type settings.
Step 2: Select the Settings app from the search results as shown in the below screenshot.

Step 3: Click Windows Update from the left side menu of the Settings app.
![How to Fix Stuck at Restart Screen in Windows 11 1 Settings Windowsupdate Min[1]](https://thegeekpage.com/wp-content/plugins/wp-fastest-cache-premium/pro/images/blank.gif)
Step 4: On the Windows Update page, Click Update history as shown below.

Step 5: Then, Select Uninstall updates at the bottom of the page as shown below.

Step 6: Click Uninstall of the recent windows updates done.

Step 7: After the windows update is uninstalled, restart your system and see if the problem still occurs.
Hope this should solve the problem.
Fix 5: Update the Externally connected hardware’s Driver
Many times, we try to solve an issue within the system when the problem might have been caused by something external to the system. For example, most of the users use an external USB mouse connected to the system for convenience. So, if there is any error or its driver is not being updated, then this might cause an issue. So we suggest that the users try to update the external connected hardware’s driver.
Let us see how to update the driver via device manager with the steps given below.
Step 1: Open Device Manager by right-clicking on the Start button.
Step 2: Select Device Manager from the context menu as shown in the below screenshot.

Step 3: In the device manager window, Double click on Mice and other pointing devices option to expand it from the list of devices as shown below.
Step 4: Then, right-click on the HID-compliant mouse and select Update driver from the context menu as shown below.

Step 5: Follow the on-screen instructions to update the driver.
Step 6: You can update any other externally connected hardware driver also.
Step 7: Once it is done, please check if the problem still persists.
Hope this solved the issue.
Hope you found this post informative and helpful. Please let us know in the comments section below.
Thank you!