If you see Error Code 48 in the Device Manager, then Windows has blocked the device driver from starting. This way, Windows disables the device showing Error Code 48 to prevent any issues. So, you have to take the matter into your own hands now and fix the device so that you don’t see the error message again.
Fix 1 – Uninstall and reinstall the driver
Got a new driver update for the device? Uninstall and reinstall the driver from your computer.
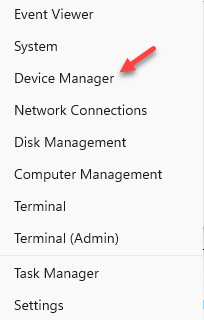
Step 1 – Use the Windows key+X keys together.
Step 2 – Open “Device Manager” from the context menu.
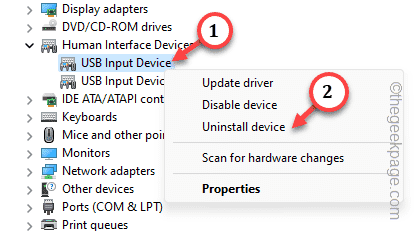
Step 3 – Directly expand the section of devices.
Step 4 – Then, right-click the affected device driver and click “Uninstall device“.
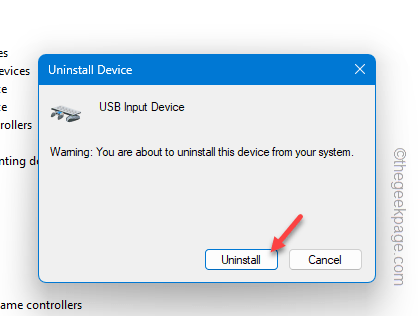
Step 5 – When you see the warning message, tap “Uninstall” to confirm uninstalling the affected driver from
Uninstalling the affected device driver should eradicate Error Code 48.
Now all you have to do is to reboot the device.
After restarting the computer, the faulty driver will be automatically replaced with the normal, default driver on your computer.
Fix 2 – Rollback the faulty driver
Roll back the faulty device driver and test if it helps.
Step 1 – Start to type “device” in the box.
Step 2 – When you see the “Device Manager“, open it up.
Step 3 – Once you reach that spot, locate the driver in question.
Step 4 – Next, right-tap the affected driver and tap “Properties“.
Step 5 –On the driver properties page, go straight to the “Drivers” tab.
Step 6 – On the Drivers section, click “Rollback driver” to start rolling back the driver to the old one, which was working just fine.
[If you see the Rollback Driver option is greyed out, you can just skip these steps. ]
Step 6 – Follow the rest of the process following the steps on the screen to roll back the driver.
Exit the Device Manager.
Fix 3 – Update the device driver in question
Install the latest update of the device driver and fix the issue.
Step 1 – Use the Run box to open up the Device Manager page. You can do it using the Win+R keys together.
Step 2 – So, type this and hit Enter.
devmgmt.msc
Step 3 – You can directly right-click the device driver and tap “Update driver“.
Step 4 – Tap “Search automatically for drivers“. Search for the latest driver and fix it.
Wait for the response from Windows. Check what it is saying.
You may see this message –
The best drivers for your device are already installed.
Step 5 – Then, click “Search for updated drivers on Windows Update“.
This will take you to the Windows Update page. Windows will automatically install the driver update for the device driver.
Open the device driver in question and check the General tab. Check the status of the issue.
Fix 4 – Disable the Hyper-V
We have identified that the users who use the Hyper-V or Hypervisor feature, are prone to this Error Code 48.
Step 1 – Quickly use the ⊞ Win+R keys at once.
Step 2 – Write down this. Click “OK” to open the Windows Features.
optionalfeatures
Step 3 – Directly go down to find “Hyper-V“.
Step 4 – Just uncheck that and click “OK“.
Windows will automatically turn off the Hypervisor on your system.
Windows will require you to restart the computer. Restarting the system should help you resolve the issue.
Fix 5 – Disable the Core Memory Isolation
Core Memory Isolation is a feature of Windows Security. Try disabling it and testing the issue.
Step 1 – You can directly open the Core Isolation directly. So, type “core isolation” in the box.
Step 2 – Then, tap “Core Isolation” to open it up.
Step 3 – You will get to the Core isolation page.
Step 4 – In that section, you will find the Memory integrity feature. Turn it “Off“.
You have to restart your device to let this change take effect. Restarting the system should help you resolve the issue.
You won’t see the “The software for this device has been blocked from starting.” with the Error Code 48 on your screen.


