Many users have reported an issue where there are seeing incompatible drivers listed when they try to enable the Memory Integrity feature in Core isolation on their Windows 11/10 PC. Actually, when memory integrity in Core Isolation is turned on, the drivers are scanned to check their compatibility. If there are any incompatible drivers on your PC they are not allowed to load and this may result in unpredicted behavior. The error message displayed to the user is “Memory Integrity cannot be turned on. Try resolving any incompatibilities with your drivers.” When you review these drivers, it will show you a list of all the incompatible drivers.
In order to make use of Memory Integrity, you will need to resolve this issue of driver incompatibility. Are you experiencing this problem of incompatible drivers when trying to use Core Isolation on your Windows 11/10 PC? Then, go ahead and read this article to look for some troubleshooting methods that have been successfully used by other users facing this problem to resolve it.
Fix 1 – Enable Memory Integrity in Windows Features
Since Memory Integrity is a security feature that is related to virtualization on the Windows PC, you can try enabling features using Windows features.
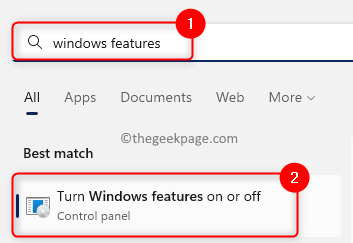
Step 1. Press Windows + S key combination on our keyboard and type windows features in the search bar.
Step 2. In the displayed search results, select Turn Windows features on or off.
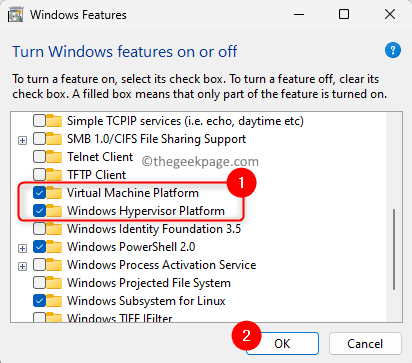
Step 3. Scroll down in the Windows features and locate Virtual Machine Platform and Windows Hypervisor Platform in the list of features.
Step 4. Make sure that the box next to Virtual Machine Platform and Windows Hypervisor Platform is checked.
Step 5. Click on OK to apply the changes to the features.
Step 6. Wait for some time till Windows searches for the updates and adds these features to your system.
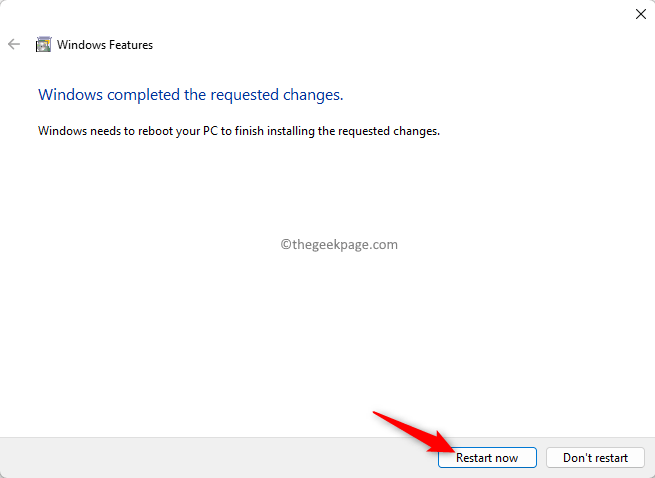
Step 7. You will be prompted to either restart now or later.
Click on the Restart Now button to get the changes into effect on your PC.
Step 8. After your system restarts, go and try to enable Memory Integrity and check if the incompatible driver problem is resolved.
Fix 2 – Remove Incompatible Driver Using PNPUtil Command Via the Terminal
If you are still facing the driver incompatibility issue while trying to enable the Memory Integrity feature, then you can try deleting the driver from your PC.
Before beginning with the steps, make a note of the Published Name of the incompatible driver from the Core Isolation page where you were trying to enable the feature.
Step 1. Press Windows + X key on your keyboard to open the Start button menu.
Step 2. In the menu that opens, click on Terminal (Admin).
Step 3. If prompted by User Account Control for permissions, click on Yes.
Step 4. In the Terminal, type the command below and hit Enter.
pnputil /enum-drivers
On executing the above command you will see a list of all the drivers that are installed on your computer.
Step 5. From the list, find the incompatible driver that is causing this problem for you based on the Published Name that you noted down from the Core Isolation page.
Step 6. Next, type the following command and press the Enter key.
pnputil /delete-driver <driver-published-name>
Note: Replace <driver-published-name> with the actual Published Name of the problematic driver obtained from the Core Isolation screen.
Step 7. Once the driver is deleted, go back to the Core Isolation details window and try to enable memory integrity.
Step 8. After enabling, perform a system reboot to make sure that the changes have been put into effect on your PC.
Note: If you are not able to delete the driver using the above command and you see an error, then try the methods mentioned in Fix 3 and Fix 4 to remove the incompatible driver from your PC.
Fix 3 – Uninstall the Driver Using Autoruns
Step 1. Click here to download Autoruns for your Windows PC.
Step 2. On this page, click on the link Download Autoruns and Autorunsc.
This will download a zip file onto your PC.
Step 3. Navigate to the location of the downloaded file.
Right-click on the zip file and select Extract All…
Step 4. In the dialog that opens, choose a location to save the extracted files using the Browse button.
Then, click on Extract.
Step 5. Open the Autoruns folder containing the extracted files.
Here, right-click on Autoruns64.exe and choose Run as administrator to run the application.
Step 6. In the Autoruns app window, go to the Drivers tab.
Locate the driver in the list that is displayed. To locate the driver you need to know the name of the incompatible driver listed on the Core Isolation page.
Step 7. Right-click on the driver and choose Delete.
In the dialog that asks for confirmation of the delete operation, click on OK.
Step 8. Reboot your PC and check if the driver incompatibility issue in Core Isolation is fixed.
Fix 4 – Use Drive Store Explorer App to Remove the Driver
Step 1. Click here to go to the GitHub page to download the archive file for Drive Store Explorer.
On this page, click on the respective link to download the archive file.
Step 2. Go to the downloaded location and extract the files to another folder on your system.
Step 3. Open the folder containing the files.
Now, run the Rapr.exe file by double-clicking on it.
Step 4. Before moving ahead, you need to know the Original File Name of the driver instead of the Published name as the Driver Store Explorer lists the driver using the Original File Name.
Open Run (Windows + R) and type cmd and press Ctrl + Shift + Enter to open Command Prompt as admin.
Type the command below and hit Enter.
dism /online /get-drivers /format:table
From the table that is listed, note down the Original File Name of the driver based on the Published Name.
Step 5. In the Driver Store Explorer, locate the incompatible driver using the Original File Name that you obtained above.
Check the box next to the driver’s name and click on the Delete Driver(s) button.
Click on OK to confirm the removal of the driver.
Step 6. After the incompatible drivers are removed, restart your PC.
Check if the problem is resolved.
Fix 5 – Perform Clean Boot
Step 1. Open Run using the Windows and R keys.
Type msconfig and hit Enter to open the System Configuration.
Step 2. In the General tab, select the option labeled Selective startup.
Then, check the box next to Load system services and make sure that the other options are unchecked.
Step 3. Go to the Services tab.
Check the box associated with Hide all Microsoft services at the bottom left corner.
Then, disable all the Microsoft services by clicking on the Disable all button.
Step 4. Finally, click on Apply and then on OK to apply the changes.
Step 5. Restart your system.
After the system starts up, go to Core Isolation and check if the problem is overcome.
Once the issue is resolved, you can perform a normal startup by changing the setting in the System Configuration window.
That’s it!
Thanks for reading.
We hope that you have been able to resolve the driver incompatibility issue in Core Isolation by following the fixes mentioned in this article. Did you find this article informative enough? Please comment and let us know your thoughts on this topic and the fix that worked in your case.


