Microsoft Excel is used for a wide variety of things like calculations, creating models, etc. Few of the operations might need adding rows and columns. But some of the users face problems like cannot create a new row or column in excel. Stop here and go through this article that tells about different methods to solve this issue. Let us start!
Method 1: Remove Cell Protection
Step 1: Open the excel sheet which you are facing an issue with. Select all the cells from your spreadsheet using Ctrl + A keys together.
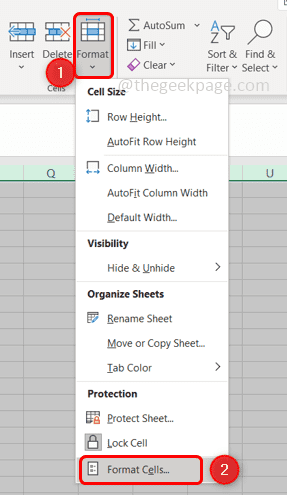
Step 2: Click on the Format option present in the Home tab and select format cells. From the dropdown select Format Cells
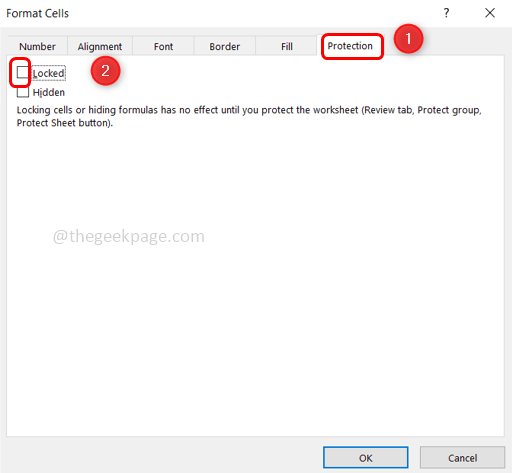
Step 3: Under the protection tab, uncheck the box next to the Locked option.
Step 4: Click on OK to save the changes.
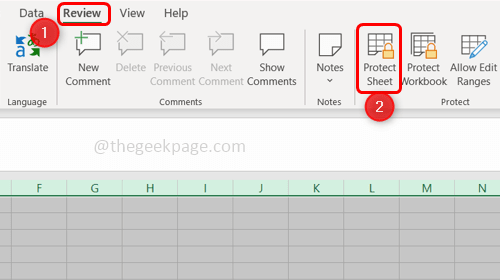
Step 5: Click on the Review tab and click on Protect Sheet.
Step 6: Put your password to remove protection from the workbook and save it using Ctrl + S keys together.
Step 7: Close the Excel and again open it. Now you can add/insert a new row or column.
Method 2: Unmerge The Cells
Step 1: Open the troublesome excel worksheet and check if there are any merged cells.
Step 2: If there is a merged column, select the column header and click on the merge & center option which is on the Home tab.
Step 3: Repeat Step 2 for each merged column.
Step 4: If there is a merged row, select the row and click on the merge & center option from the Home tab.
Step 5: Repeat Step 4 for each merged row.
Step 5: Save the file using Ctrl + S keys together.
Step 6: Close the Excel and again open it and check if the error is resolved.
Method 3: Unfreeze The Panes
Step 1: Open the troublesome spreadsheet and click on the View tab and select Freeze Panes
Step 2: From the dropdown select Unfreeze panes and save your file using Ctrl + S keys
Step 3: Close and re-open the excel file. Now check if you can add the rows/columns.
Method 4: Trusted File Source
Step 1: Open the Excel file which is troublesome and click on the File tab at the top left corner.
Step 2: Then click on options and then choose Trust Center from the window that appeared.
Step 3: On the right pane click on Trusted Center Settings option.
Step 4: From the left, select Trusted locations. Click on Add new location option.
Step 5: In the appeared window browse the location of your excel file.
Step 6: Click Ok
Step 7: Close the excel file and again open it. Now add new rows/columns.
Method 5: Clear Unused Rows/Columns
Step 1: Open the excel spreadsheet and select all the unused columns until the column that has data excluding the data column using the Shift + Ctrl keys together along with the right arrow key.
Step 2: If you are performing this method for rows, then select all the unused rows until the row that has data excluding the data row using the Shift + Ctrl keys together along with the up/down arrow key.
Step 3: In the Home tab, click on the Borders dropdown, and a list will appear. Select No border from the list
Step 4: Click on the Theme colors dropdown and select No fill.
Step 5: Press the Delete key from the keyboard to remove the data entered by mistake on the unused columns.
Step 6: You can go to the Editing section in the Home tab.
Step 7: Click on the Clear option and select Clear formats
Step 8: Again Click on Clear and select Clear All.
Step 9: Save the changes using Ctrl + S keys. Close the excel sheet and again open it and check if the issue is resolved.
Method 6: Use VBA (Visual Basic For Applications)
Step 1: Open the excel sheet for which you are facing the issue, right click on the sheet.
Step 2: Click on the View code option.
Step 3: Click on Ctrl + G to display the immediate window.
Step 4: Type ActiveSheet.UsedRange and hit enter.
Step 5: Select the File tab from the top and click on Close and Return to Microsoft Excel
Step 6: Save the file. Close the excel file and reopen it. Now check if you can add the rows/columns.
That’s it! Hope this article helps. Do comment on which method worked for you. Thank you!!


