If you are a Windows user and want to disable the core parking feature in your system, this article will guide you through the process.
What is Core Parking?
Core Parking feature is a power-saving mechanism. It makes a few of your processors go into a sleep mode that does not perform any tasks and consumes very less to no power. This helps in decreasing energy consumption and therefore reduces heat in the system. When required these cores are out from the parked state. Few users would need to disable this feature, especially those who are gamers. Disabling this feature will boost your system performance.
Disable Windows Core Parking Using Windows Registry Editor
Step 1: Open the run prompt using Windows + R keys together.
Step 2: Type regedit in the Run prompt and hit enter. A dialog box will appear click Yes.
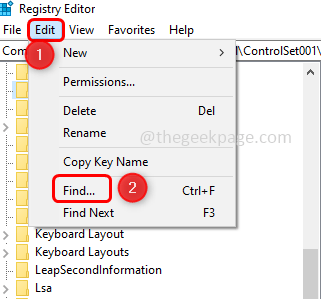
Step 3: Click on the Edit tab which is on the top of the registry window, from the list select Find
Step 4: Copy the below registry key and paste it into the Find what box
0cc5b647-c1df-4637-891a-dec35c318583
Step 5: Click on Find next to search for the value. It will take a few minutes.
Step 6: From the search results, Double click on ValueMax which is on the right side to edit the value.
Step 7: Change the value data to 0 (zero) so that no cores get parked. Click on OK
Step 8: Then click on Edit again and from the list, select Find next which will find the next entry for that particular registry key.
Step 9: Make sure the value of that particular entry is also set to 0.
Step 10: Again repeat Step 8 to find more entries and then check for the ValueMax to be set to 0. Repeat the step until there appears a window saying Finished searching through the registry.
Step 11: It’s done! Now Restart the system.
That’s it! Hope this article is helpful. Thank you!!


