Wouldn’t it be great if you could play most of the great android mobile games on your Windows system? Yes, it is. Bluestacks is an android simulator app which if installed on the windows system can make it possible for the users to play android games.
Recently it is been reported that many users are experiencing an issue with the Bluestacks app. The problem is caused when the users tried launching the app and it got stuck at the initial loading screen and does not open the Bluestacks app’s home screen. This might have been caused because of one of the issues such as some compatibility mode issues, outdated windows, old versions of Bluestacks, and so on.
Here in this article, we have gathered a few solutions that will definitely resolve this issue on your system.
A few workarounds that might help a bit before proceeding –
- Try updating the windows on your system.
- If you are using any old version of bluestacks, this might be the reason. So you need to uninstall the bluestacks app from your system completely and then reinstall it with the latest version.
- Some users said that their antivirus was actually causing the issue by interfering with the loading process. So please disable the antivirus and see if this works.
Method 1 – Check if any Startup App is causing the issue
There may be a chance that we are unaware of some startup apps that are running in the background that is causing this issue with the Bluestacks app as mentioned above. So it is better to disable all the startup services and apps and see if the issue is resolved and check which one is causing the problem.
Follow the steps below on how to do it.
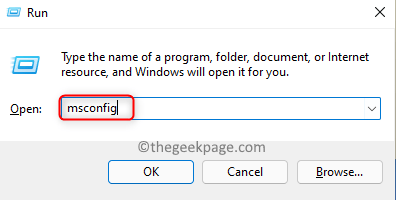
Step 1: First, press the Windows and R keys simultaneously on your keyboard to open the run command box.
Step 2: Type msconfig in the textbox and press Enter key.

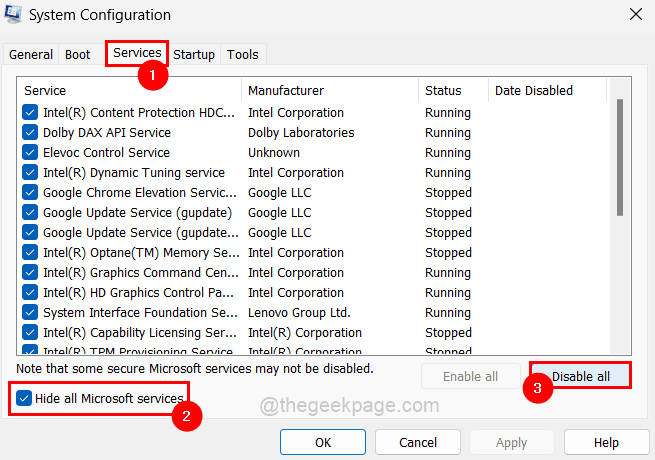
Step 3: This opens the System Configuration window on your system.
Step 4: Now you should click on the Services tab and check the Hide all Microsoft services checkbox.
Step 5: Then click Disable all on the right side as shown in the below screenshot.

Step 6: After all the services are disabled, click the Startup tab and then click the Open Task Manager link as shown below.

Step 7: Now that the task manager window appears on the screen, you will be on the startup apps tab.
Step 8: Disable all the startup apps from the list by right-clicking and then selecting Disable option from the context menu for each and every app from the list as sown below.

Step 9: Once it is done, you can close the task manager window.
Step 10: Now click Apply and OK on the System Configuration window to reflect changes and this restarts the system automatically once.

Step 11: After the system gets started, please check if the bluestacks app issue is still there.
If it is working fine, it indicates that some startup app is actually causing this issue so you might have to enable one startup app and check if it is causing the issue or not.
Method 2 – Check the Compatibility between the Bluestacks app and the Windows
These types of problems usually occur when there is a compatibility issue between the app and the windows system. So we need to check if the compatibility mode is set to the previous version of windows that is being installed on your system.
Let us see how to check the compatibility mode of the app using the steps explained below.
Step 1: Go to Desktop first by pressing the Windows and D keys together.
Step 2: Locate the Bluestacks app icon placed on the desktop screen.
Step 3: Next right-click on the Bluestacks app icon and select Properties from the context menu as shown below.

Step 4: The properties window will appear on the system.
Step 5: Click the Compatibility tab and select the Run this program in compatibility mode for checkbox.
Step 6: Next you should select the previous version of the windows installed on your system from the dropdown list as shown below.
NOTE: If you are using Windows 11/10, then you should select Windows 8 from the list.
Step 7: Also make sure you have checked the Run this program as an administrator checkbox and then click Apply and OK.

Step 8: Now try running the app on your system and see if this worked.
Method 3 – Restart the BlueStacks app
Whenever any app gets hanged or stuck, closing the app forcibly and then launching it works in most cases. So let us also give it a try and follow the steps below on how to restart the Bluestacks app on your system.
Step 1: Open the Task Manager window by pressing CTRL + SHIFT + ESC keys on your keyboard.
Step 2: Make sure you are on the Processes tab and find the Bluestacks app from the list as shown below.
Step 3: Now right-click on the Bluestacks app from the list and click End task from its context menu as shown in the below screenshot.

Step 4: Now you can see that the bluestacks app is closed.
Step 5: You should try to launch the Bluestacks app now. To do so, you should press the Windows key and type bluestacks.
Step 6: Then select the Bluestacks app from the search results as shown below.

Step 7: See if the bluestacks app opened without any issue.
Method 4 – Make sure your system meets minimum requirements
There is a criterion for the system set by the Bluestacks app team to meet the minimum system requirements in order to run the Bluestacks app on your system and play android games without any issue. Now please make sure you have the minimum requirements by referring to this link provided here.
Method 5 – Check if Virtualization is enabled or not
For a smooth application experience, there is a requirement for Virtualization on any windows system. If it is enabled on your system then the Bluestacks app will work well. Let us see how to check if virtualization is enabled or not with the following steps below.
Step 1: Press the CTRL + SHIFT + ESC keys together to launch the Task Manager.
Step 2: Next go to the Performance tab and at the bottom right end you can see the option called Virtualization.
Step 3: If it is enabled, it will display as Enabled in front of Virtualization as shown below.
Otherwise, it will display Disabled.

Step 4: If the Virtualization is not enabled on your system, then please enable it and check if the problem got resolved.
Method 6 – Close All Apps and then Launch the Bluestacks app
Since Bluestacks app is a very huge app, some systems having lower speed and slow performance might face this kind of problem. Therefore, we recommend our users close all the applications that are running on the system and then try to launch the bluestack app so that it runs smoothly.
Follow the steps below on how to close all the running apps/ background apps using the task manager.
Step 1: Press the Windows key and type task manager on your keyboard.
Step 2: Hit the Enter key to open the Task Manager.

Step 3: By default, you will be on the Processes tab. But please make sure you are there.
Step 4: Right-click on the app listed under the Processes tab and click End task to close the app.
Repeat the same for all the apps listed.

Step 5: Once all the apps are closed, please try to launch the Bluestacks app and see if it opens up fine.
Hope one of the above methods helped you resolve this issue on your system. Please let us know in the comments area below.
Thank you!