Is the option to change the WiFi network profile from public to private missing on your computer? If it is, then you will not be able to change the type of WiFi network on your computer in a traditional way. Simply, follow these easy steps to change the type of your network using Windows Powershell.
Initial Workaround–
If you are using any third-party antivirus which manages the firewall, it is possible that it may restrict the change of the network for you. Disable the firewall temporarily and try to change the network profile.
Change public network to private network using PowerShell-
You can easily change the type of WiFi network using the PowerShell window.
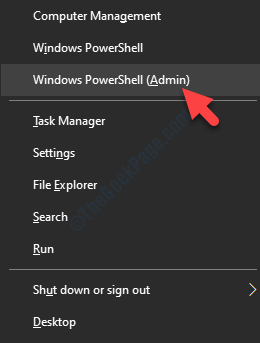
1. Press ‘Windows key+X‘.
2. Then, what you need to do is to simply click on the “PowerShell(Admin)“.

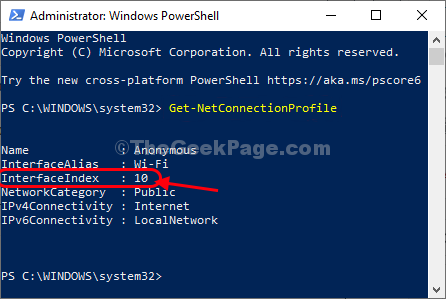
3. To know the network profile, execute this command by pasting it in the PowerShell window and hitting Enter.
Get-NetConnectionProfile

You will notice all the networks on your computer has access to.
4. Note the ‘InterfaceIndex‘ number for the network profile you want to change (For our network it is “10“).

5. Now, copy-paste this command in PowerShell window, modify it, and then hit Enter to change the network profile.
Set-NetConnectionProfile -InterfaceIndex <index number> -NetworkCategory Private
[NOTE– Replace “index number” with the InterfaceIndex number you noticed before. Also, Type public or private based on which profile you want]

That’s it! You have successfully changed the network profile. If you want to see it actually works or not follow these steps-
6. Again copy-paste this command in PowerShell window and then hit Enter.
Get-NetConnectionProfile
You will be able to see the ‘NetworkCategory‘ for your network and it will be notified as “Private“.

Close PowerShell window on your computer.
You have successfully changed the network profile on your computer.
Fix-2 Modify Registry Editor-
If the first method didn’t work out for you, try changing the registry value to change the network profile.
NOTE–
Registry Editor is a very sensitive location. Your single mistake in Registry Editor can brick your entire system. So, create a backup in advance. After opening Registry Editor, click on “File” > “Export” and save the backup in an easily accessible but secure location.
If anything goes wrong you can retrieve your registry by simply importing the backup.
1. Press the Windows key and the ‘R‘ key to launch the Run window.
2. Then, you need to write “regedit” and then press Enter.

3. In Registry Editor window, on the left-hand side, expand in this way-
HKEY_LOCAL_MACHINE\SOFTWARE\Microsoft\Windows NT\CurrentVersion\NetworkList\Profiles
4. Now, on the left-hand side, click on to select one of the sub-keys.
5. Then, on the right-hand side, check the “ProfileName” to know the SSID (name) of the network.

This way, select and check the name of the sub-keys one-by-one until you detect the network you want to change.
6. Once, you have detected the network, double click on the “Category” value to modify it.

7. Simply set the ‘Value Data:‘ to “1“.
8. Click on “OK“.

Once you have done this, close Registry Editor on your computer.
Restart your computer to save the changes on your computer.
After rebooting, the network profile should be changed to private.