Microsft Outlook has become the staple of our formal email setup. It is omnipresent and people seem to have integrated it into their lives. Nowadays emails in the companies are primarily sent through the Outlook application. This also leads to many cases where hackers will try to gain access to confidential company documents and marketers will try to gain eyeballs for their products or services. Outlook users need to know such tricks. We may face a regular attack from multiple sources on our Outlook mailbox. Fortunately, Outlook has some good features which can help mitigate this. You can set up different options for the junk emails received in Outlook.
Accessing the Junk Options on Outlook
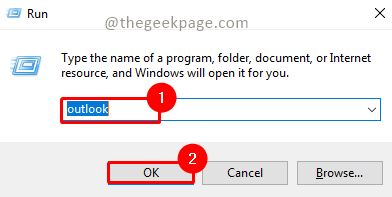
Step 1: Press the Windows+R button and type Outlook and click on OK.

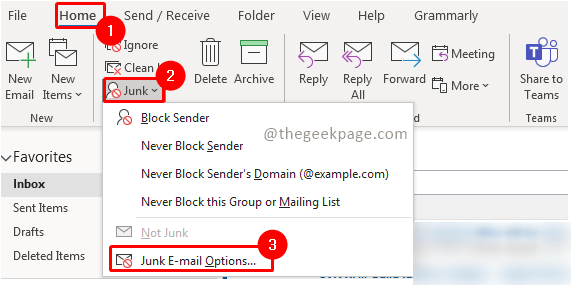
Step 2: Go to Home, click on Junk, and select Junk E-mail Options.

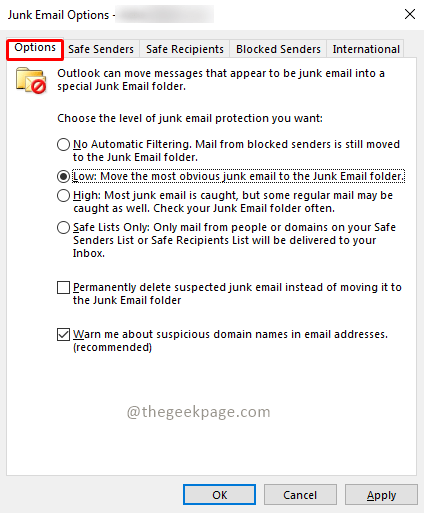
Step 3: Go to the Options tab to see the different options available to manage Junk email.

Step 4: There are multiple features available so that users can customize it as per their needs.
Explanation of different features in Option Tab in Junk Email Options
No Automatic Filtering: This feature ensures that only the blocked email IDs will not flow into your inbox but into the Junk Email folder. Other mails that flow into your inbox will be without any filter and hence rest all emails will be passed.
Low: This only looks at the most obvious mails to the Junk email folder. Spam mails can still leak through into your inbox.
High: This feature ensures most emails will be caught in the Junk email folder. However, the downside to this is that certain regular mail may also be caught as well. Using this feature will mean that you will have to check your junk folder often to ensure you do not miss any regular email updates. It may be required to move some emails to Inbox from the Junk email folder.
Safe Lists: This feature ensures the highest protection against junk emails. By allowing only emails from the safe sender’s list or safe recipients list.
There are 2 checkboxes in the Options tab. If you select the checkbox for the first one, it will enable all suspected Junk emails to be deleted instead of moving them to the Junk email folder. Users are advised to use this check box with care. The second checkbox needs to be clicked. They will ensure that you will be notified of any suspicious emails with irregular domain addresses. This will also disable links from suspicious phishing messages. This will help protect your computer and outlook accounts from malicious intent.
Safe Senders Tab
The Safe Senders Tab helps you to add all the safe email addresses known to you and from whom you can regularly expect emails.
Step 1: Click on the Safe Senders Tab.
Step 2: Click on Add.

Step 3: Under the Add address or domain box, enter the email address and click on OK.

Safe Recipients Tab
The safe recipient’s tab allows you to add all emails known to you and to whom you will regularly send emails. Outlook will not consider any email from these addresses as Junk.
Step 1: Click on the Safe Recipients tab.
Step 2: Click on Add.

Step 3: Under the Add address or domain box, enter the email address and click on OK.

Blocked Senders Tab
The blocked senders’ tab allows you to add any suspicious addresses or any email that you consider Junk. Any email from these email addresses will be moved to Junk automatically.
Step 1: Click on the Blocked Senders tab.
Step 2: Click on Add.

Step 3: Under the Add address or domain box, enter the email address and click on OK.

International Tab
The international tab allows you to block emails from some domains or even certain languages. This feature can be useful when you receive certain emails in languages that you may not understand.
Step 1: Click on International Tab.
Step 2: Click on Blocked Top-level Domain List.

Step 3: Select any of the countries to block them by checking the respective boxes.
Note: You can also select all.
Step 4: Clik OK to save the changes.

Step 5: Click on Blocked Encoding List.

Step 6: Select the Languages you want to block by checking the respective boxes.
Step 7: Click OK to save the changes.

Step 8: Click on Apply in order to apply all changes made to the Junk Email folder option.
Step 9: Click OK to close the window.

So now you are ready to face the daily barrage of emails and also be assured that you will receive only those emails which you expect. Hope the article was informative and useful. Tell us in the comments which Junk option is most helpful? Thank you for reading!!