Not every time would we want to settle with the conventional Word documents that have only single sectioned pages. Sometimes, we might fancy having 2 sections in our document, just like how a magazine page would look. Sometimes when you prepare your CV, you might need to have a small column on the left and a big one on the right. The small section to contain all the skill sets and related information, and the big one to contain all the experience related information and data of similar nature. In both scenarios, dividing the page into multiple sections is important and we are here to explain how.
Though it might seem complex to section a Word document, it is in reality a very simple process. Read on, to learn how you can easily section a word document by dividing it into more than one column. Hope you enjoy reading!
Section 1: How to Divide a Blank Page into 2 Columns
This section explains in detail how you can section a new page into 2.
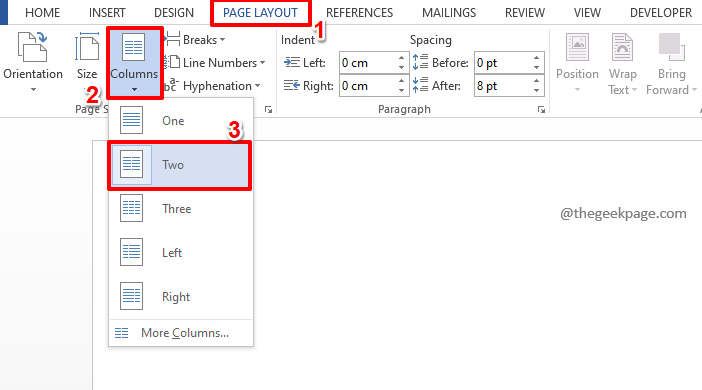
Step 1: Firstly, click on the PAGE LAYOUT tab at the top ribbon.
Now, click on the Columns dropdown button under the PAGE LAYOUT options and then click on the option Two.
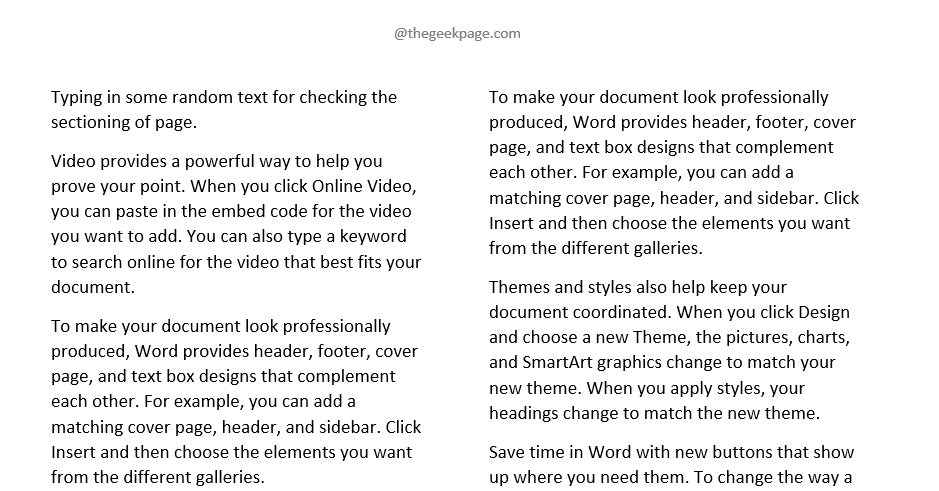
Step 2: That’s it. If you type in something, you can see that the sentence automatically breaks at the middle of the page and then goes to the next line.
If you would like to generate some random text and see if the second column gets populated fine, simply type in =rand(12,3). This will generate random text of 12 paragraphs, with 3 sentences in each one.
If you would like to know more about random text generation in MS Word, you can read our article How to Generate Random Text in Microsoft Word.
Step 3: That’s it. You can see that your page is now beautifully sectioned into 2.
Section 2: How to Convert an Existing Single Columned Page into Multi Columned Page
We talked about sectioning a new page in the previous section. But what if you already have a page and you want it sectioned?
Step 1: Launch the already existing document and simply click on the PAGE LAYOUT tab at the top.
Now, click on the dropdown button named Columns and hit the Two option.
Step 2: Yes, it cannot be simpler, we agree too!
Section 3: How to Divide a New Page into More than 2 Columns
So far, we have talked about sectioning a page into 2 columns. On the Columns dropdown button, you have options to divide a page for upto 3 columns. But what if you want to section the page into more than 3 columns? Is there a way? Sure there is!
Step 1: Once again, click on the PAGE LAYOUT tab at the top.
Now, click on the Columns dropdown button and click on the last option, which says More Columns.
Step 2: On the Columns window, you can use the up arrow and down arrow against the option Number of columns field.
Once the number of columns is set, hit the OK button.
In the example below, I want to divide my page into 4 columns, hence I have set the Number of columns as 4.
Step 3: When you are back at your document, you will see your page exactly as you want, beautifully sectioned into 4.
Section 4: How to Configure the Width Settings of Each Column on a Page
Now let’s say you have divided your page into 2 columns, but you want one column to be wider than the other. So it should be more like a big column on the left and a small column on the right. For this, obviously, you need to be able to adjust the width settings of each column. Let’s see how this can be done.
Step 1: This time also, click on the PAGE LAYOUT tab at the top ribbon. Now click on the Columns dropdown button and click on the option More Columns.
Step 2: On the Columns window, You can use the Number of columns up and down arrows to increase or decrease the number of columns. In the example below, we need 2 columns, so the Number of columns value is set to 2.
Now, uncheck the checkbox corresponding to the option Equal column width. If this option is left checked, you will not be able to edit the width configurations of each column as this option will divide all the columns into equal widths.
As next, under the Width and spacing section, you can adjust the Width and Spacing of each column as shown in the screenshot below.
Once you are all done, hit the OK button.
Step 3: When you are back at the document, you can see that the columns are now of the widths you prefer.
Section 5: How to Add a Line Between Columns
If you would like to have a physical line drawn between the divided columns, there is a way for that too.
Step 1: Once again, it is the PAGE LAYOUT tab that you have to start with. Then click on the Columns dropdown button and then click on the More Columns option.
Step 2: On the Columns window, on the right pane, check the checkbox corresponding to Line between.
That’s it. Hit the OK button to proceed.
Step 3: Get back to your Word document to view a line beautifully drawn between your sections. If there are 3 sections, there will be 2 lines, if there are 4 sections, there will be 3 lines, and so on.
You can explore more on the Columns window to discover more tricks that would suit your needs.
Hope you found the article helpful. Please do come back for more amazing tricks, tips, hacks, and how-tos.


