When you install the Windows 10 OS for the first time or whenever you re-install it, you usually have to create a new account that requires an email id and password. This helps you to sign into Windows and this is primarily the Microsoft account. However, you may want to use a local account instead for privacy. Also, it may be possible that you deleted the Microsoft account accidentally and now you want to add it again.
So, whether you want to create or delete a Microsoft account on your Windows 10 PC, we are here to guide you with the same.
Method 1: How To Add Accounts Using Account Settings
How To Add Local Account
Step 1: Press Win + I keys together on your keyboard to open the Settings window.
Step 2: In the Settings window, click on Accounts.

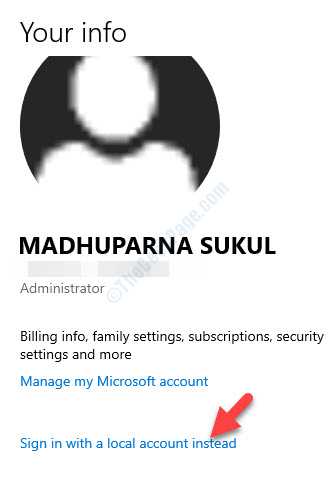
Step 3: Next, go to the right side and you will see that you are signed-in into your Microsoft Account as an Administrator.
Below that, click on Sign in with a local account instead.

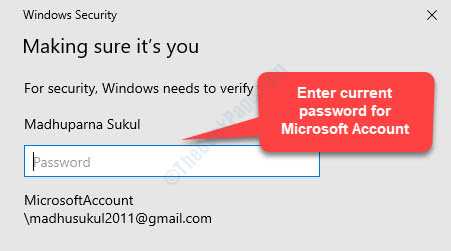
Step 4: In the next window, enter the current password of the Microsoft account that you are signed in with.

Step 5: In the Enter your local account info window, add all the required details and press Next.

Wait for sometime and the local account is created. Once the Local account is created, it will automatically remove the Microsoft account.
You can also remove the Microsoft Account using other methods as below.
How To Add Microsoft Account
Step 1: Press Win + I keys together on your keyboard to open the Settings window.
Step 2: In the Settings window, click on Accounts.

Step 3: Next, go to the right side and you will see that you are signed-in into your Local Account as an Administrator.
Below that, click on Sign in with a Microsoft account instead.

Step 4: It will open the Create account window. Add the email address you want to use.
You can also use a phone number instead.
Click Next to proceed.

Step 5: Next, in the Create a password window, add a password (make it a strong password) and click Next.

Step 6: In the next window, add your First Name and Last Name and then click Next to continue.

Step 7: You will then enter the What’s your date of birth? window. Add your Country/region and Date of birth.
Click Next.

Step 8: Next, you will be taken to the Sign in to this computer using your Microsoft account where you would need to type in the password of the local account you are logged in currently.

Step 9: It will take you to the Windows Security page > Making sure it’s you, where you will be prompted to create a Microsoft Hello PIN.

Wait for sometime and your Microsoft account will be created.
Method 2: How To Remove Microsoft Account Using Control Panel
Step 1: Go to Start and type Control Panel in the Windows search bar.

Step 2: Left-click on the result to open the Control Panel window.

Step 3: In the Control Panel window, go to View by and set the field to Large icons.
Select User Accounts from the list.

Step 4: In the User Accounts window, go to the right side of the pane and click on Manage another account.

Step 5: Next, under Choose the user you would like to change, select the account you want to remove.

Step 6: In the Change an Account window, click on Delete the account.

You will see a prompt asking if you wish to keep the files related to this account. Press Keep Files and all the related personal files will be safe.
Alternatively, you can try deleting the Microsoft account using the User Accounts.
Method 3: Using User Accounts
Step 1: Right-click on Start and click on Run in the menu.

Step 2: In the Run command window, type netplwiz and press OK to open the User Accounts dialogue box.

Step 3: In the User Accounts window, under the Users tab, go to the Users for this computer section.
Select the account and press the Remove button below.

Click Yes in the prompt that appears to confirm. It will then remove the Microsoft account.
Or, you can delete the account using the Settings app.
Method 4: Using the Settings App
Step 1: Press Win + I keys together on your keyboard to open the Settings window.
Step 2: In the Settings window, click on Accounts.

Step 3: Next, on the left side of the pane, go to to Family & other users.

Step 4: Now, go to the right side of the pane and under Other users, select the Microsoft account you want to delete, and click on Remove.

In the confirmation prompt that appears, click on Delete account and data to confirm.
That’s all. Now, your Microsoft account should be removed.