Are you seeing a ‘CRITICAL_SERVICE_FAILED’ error message on your computer screen while booting up your system? This is a fatal blue screen of death issue where you can’t log in to your system normally. Every time you will try to boot up your system it will show you the same quoted message, crashing down again. There are some easy resolutions to fix this particular issue on your computer.
You have to access the Automatic Repair window. If it automatically doesn’t open up, follow these steps~
a. At first turn off your system.
b. While your system is completely switched off, tap on the power button to switch it on again.
c. After that, when you notice that the manufacturer’s logo has arrived, just press-hold the power button. This will force the shutdown of the device.
d. Then, what you need to do is to continue this for 2-3 more times. Finally, the third time, your pc will automatically land at the startup repair screen.
Now, go for these fixes.
Fix 1 – Startup with disabling driver signature
This problem usually occurs due to a bad driver’s signature present on your computer.
1. In the Automatic Repair window, click on the “Advanced options“.

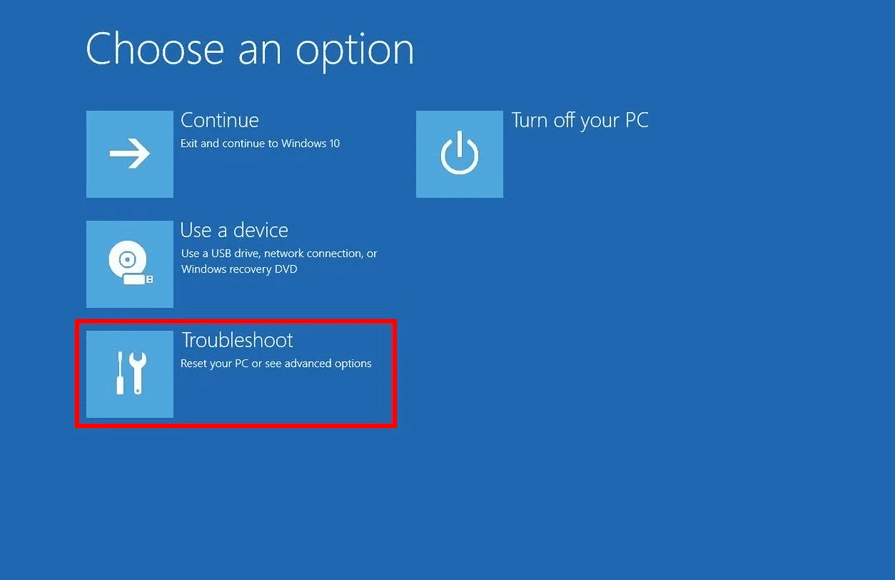
2. On the next screen you need to click on “Troubleshoot“.

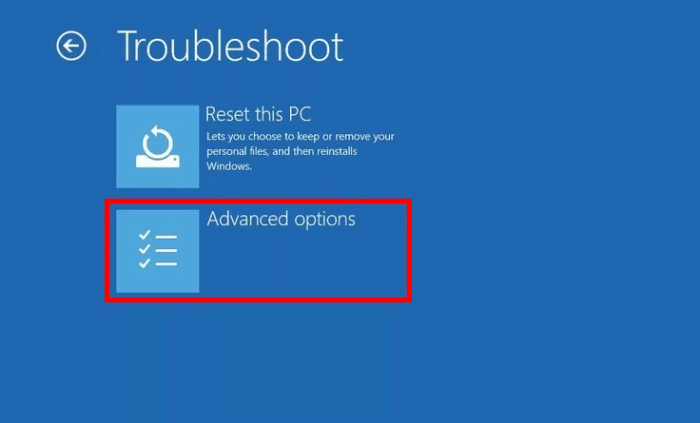
4. When the Troubleshoot window prevails, simply need to click on “Advanced options“.

5. Next, click on the “Startup Settings“.

6. Simply, click on “Restart” on the bottom-left corner of the corner.

7. You need to press the ‘F7‘ key to “Disable Driver Signature Enforcement“.

Windows will restart. But this time it will not check driver signature authenticity. So the previous error that was occurring due to the driver won’t occur again.
Fix 2 – Try startup repair
2. Click on the “Advanced options” to visualize more options.

3. Once you are in ‘Choose an option‘, click the “Troubleshoot“.

4. You need to click on “Advanced options“.

6. After that, simply click on “Startup Repair” to start the repair process.

Just wait for the Startup Repair to check what’s wrong with the startup on your computer and fix it.
Wait for this checking process to be over.
Fix 3 – Run a System Restore
Running a system restore should put your system back in time when there was no error at first.
1. You have to open the Automatic Repair window once again.
2. Then you have to click on “Advanced options“.

3. When ‘Choose an option’ appears on your screen, go this way-
Troubleshoot > Advanced options

4.Check for the ‘System Restore‘ in the ‘Advanced options’ window.
5. After that, click on “System Restore” to start the system restore process on your computer.

Just wait for the system to restore your computer safely.
6. As the System Restore window appears, click on “Next“.

7. Here choose the latest restore point available. Click on “Next“.

8. Simply click on “Finish” to end the process.
As soon as you click on the ‘Finish’ option, the restoring process will commence.

This process will reboot your device several times.
Once it has finished, check if the BSOD issue is occurring again or not.
Fix 4 – Reset your Windows Update components
Sometimes due to bad components in the Windows Update, this problem may occur.
1. Click on the “Advanced options“.

2. Then you have to go this way –
Troubleshoot > Advanced options

3. In the ‘Advanced options’ window, you need to click on the “Startup Settings“.

6. When you reach the startup settings window, click on “Restart“.

7. You need to press the ‘F4‘ key to “Enable Safe mode“.

8. When your computer restarts in safe mode, type “cmd” in the search box.
9. Then, right-click on the “Command Prompt“, followed by a click on ‘Run as administrator‘.

10. On the Command Prompt window, type these codes one-by-one. Hit Enter after typing each of these to execute them.
ren %systemroot%\softwaredistribution softwaredistribution.old
ren %systemroot%\system32\catroot2 catroot2.old

After renaming the folder names, restart your computer.
After restarting your computer, log in to the device. The problem won’t further bother you.