Notepad is the most simplified text processor present in Windows 10. You know the simple tricks of Notepad, but here, in this article, we have discussed some hidden but very useful tricks of Notepad which may still be unknown to you.
1. Inserting Time & Date
Inserting Time and Date every time you create a new entry in the log file may be very boring for you, this trick will save a lot amount of effort and time.
1. Open Notepad window.
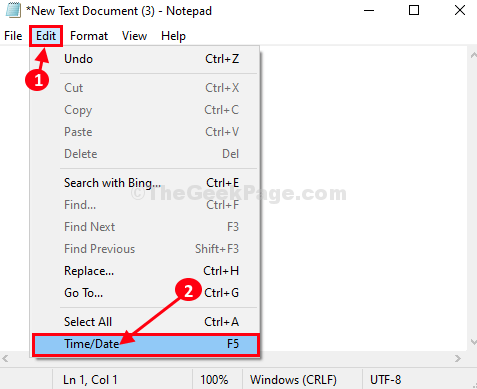
2. Click on “Edit” and then click on “Time/Date“.

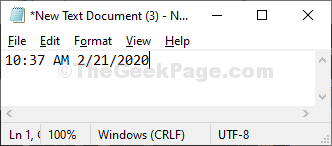
3. You will see the date and time is included in Notepad.

Note- You can add date and time simply by pressing “F5” from your keyboard also.
2. Use Right-to left Reading Order
If you are using Arabic or Hebrew language as a default language in Windows 10 and you use the Arabic keyboard in Notepad, this method will be very useful for you.
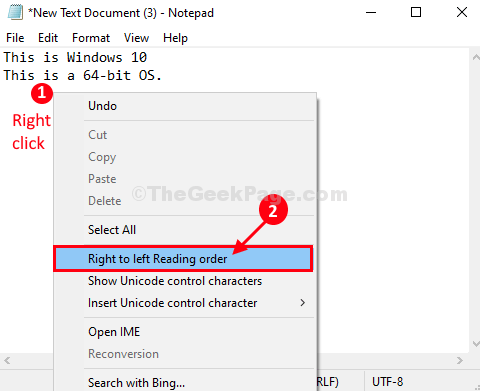
1. Simply, right-click in Notepad and then select “Right to left Reading order“.

Now, whenever you will be typing something, it will start from left.

3. Automate Timestamp each time a file is opened
If you are using a notepad document to keep a log of things, then this is an absolute time-saver. Each time you will open this document on your computer, Notepad will add time and date automatically.
1. Open Notepad window.
2. Add “.LOG” at the beginning of the document (It will be the first line).

3. Save the document by pressing Ctrl+S.
4. Reopen the document.
You will notice a timestamp being attached at the end of the document.

From now on, each time you will open this document, you will notice a timestamp being automatically attached at the end of the document.
4. Go To a specific location in Notepad
Reallocating one place from another place in Notepad becomes a very time-consuming affair, especially when the document is very large. ‘Go-To’ feature of Notepad may come in handy in this case.
1. Open the Notepad window on your computer.
2. Click on “Format” and make sure “Word Wrap” is unchecked. If it is not, then simply click on “Word Wrap” to uncheck it.

3. Now, you can click on “Edit” and then click on “Go To…“.
Or,
You can press Ctrl+G to do the same.

4. Now, under ‘Line number‘, enter the line number where you want to go, and then click on “Go-To” to go the exact line number.

You will be relocated to the exact line number.
5. Customize Header & Footer settings in Notepad
The diversity of customization available in Header & Footer settings of Notepad can surprise you. Follow the steps to discover hidden customization tricks of Header & Footer settings-
1. Open the Notepad window on your computer.
2. Now, click on “File” and then click on “Page Setup…“.

3. In-Page Setup window, set ‘Header‘ and ‘Footer‘ as you wish*, and then click on “OK” to save the changes on your computer.

Now, you save the file on your computer.
You will not notice any changes in the Notepad window (Header & Footer will remain hidden). When you will print the file, you will see the header and footer are included in the document.

* NOTE-
Here are some codes/ special characters which can be used in Header and Footer settings-
Special Character Output
&d Date
&t Timestamp
&p Page number
&f Filename
&& Ampersand (&)
&l Left align header/footer
&r Right align header/footer
&c Center align header/footer