Some Android users have recently reported an anomaly where none of their existing apps couldn’t be updated through the Play Store. This problem is directly associated with the Play Store cache. The existing corrupted Play Store cache usually causes this problem. So, today we have shown you how to fix this peculiar issue.
Fix 1 – Clear the Play Store cache
Obviously, you should clear the Play Store cache at the first step.
Step 1 – Pull down to open the Notifications shade.
Step 2 – Open the “Settings“.
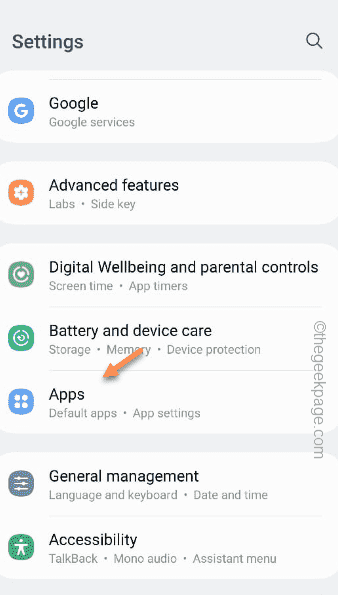
Step 3 – Open the “Apps” settings.
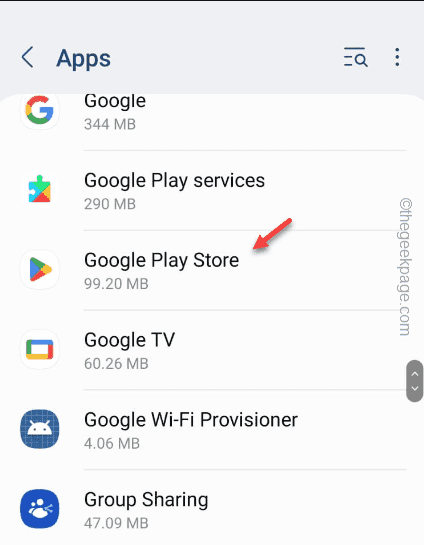
Step 4 – All the apps are listed here. So, either you can scroll to find the “Google Play Store” or use the search box to find it. Open it when you have found it.
Step 5 – On the Play Store settings page, click “Clear cache” to clear the app cache.
After clearing the Play Store cache, minimize that page and open the Play Store.
Try to update the app once more. If the update process gets stuck in the middle again, return to the Settings page.
Step 6 – Finally, tap “Clear data” to clear the current Play Store data.
This time, the apps will install for sure.
Fix 2 – Force Stop the Play Store
If clearing the Play Store cache doesn’t work, you can force-stop it and try.
Step 1 – Locate the Play Store icon on your home screen.
Step 2 – Press & hold the Play Store app and tap the ⓘ icon. This will take you directly to the main Play Store information page.
Step 3 – Upon reaching there, tap “Force Stop” to force stop the Play Store.
After this, open the Play Store and try to update the same app once more.
Fix 3 – Free up more space
Your phone may not have enough space to update the app.
Step 1 – At first, swipe down to see the Notifications shade.
Step 2 – Tap the ⚙️ to open it.
Step 3 – Get down to find the “Battery and device care” to open it.
Step 4 – On the Device Care page, you will find the “Storage” option.
Open that up.
Step 5 – Free up more space by deleting big files or uninstalling larger apps from your phone.
After cleaning up your phone, try to use the Play Store to update the apps once more.
Hope this helps.
Fix 4 – Use a WiFi connection
If you are updating a big app, you should switch to the WiFi connection instead of using mobile data. Usually, big apps like Call of Duty Mobile can be tricky as these updates can be nearly a GB. If you have a slower mobile data connection, app updates in Play Store may halt in the middle of downloading.
So, we recommend updating the apps over the WiFi only.
Fix 5 – Opt for auto-update apps
There is a feature in Play Store that you can use to auto-update the apps. So, the apps will be updated automatically when you are connected to WiFi.
Step 1 – Launch the Play Store.
Step 2 – After opening the Play Store app, you can find your Google profile photo in the top-right corner.
Step 3 – Tap that once and open “Settings” to head on to the Play Store settings.
Step 4 – Now, expand the “Network preferences“.
Step 5 – Open the “Auto-update apps“.
Step 6 – Switch to the “Over Wi-Fi only“.
Now, you can choose the first option “Over any network” as well. But your mobile data might be used to update all the apps even in the background.
Step 7 – Tap “OK” to save this change.
Now, check whether the apps are updating or not. Proceed to the next solution, if this one doesn’t work.
Fix 6 – Change the Date & Time settings
Wrong date and time settings may lead to this update issue on your Android phone.
Step 1 – Open Settings on your Android phone.
Step 2 – On the Samsung devices, if you scroll down to find the “General management” settings. Open it.
[If you have another phone, you can just search for “date” using the search box in the Settings page. ]
Step 3 – Open the “Date & time” to open it.
Step 4 – On the Date and time settings page, toggle the “Automatic date and time” to “Off” mode.
This way, you can take control of the Date and time settings.
Step 5 – Set the date and time settings according to the local time.
Open the Play Store page and test. Just try to update a random app on your phone.
Check if this helps.
Fix 7 – Opt out of Data Saver mode
Date Saving mode restricts background data usage and saves mobile data.
Step 1 – Quit the Play Store app.
Step 2 – So, open the notifications shade. If scroll horizontally, you will find the “Ultra Data Saving” mode listed there.
Make sure it is greyed out or turned off.
Now, if you can’t find the particular Ultra Data Saving mode icon there, you can do this.
Step 1 – Open the Settings.
Step 2 – Search for “data saving” from there.
Step 3 – Tap “Ultra Data Saving” from the search results.
Step 4 – Just turn the Data Saving mode off.
Open the Play Store after this. Try to update any one of your pending apps. Check how that goes.


