While traveling, most smartphone users happen to use the app for directional guidance and the Google Maps app has always been everybody’s go-to application for accessing the direction.
Recently, we got many reports from several iPhone users stating that they are not able to use Google Maps on their iPhones. It suddenly stopped working on their iPhones which is making a huge impact on them and can spoil the fun while traveling.
Google Maps might have stopped working due to the following reasons mentioned below.
- Incorrect date and time, time zone set on the iPhone.
- Internal minor errors on the iPhone.
- Technical issue with the Google Maps app.
- Background App Refresh feature is disabled.
- Location Services is not enabled, and Google Maps has not granted access to Location Services.
However, you do not have to worry about it anymore. Because in this post, we are explaining with the help of different fixes to resolve this issue easily.
Fix 1 – Turn On the Location Services
Step 1: You should tap on the settings icon.
Step 2: This will open the “Settings” app.
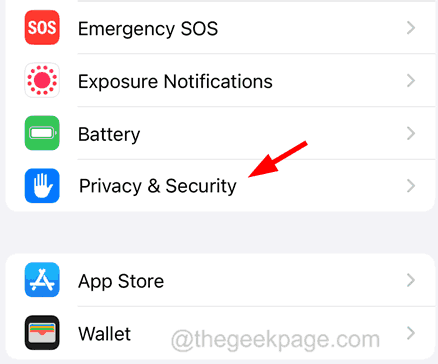
Step 3: Scroll down the settings menu list and click on the “Privacy & Security” option as shown below.

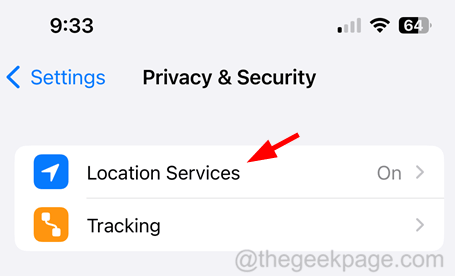
Step 4: Select the “Location Services” option at the top as shown.

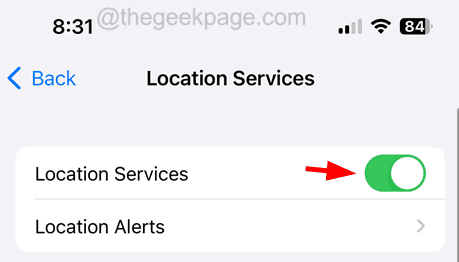
Step 5: Tap on the “Location Services” toggle switch to turn it to green color.

This enables the Location Services feature on your iPhone.
Fix 2 – Grant Location Access to Google Maps
After making sure that Location Services is enabled on your iPhone, follow the steps below to ensure you have been granted location access to Google Maps.
Step 1: Tap on the Settings icon to open the settings page.
Step 2: Now scroll down and select the Google Maps option.

Step 3: Click on the Location option at the top.

Step 4: Select either “While Using the App” OR “Always” from the list as shown below.

Fix 3 – Enable the Background App Refresh on the iPhone
Step 1: Go to the “Settings” page.
Step 2: Browse the General option and select the Background App Refresh option.

Step 3: To enable the Background App Refresh feature, click on it and select either “Wi-Fi” or Wi-Fi & Mobile Data.

Step 4: Now go back and scroll down the list of apps installed that can use the background app refresh option.
Step 5: Turn on the Google Maps option by clicking on its toggle button to green color.

Fix 4 – Turn Off the Low Power Mode
Step 1: Open the Settings app and go to the Battery option.

Step 2: Turn Off the Low Power Mode option by tapping on the toggle switch as shown below.

Fix 5 – Update the Google Maps
Step 1: To update the Google Maps app, you should go to the App Store.
Step 2: Click on the Search tab at the bottom.

Step 3: Type “Google Maps” and search for the app.

Step 4: If there is any update available, it will show “Update”. You have to click on it and follow the instructions.
Step 5: If it displays “Open”, it means the app is already updated.
NOTE – If this does not work, you can try uninstalling Google Maps from your iPhone and freshly installing it again from the App Store.

Fix 6 – Reset Location & Privacy
Step 1: Open the Settings page and click on the General option.
Step 2: Scroll down to the bottom and click Transfer or Reset iPhone.

Step 3: Tap on Reset.

Step 4: Select the Reset Location & Privacy option.

Step 5: Click Reset Settings.

This starts to reset the location and privacy settings on your iPhone. Once done, check if the issue got fixed, or else try resetting the network settings on your iPhone.
Additional Fixes to Try
- Restart the iPhone – Due to the internal minor glitches within the iPhone, several issues occur on the iPhone. This can be rectified easily by merely restarting the device once.
- Check the Google Maps server – When the Google Maps server goes down for some reason, you may face trouble accessing the application. So check the status of the Google Maps server and if it is down, please wait for some hours and try again later.
- Check the Date & Time Settings – If you have the wrong date and time set on your iPhone, you need to first change it to the correct values in order to resolve this issue. Go to Settings > General > Date & Time. Now enable the Set Automatically option by tapping on the toggle switch.