Is the ‘Get-AppxPackage‘ command not working on your PowerShell terminal? According to some users, they are simply getting a big error message, which summarizes to “The service cannot be started, either because it is disabled or because it has no enabled devices associated with it.” So, if you are facing similar issues on your computer, just follow these fixes to solve the problem.
Workarounds –
1. Check if you are opening the Windows PowerShell as an administrator.
2. If you are trying to execute the command for all users, try this cmdlet instead –
Get-AppxPackage -AllUsers | Select Name, PackageFullName
And, if you are trying to execute the command for your current account, this will b the command –
Get-AppxPackage -AllUsers | Select Name, PackageFullName
Fix 1 – Edit the registry
You can modify the registry to edit the ‘AppXSVC’ key to fix this particular problem.
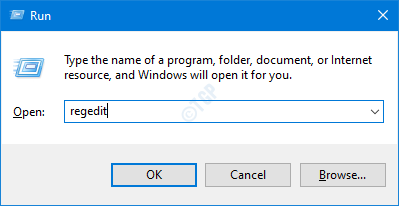
1. At first, press the Windows key+R keys together.
2. Then, type “regedit” and click on “OK“.

IMPORTANT–
Before you make any certain changes in the Registry Editor, we recommend you back up the registry keys.
a. Once you have opened the Registry Editor, you will need to click on the “File” and then click on “Export“.
b. Save the backup in a secure place.

If anything goes wrong, you can easily restore the registry to its original state.
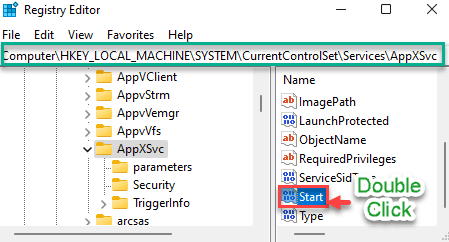
3. When the Registry Editor opens up, go this way
Computer\HKEY_LOCAL_MACHINE\SYSTEM\CurrentControlSet\Services\AppXSvc
4. On the right-hand side, double click on the “Start” key to modify it.

5. Then, set the value to “2“.
6. After that, click on “OK” to save this change.

Close the Registry Editor. Then, restart your computer to let this change take effect.
After rebooting your computer, try to use the ‘Get-AppXPackage’ command in the shell terminal again. This should solve the problem.
Fix 2 – Restart certain services
You need two particular services to use any Windows Store UWP applications on your computer.
- Client License Service (ClipSVC)
- AppX Deployment Service (AppXSVC)
1. At first, press the Windows key+R keys together.
2. Then, type “services.msc” and hit Enter.

3. In the Services section, look for the “AppX Development Service (AppXSVC)“.
4. Then, double-click on the service to open it.

5. Now, check the ‘Service status:’ of the particular service and check if it is ‘Running’ or not.
6. If the status says ‘Running’, tap on “Stop” to immediately stop the service.
(If you notice that service says it is ‘Stopped’, just click on “Start” to start the service. )
7. Then, click on “Start” to resume the service again.

8. Now, scroll down to locate the “Client License Service (ClipSVC)” service.
9. Just like before, double-click on the service to access it.

10. Now, read the ‘Service Status’ portion in the “General” tab.
11. If the status appears to be ‘Running’, click on “Stop” to stop the service instantaneously.
12. Then, click on “Start” to start the service again.

Close the Services window and try to execute a ‘Get-AppxPackage’ command in the shell.
Fix 3 – Run SFC and DISM scans
You can additionally run the SFC and DISM scans to fix this issue.
1. You can easily open the Run terminal by pressing Windows key+R.
2. In the Run window, type “cmd” and then click on “OK“.

2. To run the DISM you have to copy and paste this command and press Enter to run it.
sfc /scannow

Wait for a while to finish the process.
3. Now, copy and paste this command in the Command Prompt window again, and hit Enter.
DISM.exe /Online /Cleanup-image /Restorehealth

Close the Command Prompt window.
Now, try to use the PowerShell terminal to execute the ‘Get-AppXPacakag’ command on your system.