Game bar is a sleek little widget by Windows 10 that helps you to play games ( including Xbox games) easily using the on-screen navigation keys. All you need to do is to press the Win + G keys together on your keyboard and the game bar pops up.
However, some users have been experiencing an issue where the game bar is not opening even after pressing the shortcut keys multiple times. Apparently, they are facing this game bar not opening issue in their Windows 10 PC for any or all games.
The good news is, we have a couple of solutions for this issue so that you can continue to play your favorite games using the game bar. Let’s see how to fix it.
Method 1: No Game Bar in Full Screen Games
The Game Bar does not work for the games you play in full screens. So, if you want to play a game in full screen:
You can press the Win + Alt + R keys together on your keyboard to start and end the game recordings. You will see a flash on your PC screen when the game recording begins and ends.
OR
You can also press the Win + G keys together on your keyboard and the screen will flash twice to identify the Game Bar. Now, you can press the Win + Alt + R keys together on your keyboard to start the game recording.
Method 2: By Resetting the Xbox App
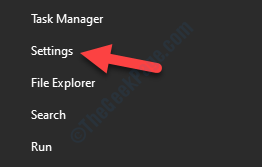
Step 1: Go to Start, click on it and select Settings from the menu.

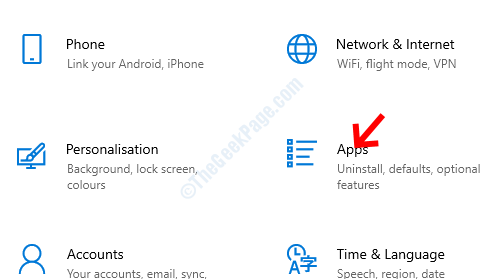
Step 2: In the Settings window, click on Apps.

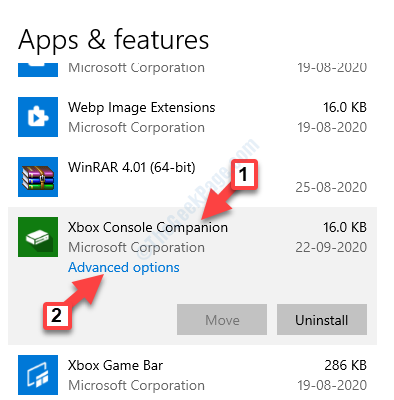
Step 3: It will take you straight to the Apps & Features section. On the right side of the pane, scroll down and select the Xbox app.
Then, click on Advanced options below it.
*Note – The Xbox app is renamed as Xbox Console Companion in the latest version of Windows 10.

Step 4: Next, scroll down to reach the Reset option. Click the Reset button below it.

Step 5: It will open a prompt with a warning. Read it properly before you proceed and once confirmed, press the Reset button on it.

If it does not work, Open settings again, reach at the same location described above and Click on repair .
For Windows 11 users
1 – Press Windows key + I keys together from your keyboard to open settings.
2 – Now, click on Apps from the left menu and installed apps from the right side.

3 – Now, search Xbox game bar in search box in the right side.
4 – When xbox game bar appears in the search result, just click on 3 vertical dots to the right of it and click on advanced options.

5 – Click on Reset to reset game bar.

If it does not work, Open settings again, reach at the same location described above and Click on repair .
Method 3 – Reinstall using powershell
1. Search Powershell in Windows 10 search box.
2. Now, right click and run as administrator .

3. Now, run the command given below to uninstall game bar from your system.
Get-AppxPackage Microsoft.XboxApp | Remove-AppxPackage
4. Now, Go to store and install Xbox app again.

Method 4: Make sure Game bar is turned ON
Step 1: Press the Win + I keys together on your keyboard to open the Settings window.
Step 2: In the Settings window, click on Gaming.

Step 3: Next, you are taken straight to the Xbox Game Bar section. On the right side of the pane, turn ON the Enable Xbox Game Bar for things like recording game clips, chatting with friends, and receiving game invitations option.
You may also want to check the box next to Open Xbox Game Bar using this button as a controller option.

Now, restart your PC and your game bar should start working now. If you are still facing the issue, follow the 3rd method.
For Windows 11 users
1 – Press Windows key and I keys together to Open run command box.
2 – Now, Click on Gaming from the left Menu and then click on Xbox game bar in the right.

3 – Make sure Game bar button is turned ON.
Method 5: By Installing the Media Feature Pack
Step 1: Copy and paste the below link in your browser to visit Microsoft’s official download page for the media feature pack:
https://www.microsoft.com/en-us/software-download/mediafeaturepack
Go to the Download section and select your Windows edition from the drop-down. Press Confirm.

Step 2: If you don’t find your Windows 10 edition in the list, click on the KB3145500 link mentioned in the description under Download.

You can then follow the instructions and download the Media Features Pack as per your Windows 10 version.
Step 3: Click on the setup file and follow the instructions to complete the installation.
Once completed, restart your PC and now, try opening the Game Bar. It should work fine now.
*Note – Some of you may also see a prompt with a message “look for an app in the Microsoft Store“. Click on that and press OK. This will take you to the Xbox Game Bar page in the Microsoft Store. Click on Get and wait for it to be installed.
If the game bar is still not opening, then try the 4th method.
Method 6: Using Windows Powershell
Step 1: Right-click on Start and select Windows PowerShell (Admin) from the menu.

Step 2: Copy the below command and paste it it in the PowerShell window. Hit Enter to execute:
# Get all the provisioned packages
$Packages = (get-item 'HKLM:\Software\Microsoft\Windows\CurrentVersion\Appx\AppxAllUserStore\Applications') | Get-ChildItem

# Filter the list if provided a filter
$PackageFilter = $args[0]
if ([string]::IsNullOrEmpty($PackageFilter))
{
echo "No filter specified, attempting to re-register all provisioned apps."
}
else
{
$Packages = $Packages | where {$_.Name -like $PackageFilter}

if ($Packages -eq $null)
{
echo "No provisioned apps match the specified filter."
exit
}
else
{
echo "Registering the provisioned apps that match $PackageFilter"
}
}

ForEach($Package in $Packages)
{
# get package name & path
$PackageName = $Package | Get-ItemProperty | Select-Object -ExpandProperty PSChildName
$PackagePath = [System.Environment]::ExpandEnvironmentVariables(($Package | Get-ItemProperty | Select-Object -ExpandProperty Path))

# register the package
echo "Attempting to register package: $PackageName"

Add-AppxPackage -register $PackagePath -DisableDevelopmentMode
}

Exit the PowerShell window and restart your computer. The GameBar should be back up and running now.
Method 7: By Making Changes to the Registry Data
Before you make any changes to the registry editor, make sure you create a backup of the registry data. This will help you to restore any data that may get lost in the process.
Step 1: Press the Win + R keys together on your keyboard to open the Run command.
Step 2: In the Run command box, type regedit and hit Enter to open the Registry Editor window.

Step 3: Copy and paste the below path in the Registry Editor address bar to reach the GameDVR key:
HKEY_CURRENT_USER\Software\Microsoft\Windows\CurrentVersion\GameDVR
Now, on the right side of the pane, select all keys and hit Delete.

Now, go back and press Win + G shortcut keys to open the Game Bar. It should open now and Windows will automatically create the required keys inside the GameDVR key all over again.
While the above methods should resolve your Game Bar not opening in Windows 10 issue, but if you are still facing the problem, you can check by uninstalling the Xbox app and then reinstalling it again.
If this also doesn’t work, then chances are that your Windows Firewall or a 3rd party antivirus software on your Windows 10 PC is blocking the Xbox app and its components. This issue occurs when the Firewall blocks the related executable files. In such a case, you must remove the executable files in the Firewall or change the settings in your 3rd party antivirus software.