One out of the many errors faced by Steam users is the Unable to Initialize Steam API error. This error is encountered as soon as a game is launched by the user via the library on the Steam application. The user faces inconvenience once this error is thrown as the game cannot be opened and played. Based on the views of different users who have faced this error, there can be varied reasons that can raise this issue while launching Steam games. Some of the identified causes are Windows Firewall blocking Steam from connecting to the network or the user who faces this issue is a Steam beta client.
Don’t worry if you are confronting this error with Steam on your Windows PC. Go ahead and read this post to find the fixes that will help you resolve the Unable to Initialize Steam API error on your PC.
Method 1 – Allow Steam Through Windows Defender Firewall
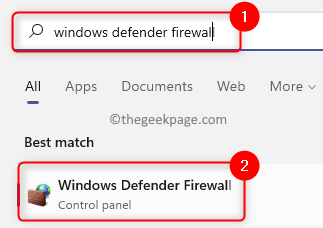
1. Click on the Windows Start button on your taskbar.
Type windows defender firewall in the Windows search box.
Click on Windows Defender Firewall in the search result.
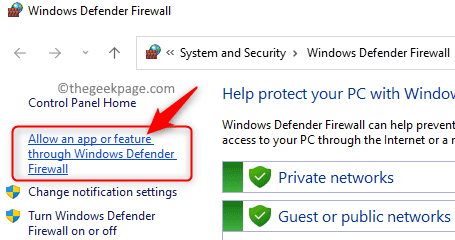
2. On this page, click on Allow an app or feature through Windows Defender Firewall in the left pane.
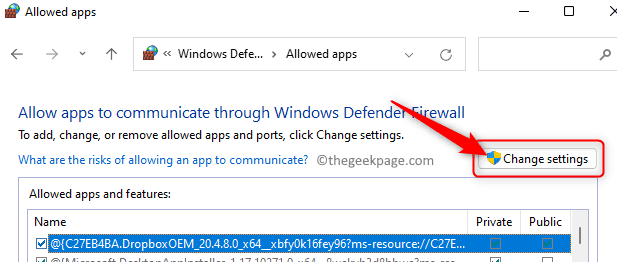
On the Allowed apps window that opens, click on the Change settings button at the top to make setting changes.
3. In the box with the heading Allowed apps and features, scroll and locate Steam in the list of apps.
Check the box next to Steam to allow this app through the firewall.
Also, make sure that the boxes in the column Private and Public associated with Steam are checked.
Finally, click on OK to save the changes.
4. If you are not able to find Steam in the list of apps, then click on the Allow another app… button at the bottom.
In the Add an app window, click on the Browse button.
Browse to the installation direction of Steam on your computer. By default, the location is C:\Program Files (x86)\Steam.
Here, select the file steam.exe and click on Open.
Back in the Add an app window, click on the Add button to add Steam to the list of allowed apps.
Perform the steps mentioned in Step 3 above.
5. Once you have made the changes, reboot your computer.
Then, try launching a game in the Steam library and check if the error is fixed.
Method 2 – Opt Out of Steam Beta Program
1. Open the Steam client on your PC.
2. Click on the Steam menu at the top and choose the option Settings.
3. In the Settings window, make sure that you are in the Account tab.
On the right side, click on the Change… button in the section named Beta participation.
4. In the window that opens, use the dropdown list below Beta participation and choose NONE – Opt out of all beta programs.
Finally, click on OK.
5. You will see a prompt that asks to restart Steam for the changes in settings to come into effect.
On this prompt, click on the Restart Steam button.
6. Wait for Steam to reopen again.
Now, launch the game that was raising the error and check if it is resolved.
Method 3 – Run Steam as an Administrator
1. Locate the Steam shortcut on your desktop.
Right-click on this and choose the option Properties.
Note: If you don’t have the Steam shortcut on your desktop, then you can go to the default installation directory and right-click on the steam.exe file there.
2. Select the Compatibility tab in the Properties window.
In the Settings section, check the box associated with Run this program as an administrator.
Lastly, click on Apply and then on OK.
3. If you see any dialogs that prompt you to confirm this choice, then accept them.
Launch Steam and check if the error has disappeared while launching the game.
That’s it!
Thanks for reading.
We hope you found the fixes in this article clear and informative enough in resolving the Unable to Initialize Steam API error on your Windows PC. If this was helpful to you, then please let us know your thoughts and opinions on the same in the comments section below.


