Uplay or now as it is known as Ubisoft Connect is the store for games that is offered by the Ubisoft studios. So, whether you wanna play Assasins Creed Valhalla or Watch Dogs: Legion, you need the Ubisoft Connect up and running. In case if you see ‘Ubisoft service is currently unavailable’ in the Ubisoft Connect on your computer, you need to solve the problem manually. Just follow these easy fixes on your computer.
Preliminary checks –
a. If you are using Hamachi by LogMein, this problem may occur. Uninstall the VPN software from your system and restart your system.
b. Check the network connectivity on your computer.
Fix 1 – Reset windows sockets
If this is a connectivity issue, resetting the Windows sockets should fix this problem.
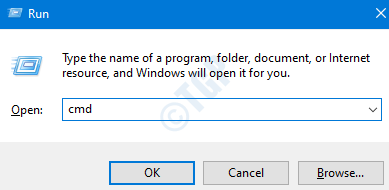
1. Just press the Windows key+R keys.
2. Type “cmd” and then hit Ctrl+Shift+Enter keys together.

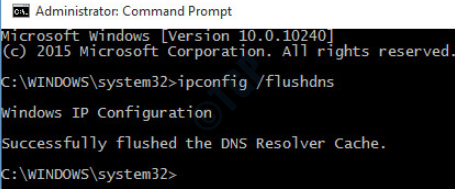
2. To flush the existing dns configuration, write this code and press the Enter key.
ipconfig /flushdns

3. Now, you have to reset the IP configuration settings. To do that, simply type or copy-paste this code and then hit Enter.
netsh winsock reset

Once you have done this, close the CMD screen and restart your computer once. Then, open Ubisoft Connect and check the status of the issue.
Fix 2 – Change DNS
1. By pressing Windows key+R you can open up a Run terminal.
2. Then, type “ncpa.cpl” and hit Enter.

3. After that, right-click on the adapter and then click on “Properties” to modify the properties.

4. Then, double click on “Internet Protocol Version 4 (TCP/IPv4)” to access it.

7. Then, click on the radio button beside the option, “Use the following DNS server settings:”
8. Input these following DNS servers settings-
1.1.1.1
1.0.0.1

9. Click on OK and close the windows.
Fix 3 – Check the date & time
Check date and time settings on your computer.
1. Press the Windows key+I keys together.
2. Click on “Time & Language” settings.

3. Here, on the right-hand side, toggle “Set time automatically” to “Off” just under the Current date and time settings.
4. You have to set the time zone manually. Click on “Set time zone automatically” to “Off“.

5. Next, click on “Change“.

6. Now, adjust the date settings.
7. Similarly, modify the correct “Time” according to your local time.
8. After that, click on “Change“.

9. Then, scroll down through the ‘Time Zone‘.
10. Click on the drop-down and select your timezone.

Close Settings window.
Alternative approach –
1. Press Windows key+R to launch the Run window on your computer.
2. Type this run command in the Run window and then hit Enter.
timedate.cpl

3. In the Date and Time window, go to the “Internet Time” tab
4. Then, click on “Change settings…“.

5. In the Internet Time Settings window, check the option “Synchronize with an Internet time server“.
6. Now, click on ‘Server:‘ and choose the “time.windows. com” server from the drop-down.
7. Then click on “Update Now“. Finally, click on “OK” to save the changes on your computer.

8. In the Date and Time settings window, click on “Apply” and “OK” to save the changes on your computer.

Fix 4 – Disable IPv6
Sometimes the IPv6 can cause this problem.
1. You need to press Windows key+R keys together.
2. After that, write “ncpal.cpl“. Click on “OK“.

3. Once the Network Connections opens up, right-click on the network connection.
4. After that, you need to click on “Properties“.

5. Scroll down to uncheck the box beside the option “Internet Protocol Version 6“.
6. Finally, click on “OK“.

You may need to restart your computer once. After that, try to log in to Ubisoft Connect again.
Fix 5 – End a task
If you are facing this issue while trying to log in to Ubisoft Connect, try to end this specific task.
1. At first, right-click on the “Windows icon” and click on “Task Manager” to access it.

2. Once the Task Manager opens up, scroll down to the ‘Background processes‘.
3. Right-click on the particular process and click on “End task” to kill the task immediately.
(
NOTE–
Look for the file with an uncommon name –
OTlzNDJh… or YTliND…
)

Once you have done this, close the Task Manager window. Open the Ubisoft Connect again. Try to log in again.
Fix 6 – Use a static IP
Using a static IP address should fix this issue.
STEP 1
1. Press the Windows key and start to type “cmd“.
2. Now, right-click on the “Command Prompt” and click on “Run as administrator”.

3. To check out all the configurations of all the network connections, write this command and hit Enter.
ipconfig /all

4. Now, find out the right connection that you are ( In this case, it is the “WiFi” settings).
Carefully note down the adapter configuration (IPv4 Address, Subnet Mask, and Default Gateway).

Minimize Command Prompt window.
STEP 2
1. By pressing Windows key+R you can open up a Run terminal.
2. Then, type “ncpa.cpl” and hit Enter.

3. After that, right-click on the adapter and then click on “Properties” to modify the properties.

4. Then, double click on “Internet Protocol Version 4 (TCP/IPv4)” to access it.

5. Click on “Use the following IP address:” to select it.
6. Here, put those data in the specific tabs ( like- IP address, Default gateway).
Now, change the last digit of the IP address in the box.
Example – As you can see that the IP address we have noted is –
192.168.2.3
We have altered the value to –
192.168.2.5

7. Then, click on the radio button beside the option, “Use the following DNS server settings:”
8. Input these following DNS servers settings-
Preferred DNS server: 8.8.8.8
Alternate DNS server: 8.8.4.4
9. Check “Validate settings upon exit”.

10. Finally, click on “Apply” and “OK” to save the changes.

This should work out for you and fix the issue.
Fix 7 – Reset the hosts file
Some users have also complained that the corruption in the hosts file is causing this issue.
STEP 1 – Create a new hosts file
1. At first, you need to type “Notepad” in the search box.
2. After that, right-click on the “Notepad” and then click on “Run as administrator“.

3. When a blank Notepad window comes up, copy-paste this code there.
# Copyright (c) 1993-2006 Microsoft Corp.
#
# This is a sample HOSTS file used by Microsoft TCP/IP for Windows.
#
# This file contains the mappings of IP addresses to host names. Each
# entry should be kept on an individual line. The IP address should
# be placed in the first column followed by the corresponding host name.
# The IP address and the host name should be separated by at least one
# space.
#
# Additionally, comments (such as these) may be inserted on individual
# lines or following the machine name denoted by a '#' symbol.
#
# For example:
#
# 102.54.94.97 rhino.acme.com # source server
# 38.25.63.10 x.acme.com # x client host
# localhost name resolution is handle within DNS itself.
# 127.0.0.1 localhost
# ::1 localhost
4. After pasting the host configuration, click on the “File” on the menu-bar and click on “Save as“.

5. Then, you have to choose a location to save the file (preferably, on your desktop).
6. After that, name the file as “hosts.file“.
7. In Save as Type , Just choose All files as option.
8. click on “Save As“.

After that, close the Notepad screen.
STEP 2 – Move the file
1. Now you have to go to the location where you have just saved the hosts file.
2. Right-click on the “hosts.file” and click on “Rename“.

3. Name the file as “hosts“.
4. You may see a prompt warning about changing the file type, just click on ‘Yes’ to confirm the change.

5. Now, select the file and right-click and, click on the “Cut” to cut it.

6. Go to this folder location on your system –
C:\Windows\System32\drivers\etc
7. Paste the ‘hosts’ file in this folder.

Restart your computer and try to log in to Ubisoft services again.
Fix 8 – Run sfc checks
Running a system file checker may resolve the situation.
1. You need to press the Windows key+S keys and type “cmd“.
2. Then, right-click on the “Command Prompt” and click on “Run as administrators“.

3. Write this command and then hit Enter.
sfc /scannow

After running the scan, try to log in to your account in the Ubisoft connect once more.
Your problem will be solved.