While starting up the First Descendant, some players have complained that the main city Albion stutters like a slideshow, after receiving the update. A recent update corrupted the driver-level shader caches — the pre-built graphics instructions your GPU saves so it doesn’t have to rebuild them mid-game. And Steam makes it worse by pushing old, pre-patch shaders back onto your machine. So the game keeps loading from a broken stash, over and over.
Fix 1 – Delete the NVIDIA GLCache Folders
Start with the driver’s own stash. This is where the corrupted files actually live.
1 – Press Windows + R, type %localappdata%, and hit Enter.
2 – Open the NVIDIA folder.
3 – Open GLCache.
4 – Select everything inside and delete it.
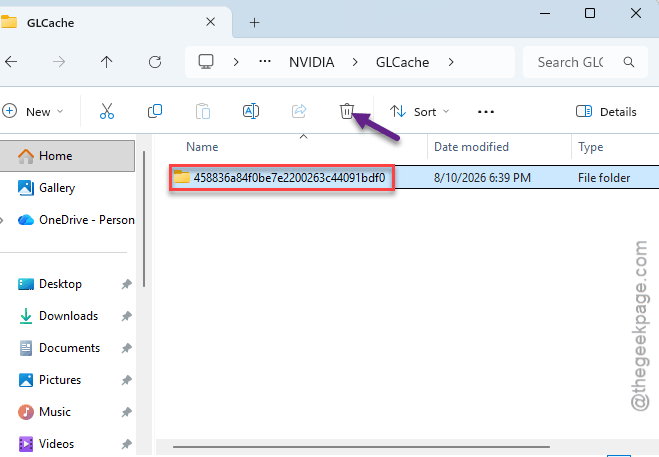
Delete the contents, not the GLCache folder itself. The driver rebuilds everything clean on the next launch. First load afterward runs longer than usual — that’s the rebuild, not the bug.
Fix 2 – Toggle Ray Tracing Off and On
For when the game is hanging right now and you just want in.
1 – On the Preparing Shaders hang, go straight to your graphics settings.
2 – Turn Ray Tracing off.
3 – Wait for the shaders to finish loading. The bar should start moving within a few seconds.
4 – Turn Ray Tracing back on.
Dumb-sounding? Sure. But the toggle forces the engine to abandon its jammed compilation queue, and the menu loads. It’s a workaround, not a cure — pair it with Fix 1 or Fix 3.
Fix 3 – Clear Steam’s Shader Pre-Cache
Steam keeps its own shader copy per game. And right now it keeps shoving the stale, pre-patch version back at the client. That’s the severe stutter in Albion.
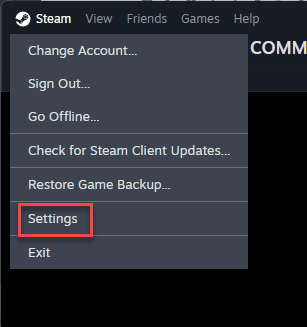
1 – Open Steam and click Steam in the top-left corner, then Settings.
2 – Go to Storage.
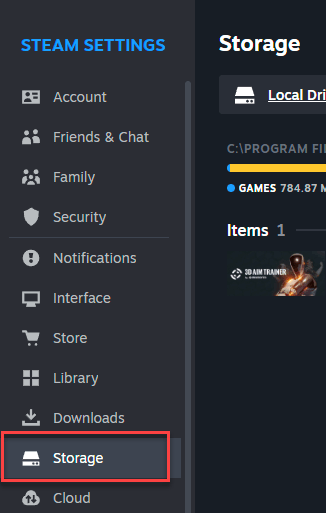
3 – Find the shader cache entry for The First Descendant and delete it.
Not showing up there? Manual route: open C:\Program Files (x86)\Steam\steamapps\shadercache in File Explorer and delete the folder named 2074920. That number is the game’s Steam ID, so you’re not guessing.
Then one last flick. Go to Settings > Downloads in Steam, switch Shader Pre-caching off, then back on. That forces a fresh shader download instead of another push of the old set.
Fix 4 – Disable the NVIDIA Shader Cache, Then Restart
The update didn’t just corrupt files. It broke the cache’s read and write permissions too. Setting the cache to Disabled wipes that slate completely.
1 – Right-click an empty spot on your desktop and open NVIDIA Control Panel.
2 – Go to Manage 3D Settings in the left sidebar.
3 – Stay on the Global Settings tab.
4 – Scroll to Shader Cache Size and set it to Disabled.
5 – Click Apply and restart your PC.
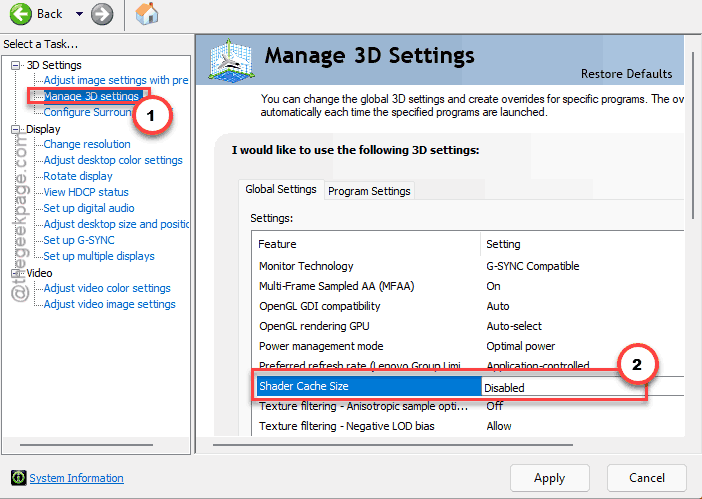
Do not game like this. No cache means constant recompiling. This is step one of two — the next fix finishes the job.
Fix 5 – Now Set the Cache to 10GB or Unlimited
Part two. With permissions reset, give the cache more room than the default.
1 – Open NVIDIA Control Panel again, same spot as Fix 4.
2 – Set Shader Cache Size to 10 GB or Unlimited.
3 – Click Apply and launch the game.
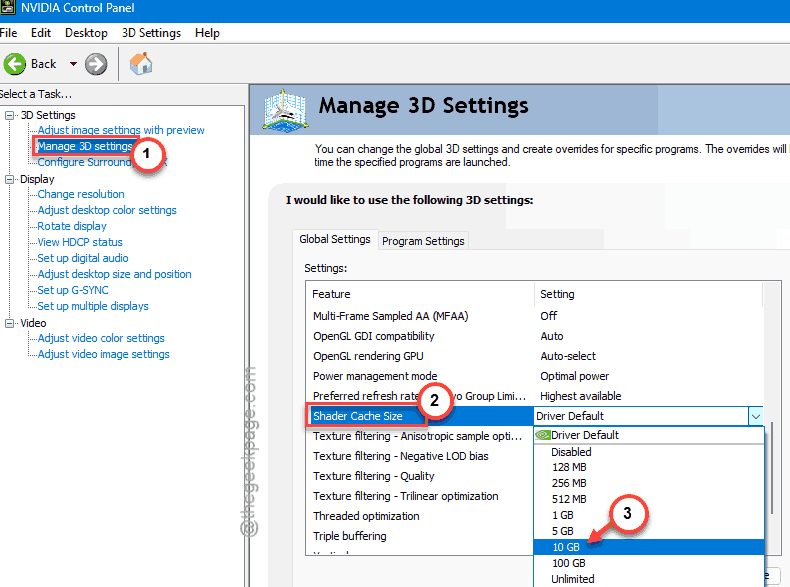
Why bother? The default cache is small. It fills up, and every overflow costs you a pipeline hitch of around 100 milliseconds — that’s the micro-stutter you feel mid-fight. Ten gigs gives it room to breathe.
Fix 6 – Link Your Account In-Game
The weird one. Nobody has explained why this works. It works anyway.
1 – Get to the game’s menu — use the Fix 2 toggle if you have to.
2 – Press ESC.
3 – Go to Options, then Account.
4 – Link your account and confirm.
That’s the whole fix. Players on the game’s community hub report load times dropping from minutes to seconds after linking. No dev explanation. Take the win and don’t ask questions.
Fix 7 – Update Your Driver, Then Get Off Low Settings
Two-parter from the trenches. First, install the newest driver for your graphics card from NVIDIA’s or AMD’s site. Old driver plus new shader format is a classic hang recipe.
Game still closing itself during the shader load? Here’s the odd part.
1 – Launch the game.
2 – Press O to open the options as soon as you can.
3 – Set your graphics settings to Medium or High.
4 – Wait for the shader load to run through.
Yes, upward. Players found the game crashes out of shader loading specifically on all-Low settings — bump the quality and the load finishes. Backwards, but repeatedly reported to work. And you can drop settings back down after the first clean load.
Keep It From Coming Back
- Clear the GLCache contents after every big patch. Ten seconds, saves the whole evening.
- Leave the NVIDIA cache at 10GB once you’ve set it. Back on default, it refills and starts hitching again.
- Keep Shader Pre-caching on in Steam. The feature is fine — it was the stale copy that hurt you.
- Update your GPU driver before big content drops land, not after something breaks.
People Also Ask
Why does preparing shaders take so long?
The game is compiling thousands of graphics instructions for your exact GPU and driver combo, and it redoes the work after every game patch or driver update. A corrupted cache makes it far worse — the compiler stalls on broken files instead of skipping them. Clearing the cache usually restores normal times.
How do I fix shader stutter?
Delete the corrupted caches first: the NVIDIA GLCache folder contents and Steam’s per-game shader cache. Then raise Shader Cache Size to 10GB in NVIDIA Control Panel so it stops overflowing. Each overflow forces a mid-game recompile, and that pause is the stutter you’re feeling.