Skype is a very helpful application to not only do a video chat with your friends but using it you can call anyone on any number around the world. These cool features have made this an essential part of our life. While using Skype on Internet Explorer, sometimes you may notice “Javascript required to sign in” error message. Sometimes this problem may occur due to erroneous Skype installation, antiquated browsers setting, corrupt system components, etc.
Initial Workarounds–
1. If you are using a VPN for network connection on your computer, disable it temporarily and check if Skype is working or not.
2. Disable antivirus and firewall on your computer. Check again if Skype is working or not.
Fix-1 Test JavaScript on Internet Explorer-
Check if JavaScript is working on your web browser.
1. Open the Internet Explorer on your computer.
2. Now, open the JavaScript Tester website on your computer.

3. You will see the Test results.
4. If you see Javascript “IS WORKING” in your web browser, then this is not the issue causing the problem.
In case if you see the Javascript is not working on your computer, then the browser is the culprit. Consider using another browser or updating the existing one.
Fix-2 Modify Internet Options settings-
Modifying Internet Options settings on your computer may solve this problem.
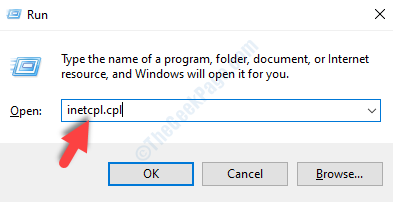
1. Open the Run window by pressing Windows key+R.
2. In the Run window, type “inetcpl.cpl” and then hit Enter.

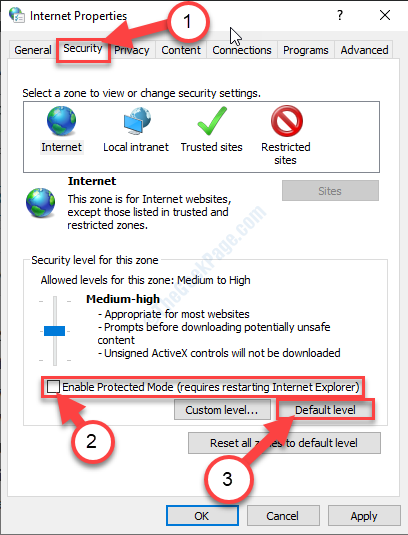
The Internet Properties window will open.
3. In the Properties window, go to the “Security“.
4. Now, uncheck the option “Enable Protected Mode (requires restarting Internet Explorer)“.
5. Then, click on “Default Level“.

6. After that, in the same window, click on the “Custom level…“.

7. In the Security Settings- Internet Zone window, scroll down to “Scripting“.
8. Set the ‘Active scripting‘ settings to “Enable“.

9. Now, click on “OK” to save the changes on your computer.

10. Coming back to the Internet Properties window, click on “Apply” and then click on “OK” to save these changes.

Now, try to open Skype in the Internet Explorer window and check if the error is occurring again or not.
Fix-3 Uninstall and Re-install Skype-
Uninstalling and reinstalling Skype may solve this issue.
STEP-1 Kill Skype process and uninstall Skype-
1. To open the Task Manager window, press Ctrl+Shift+Esc together.
2. Now, scroll down and right-click on “Skype” from the running process, and then click on “End Task” to end it.

Close Task Manager window.
3. Type “Skype“.
4. Now, right-click on “Skype” and then click on “Uninstall“.

5. If there is a prompt, click on “Uninstall“.

Skype will be uninstalled.
STEP-2 remove Skype AppData and delete Skype keys-
1. Press Windows key+R.
2. Type or copy-paste in Run window and hit Enter.
%appdata%

3. You need to find the “Skype” folder.
4. To delete the folder, right-click on the “Skype” folder and then click on “Delete“.

5. Similarly, navigate to this location in File Explorer.
C:\Program Files (x86)
6. Now, right-click on the “Skype” folder and then click on “Delete” to delete the folder from your computer.

Once you have deleted the folder, close the File Explorer window.
NOTE–
You need to delete Skype keys from the registry editor.
7. Click on the Search box and then type “regedit“.
8. Now, click on “Registry Editor” from the search results to open it on your computer.

9. In Registry Editor window, click on “Edit” on the menu bar and then click on “Find“.

10. In Find panel, type “Skype” in the search box of ‘Find what:‘, and then click on “Find Next“.

11. Now, right-click on the key which will appear as the search result, and then click on “Delete” to delete the key from your computer.

12. Repeat Step-16, Step -17, and Step-18 to find and delete all the registry keys associated with Skype application.
Once done, close Registry Editor.
Step-3 Install the latest version of Skype-
Now, you have to download and install the latest version of Skype.
When you have finished downloading Skype, simply open the setup file and then follow the on-screen instructions to install Skype.
Once you have installed Skype, reboot your computer.
Fix- 4 Check for Windows Update
Check if there are Windows Update is pending or not.
1. Now, press Windows key+I to open the Settings window.
2. In the Settings window, click on “Update & Security“.

3. Now, on the left pane, click on “Windows Update“.
4. On the right-hand side, click on “Check for updates“.

Windows will now download and install the update on your computer.
Your problem is solved for sure.