It is very frustrating when you want to connect with your WiFi network but all of a sudden no WiFi network is showing up on your computer. Many Windows 10 users are reporting this problem. Now, there may be many reasons behind this dilemma but almost in every case, outdated WiFi driver and Corrupted WiFi driver update are the main reasons to blame. Uninstalling and further installing the WiFi driver or Updating the WiFi driver may solve your problem.
Before proceeding to the fixes you can try rebooting your computer, and check if any WiFi networks are showing up on our computer. If rebooting your computer didn’t work out then go for these fixes.
Fix 1 – Make sure WiFi is enabled
Some laptop manufacturers put a WiFi/ Network button (Physical switch). It may happen that , it got turned Off accidentally. Look closely on your keyboard and laptop and try to locate that physical switch. If it is there, press it once to turn on wifi again.

Also, make sure WiFI adapter is enabled on your PC.
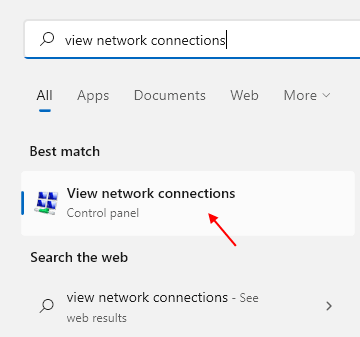
1 – Search View Network connections in Windows search box.
2 -Now, Click on View Network Connections

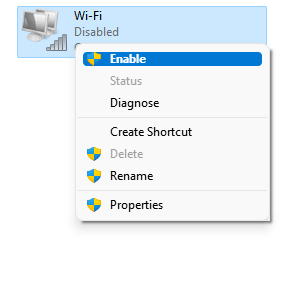
3 – Now, Right click on your Wifi adapter and choose enable.

4 -If it is already enabled , just disable it once. Then again enable it.
Fix 2 – Make sure WLAN auto config service is running
1 – Search services in Windows search box.
2 – Click on gear shaped services icon which appears in the search result to open service manager.

3 – Now, Locate WLAN auto config service from the list
4 -Now, double click on it.

5 – Make sure it is running and startup type is set to automatic.
Just click on Start and set Startup type to automatic.
6 -Then click on Apply and OK.

7 – Also repeat the same steps for the following service. Just make sure they are running.
- Network Location Awareness (Startup type should be Automatic)
- Network List Service (Startup type should be Manual)
- Windows Event Log (Startup type should be Automatic)
- Radio Management Service (Startup type should be Manual)
- Windows Update (Startup type should be Manual)
Fix 3 – Update Wireless adapter driver to a different version
1 – Search Device manager in Windows search box and click on device manager icon to open it.

2 -Now, double click on Network adapter to expand it.
3 –Right click on your wireless adapter and click on update driver

4 – Click on browse my computer for drivers.

5 – Click Let me pick from a list

6 – Now, select a different Wireless adapter driver from the list from the current one (If only one item is listed, then select that one only)

7 -Click Next.
After this check whether your issue got solved
Fix 4 – Make sure Wifi driver is enabled
1 – Search Device manager in Windows search box and click on device manager icon to open it.

2 -Now, double click on Network adapter to expand it.
3 -Now, Make sure your wifi adapter is enabled. For checking this, Just right click on your wifi adpater and then if an option which says Enable device is showing up, then it means your Wireless adapter is disabled. Just click on enable device to enable the wireless driver.

4 – If it is not disabled , Just right click and click on disable device once.

5 – Wait for few seconds and then enable it again.

Fix 5 – Force the router to use free channel in your PC range
Some laptops are configured to only see channels 1-11 . Locate range setting in your router to use free channel in range 1-11 (Which your laptop is using)

So, Just remove auto setting for router channel and change it in the range of 1 to 11.
Fix 6 – Enable SSID broadcast
Make sure SSID broadcast is enabled in your router.

Fix 7 – Turn On Network discovery
1 – Search Manage advanced sharing settings in Windows search box.

2 -Now, turn on network discovery and click on Save changes.

Fix 8 – Rollback WiFi driver update
Recent updates to your WiFi driver may be the reason you are not seeing any WiFi network on your computer. Rolling back the last update your WiFi driver received can solve the problem.
Follow these steps to rollback the faulty update of your WiFi driver–
1. Press Windows key+S together and type “Device Manager”.
2. Then, click on the “Device Manager“.

3. In the Device Manager window, look for “Network Adapters” section the list, click on it to expand it.
4. Now, from the drop-down double click on the driver which you are using.

The Properties window will open.
5. In the Properties window, first, go to the “Driver” tab.
6. Click on “Roll Back Driver“. Click on “OK“.

This will rollback older updates of your WiFi driver and it will be replaced with older versions of your driver.
Close Device Manager window.
Then, you will have to restart your computer.
After rebooting your computer check if any WiFi network is visible on your computer. If you are still having the same problem go for the next fix.
Fix 9 – Update the WiFi network driver
Your WiFi is not showing up maybe because the old/incompatible network driver may be installed. Updating your WiFi driver may solve the problem. Follow these steps to update your WiFi driver-
1. Simply by pressing the Windows key and the ‘R‘ key you can open the Run window.
2. Now, type “devmgmt.msc” and then click on “OK“.

The Device Manager utility should open.
2. In the Device Manager window, find “Network Adapters” from the list, click on it to expand it.
3. Now, from the drop-down right-click on it and click on “Update driver“.

4. When the “How do you want to search for the drivers?” question appears before you, prefer the option “Search automatically for updated driver software“.

Wait till Windows searches for a compatible driver for your WiFi driver, downloads it and installs it.
Close the Device Manager window.
Then, restart your computer.
Check if you are able to connect with the WiFi network.
Fix 10 – Uninstall and Reinstalling WiFi driver
Uninstalling and reinstalling the WiFi driver can clear any corrupt or bad files of the WiFi driver from your computer. Now, in the first step, the uninstallation of the WiFi driver will be done, and in the next step, we will install the WiFi driver.
Follow these steps to uninstall your WiFi driver–
1. Press the Windows key from your keyboard and type “Device Manager” in the search box.
2. Then, just click on the “Device Manager” when it appears in the elevated search result.

2. In the Device Manager utility window, expand the “Network Adapter” section.
3. Right-click on the WiFi driver you are using, click on “Uninstall device“.

This will uninstall the driver.
In the next step, we will reinstall the WiFi driver again-
Method 1-
Just reboot your computer and Windows will install the uninstalled driver itself. WiFi driver should work just normal as before.
Method 2–
If only restarting your computer didn’t install the driver, then you will need to install the driver yourself.
Follow these instructions to install the driver manually-
1. In the Device Manager window, click on “Action“.
2. Again, click on “Scan for hardware changes“.

Windows will scan for any recent hardware changes and reinstall the driver again.
Method 3-
If Method 2 did not install the driver then follow this next steps –
1.Click on “View” of the Device Manager. Then click on “Show hidden device“.

2. This will show the hidden drivers. Look out for your WiFi driver. Your WiFi driver will have a yellow triangle with its name (as it has no installed driver).
3. Right Click on the WiFi driver and click on the “Update driver software“.

3. You will be asked, “How do you want search for the drivers?“. Choose the option “Search automatically for updated driver software“.

4. Wait till Windows searches for a compatible driver for your WiFi driver, downloads it and installs it. Close Device Manager window. Restart your computer to save the changes.
Check if you can access any WiFi network.
Fix 11 – Disable any other WiFi Adapter you are not using
You can also try disabling the any other WiFi adapter ( suppose you are using an external adapter on your laptop which generally comes with an inbuilt WiFi driver) which you are not using. You can disable them by following these steps-
1. Right-click on the Windows icon on the left-most corner of your screen, and click on “Device Manager“. Device Manager utility will open.

2. Click on the “Network Adapter” (Ethernet or other WiFi adapters) and it will expand and show available network adapters. Right-click on the network adapters you are not using and click on “Disable device“.

3. Close Device Manger window. Restart your computer.
Check if you can find WiFi networks on your computer.
Note: – If nothing works , try buying an external USB adapter.