It will be very frustrating if you want to install Windows .NET Framework 3.5 on your computer but you are denied with an error message saying “Windows couldn’t complete requested changes. Error Code 0x800F0954 “. This error code can create problems when you are trying to enable or install any of Windows Optional Features on your Windows 10 device. If you are facing this problem don’t worry. There are fixes available to fix the problem for you. This error happens when the connection between Windows Server Update Services (WSUS) and Windows Optional Feature Installer fails or gets terminated. So Windows Update Optional Feature Installer also fails to get the approval of downloading the Windows Optional Feature and it shows the error message. Let’s keep the reasons aside, lets go straight for the fixes.
If you notice the same error code in the command prompt window attempt these initial workarounds and check if your problem is solved-
Initial Workarounds–
1. Restart your computer and after restarting your device, try to install the .NET framework again.
2. Check if any Windows Updates are pending or not. If any of the Windows Updates are pending, install the Windows Update (many of the Windows Update comes with .NET framework systems that are installed when Windows is updated).
[IMPORTANT]- Before moving to the fixes make sure that you have created a system restore point for your system. In any case, if anything goes wrong, you can restore the system back to the present condition.
If still, you are facing the issue with the installation of .NET framework 3.5 or any Windows Optional Feature go for these fixes-
Fix-1 Update from Windows Update without permission of WSUS-
As we discussed the reason behind this error is the request acceptance or rejection between Windows Server Update Services (WSUS) and Windows Optional Feature Installer, so we can bypass the approval request to WSUS and directly install the Windows Feature without WSUS. Follow these steps carefully to do so-
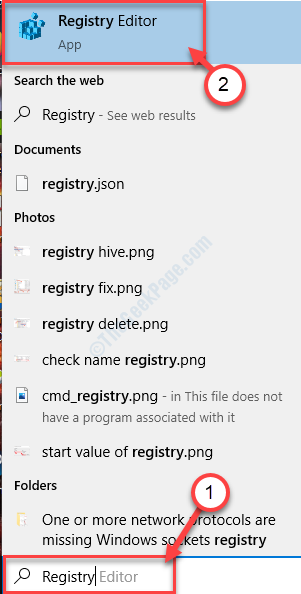
1. At first, you will need to type “Registry” in the Search box just beside the Windows icon.
2. Then, you have to click on the “Registry Editor“.

2. On the left pane of Registry Editor, navigate to this location-
HKEY_LOCAL_MACHINE\SOFTWARE\Policies\Microsoft\Windows\WindowsUpdate\AU
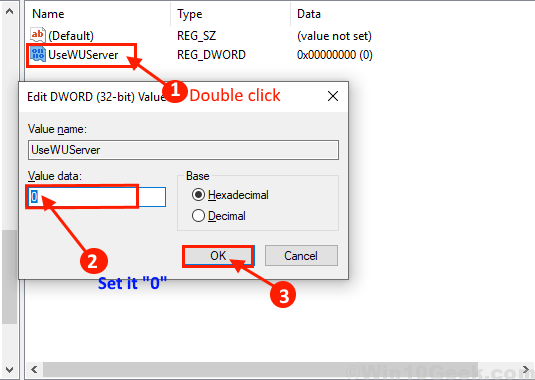
3. Now on the right pane double click on “UseWUServer“.
4. Change the Value data to “0“. Click on “OK“.

If you are unable to find “UseWUServer“, you have to create the key by yourself. Follow these steps to create the key-
a. After navigating to the “AU” registry, right-click on the blank space and click on “New” and click on “DWORD (32-bit) Value“.

b. Now, rename the “New Key” as “UseWUServer“. Now, follow step 2 of the Fix-1.

Close the Registry Editor and reboot your computer. After rebooting try installing the .NET framework 3.5 again on your computer. If you are still facing the problem go for the next fix.
Fix-2 Install the Optional Feature with Windows MCT-
If you are facing the problem with installing the feature from Control Panel directly you can do it using Windows PowerShell, where you have to download the Windows 10 ISO using Media Creation Tool (MCT). Follow these steps to install the optional feature from Windows PowerShell–
1. Download the Windows 10 ISO (don’t forget to match the build no of the ISO with your Windows 10 on your computer. Now mount the ISO in your system by double-clicking on it.
2. Press Windows key+R key and type “powershell” and hit “OK“.

2. Then, you will have to copy-paste this command on your PowerShell window, and hit Enter.
Add-WindowsCapability -Online -Name NetFx3~~~~ -Source D:\Sources\SxS

Change the Source name according to the drive where you have mounted the Windows 10 ISO, means, if you have mounted the ISO in the G:\ drive then you have to change the command as-
Add-WindowsCapability -Online -Name NetFx3~~~~ -Source G:\Sources\SxS
NOTE-
If you can’t run this command on your PowerShell window, copy and paste this command in PowerShell window and hit Enter.
DISM.exe /Online /Add-Capability /CapabilityName:NetFx3~~~~ /Source:D:\Sources\SxS
[NOTE-Change the Source name according to the drive where you have mounted the Windows 10 ISO, means, if you have mounted the ISO in the G:\ drive then you have to change the command as-
DISM.exe /Online /Add-Capability /CapabilityName:NetFx3~~~~ /Source:G:\Sources\SxS
3. Now, finally, you need to check if the .NET Framework is installed or not by copy and paste this command in PowerShell window and hit Enter.
Get-WindowsCapability -Online -Name NetFx3~~~~
Reboot your computer.
After rebooting check if .NET Framework 3.5 is installed on your computer or not. Go for the next fix if you are still having ‘Installing .NET Framework 3.5 failed Error Code 0x800F0954’.
Fix-3 Install .NET Framework 3.5 from Command prompt-
You can install the .NET framework 3.5 just by loading the Windows 10 ISO/DVD and executing a command in the Command prompt window. Follow these steps to install .NET Framework 3.5 from Command prompt window-
1. Download the Windows 10 ISO.
(NOTE– While downloading the don’t forget to match the build no of the ISO with your Windows 10 on your computer.)
2. Now mount the ISO by double-clicking on it.
3. Remember the drive letter name ( like “G:”/”H:” etc).
4. Now, you have to press Windows key+R to launch the Run.
5. When you can see the Run window, you will need to type “cmd” in that Run window and click on “OK“.

3. Now copy-paste this command on your Command prompt window, and hit Enter.
dism /online /enable-feature /featurename:NetFX3 /Source:H:\sources\sxs /LimitAccess
NOTE– You will need to change the drive letter in the command according to the drive letter where you have loaded the DVD.
dism /online /enable-feature /featurename:NetFX3 /Source:G:\sources\sxs /LimitAccess

NOTE-
If you are facing problem with executing this command, try executing below mentioned command-
dism /online /enable-feature /featurename:NetFX3/All /Source:drive letter:\sources\sxs /LimitAccess
NOTE– Don’t forget to change the ‘drive letter‘ in the command as discussed before.
dism /online /enable-feature /featurename:NetFX3/All /Source:G:\sources\sxs /LimitAccess

Reboot your computer.
After rebooting check if you are still facing ‘Installing .NET Framework 3.5 failed Error Code 0x800F0954’ problem on your computer.
You should be able to enable/ install .NET Framework 3.5 on your computer, without any further error.

