Some Windows 10 users are facing a problem as they are trying to connect with the internet but they are denied access with an error message saying ” INET_E_RESOURCE_NOT_FOUND” is appearing in the browser. This particular problem is happening mainly in the Microsoft Edge browser. There are no particular reasons for this problem. If you are facing the same problem on your end, don’t worry. There are fixes available to solve this problem. Just follow them and you will be able to browse the internet again in Edge. But before going ahead, don’t forget to attempt these workarounds to check some necessary peripherals.
Workarounds–
1. Check if there any problem with the internet connection. Try to browse the internet with another browser.
2. If this problem is happening for the first time, restart your device. After restarting, try to browse again with the Edge browser.
3. Disable Antivirus and firewall on your computer temporarily. Now try browsing using the Edge browser again.
If any of these workarounds didn’t work out for you, go for these fixes-
Fix-1 Enable TCP Fast Open-
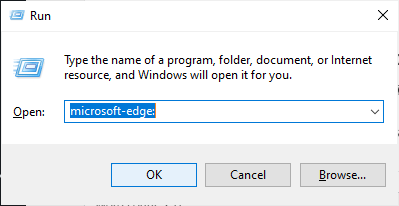
1. At first, you have to open the Microsoft Edge on your computer.

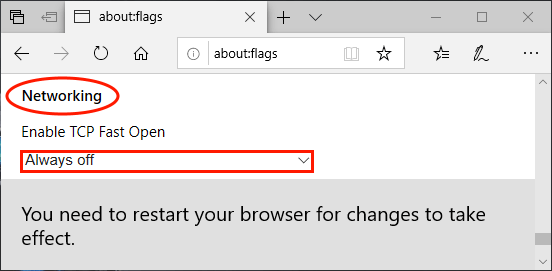
2. Now, type “about:flags” in the search box of Microsoft Edge browser, and hit Enter.

3. Scroll down to find “Enable TCP Fast Open” under the Networking section and click on the drop-down and select “Always off“.
[NOTE– If you can’t find “Enable TCP Fast Open“, press Ctrl+Shift+D]

4. Now, close the Edge browser.
Reboot your device. Open the Edge browser again, and you should not face the same error again.
Fix-2 Update the WiFi network driver-
1. At first, you need to press Windows key+S and then type “Device Manager“.
2. Now, click on “OK” to open the Device Manager.

3. In the Device Manager window, find “Network Adapters” in the list of the installed devices on your computer.
4. Now, all you need to do is to right-click on it and click on “Update driver“.

3. In the next step, click on this “Search automatically for updated driver software” option to proceed further.

You have to wait while Windows installs the latest
Close Device Manager window. Then, reboot your computer.
Try to use the Edge browser again.
Fix-3 Try InPrivate Browsing-
1. Open Microsoft Edge browser in your computer by typing “Edge” in the search box beside the Windows icon and clicking on “Microsoft Edge“.

2. Now, press Ctrl+Shift+P to start an InPrivate browsing session. A new window will be opened.

4. Try to connect to the network now.
If you see the “inet_e_resource_not_found” error again in the Edge browser, go for the next fix.
Fix-4 Flush DNS and reset Netsh-
Windows generally stores DNS servers data of websites in the cache. If the IP of the login page of the public WiFi has changed recently, you may face this error. To solve this problem, follow these steps-
1. Pressing Windows key and the ‘R‘ key will open the Run window.
2. In that Run window, paste this command and press Ctlr+Shift+Enter.
cmd

3. In order to release, flush the DNS and rebuild it, copy-paste all these three commands and hit Enter after pasting each of them.
ipconfig /release
ipconfig /flushdns
ipconfig /renew
Wait a few minutes to complete the process.

4. Just as same as before, copy and paste these commands one by one in the Command Prompt window and hit Enter after each of them to execute them.
ipconfig /flushdns
nbtstat –r
netsh int ip reset
netsh winsock reset
Wait few minutes to complete the process.

Reboot your computer. After rebooting check if you still facing the issue on your computer.
Fix-5 Uninstall and Reinstall WiFi driver-
Uninstalling and reinstalling the WiFi driver may solve the problem-
1.

2. In the Device Manager utility window, you will have many devices as a list. Look for the “Network Adapter” device and click on it and it will be expanded to show available drivers. Right click on the WiFi driver you are using, click on “Uninstall device“. This will uninstall the driver.

In the next process, we will install the WiFi driver again-
Process 1-
Just reboot your computer and Windows will install the uninstalled driver itself. You will have your WiFi driver working fine again.
Process 2–
If restarting your computer didn’t install the driver then you have to install the driver yourself. Follow to install the driver manually-
1. In the Device Manager window, click on “Action”. Again click on “Scan for hardware changes“.

2. This will find the uninstalled the driver and install the driver again.
Close Device Manager window. Restart your computer to save the changes.
Fix-6 Rename the Connections folder-
1. To open the Registry Editor, type “regedit” in the Search box.
2. Now, click on the “Registry Editor” on the search results.

NOTE–
You have to create a backup of your registry on your computer.
After opening the Registry Editor window, click on “File” and then click on “Export“. Save the exported registry to a favorable location of your choice to take backup.

3. Now, navigate to this location in Registry Editor.
HKEY_LOCAL_MACHINE\SOFTWARE\Microsoft\Windows\CurrentVersion\Internet Settings\Connections
Now, right-click on the “Connections” folder, and then click on “Rename“. Give it a name as you wish.

Close Registry Editor window. Reboot your computer.
Fix-7 Uninstall Microsoft Edge-
1. Once you have pressed the Windows key+S, you need to type “System Configuration“.
2. Click on the ‘System Configuration‘ icon.

3. Go to the “Boot” tab.
4. Check the “Safe mode” option,
5. Then, click on “Apply” and “OK“.

Restart your computer. It should be started in Safe Mode.
6. Pressing Windows key+R together will launch Run, here type “%localappdata%” and hit Enter.

7. Now, double click on “Packages” and then find “Microsoft.MicrosoftEdge_8wekyb3d8bbwe” folder.
9. Double click on it to open the folder.

10. Delete everything in that folder.

[NOTE- If you face “Access is denied” error, click on “Continue“. Follow these steps-
1. Right-click on “Microsoft.MicrosoftEdge_8wekyb3d8bbwe” and click on “Properties“.

2. Now, in the “Attributes” option, uncheck “Read-only (Only applies to files in hidden)“. Click on “Apply” and “OK“.

Now, delete all the contents of “Microsoft.MicrosoftEdge_8wekyb3d8bbwe” folder.]
6. Now, press Windows key+R to launch Run, and type “powershell” and press Ctrl+Shift+Enter.

7. Now, just copy and paste this following command in Powershell window, and hit Enter to execute it.
Get-AppXPackage -AllUsers -Name Microsoft.MicrosoftEdge | Foreach {Add-AppxPackage -DisableDevelopmentMode -Register "$($_.InstallLocation)\AppXManifest.xml" –Verbose}

8. Now, reinstall the edge browser on your device. Reboot your computer to save changes.
You should not face any further issues with Microsoft Edge.