Geforce Experience doesn’t only downloads you the latest version of the game drivers, it offers so much more! One of the coolest things is that it can optimize all your installed games according to your system specs to provide you with the best in-game experience. But some gamers have reported an issue where GeForce Experience isn’t optimizing the games on their systems. Just do these easy steps to fix this problem on your system.
Fix 1 – Use optimal settings for all games
You can set to use the optimal settings for all the games.
1. Open the GeForce Experience app on your system.
2. Once the GeForce Experience panel appears, you should go to the “HOME” tab.
3. You will find three dots on the right-hand corner of the screen. Click on it and tap “Optimize all games & apps“.
This optimizes all the games on your system. Check if the game is optimized or not.
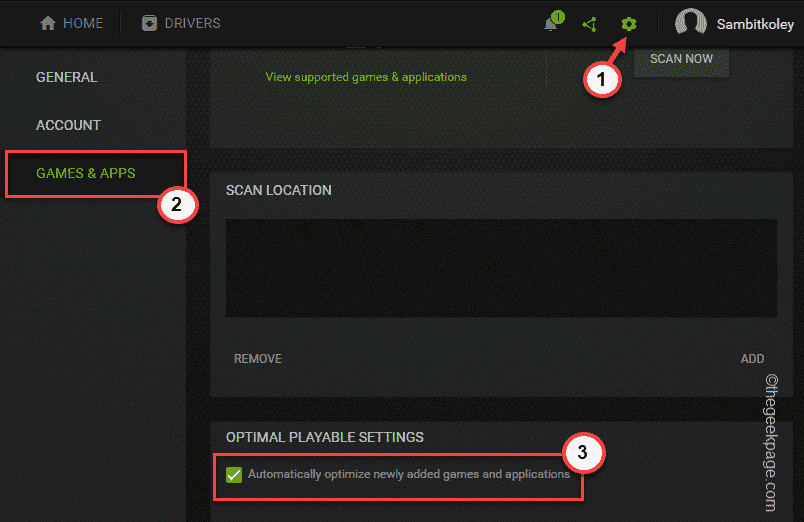
4. Now, click on the gear-shaped icon to access the Settings.
5. Then, go to the “GAMES & APPS” on the left-hand pane.
6. After that, check the “Automatically optimize newly added games and applications” box.
After that, test whether the games and apps are optimized or not.
Fix 2 – Remove the user configuration files
You can remove the user configuration files from your system.
Step 1
1. You have to close and terminate all the NVIDIA GeForce threads and services.
2. To do that, close the GeForce Experience app.
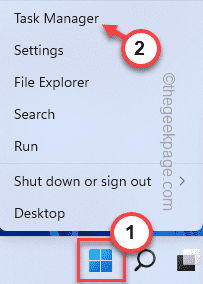
3. After doing that, press the Win key and the X keys together and tap “Task Manager“.
4. When the Task Manager opens up, look whether any NVIDIA-related process is running in the background.
5. If you can identify such a process, just right-tap it and click “End task” to kill it.
This way, terminate all the NVIDIA processes and make sure no other such task is running.
Close the Task Manager once you are done.
Step 2
1. You have to open the local appdata folder. Just, press the Windows key+R keys together.
2. Then, paste this address and click “OK“.
%localappdata%
3. When the Local folder appears on the screen, head on to this folder –
NVIDIA Corporation > NVIDIA GeForce Experience
4. When you reach the NVIDIA GeForce Experience page, you will find the “CefCache” folder.
5. You have to select that folder and click on the “Delete” icon to remove the folder.
After this, you should restart the system. Once you have restarted the system, open the GeForce Experience app once again.
It will automatically generate a new user profile. You should be able to optimize the games again.
Fix 3 – Download and install the driver
Installing the latest driver may fix this glitch you are facing.
1. Open the GeForce Experience app.
2. If you go to the “DRIVERS” tab, you can find the latest graphics driver is awaiting to be downloaded.
3. So, click “DOWNLOAD” to download the latest version.
Let it download the latest driver package. You may have to wait for 10 minutes or so.
4. Once the driver is downloaded, you will be two choices of installation.
5. Just tap “EXPRESS INSTALLATION” to install the latest driver.
Once it is done, go to the home tab and try to optimize any game.
Fix 4 – Pause the AV
The antivirus on your system may obstruct the GeForce Experience app from interfering with the game settings.
1. Antivirus always runs in the background. So, click on the upward arrow icon
2. There should be some icons representing apps running in the background. You will find several hidden icons alongside the antivirus that you are using.
3. Now, just right-tap the antivirus software and tap “Pause protection” to pause it temporarily.
Once you have paused it, relaunch the GeForce Experience app. Check whether you can optimize the games or not.
Fix 5 – Optimize a single game
Try to optimize a single game instead of trying to optimize all the games.
1. Open the GeForce Experience.
2. Go to the “HOME” panel to find all the games there.
3. Now, find a game that is not optimized. It bears a ⊖ sign with its name. Just, tap on the game to open it.
4. Now, on the right-hand corner, tap “Optimize” to optimize the graphics for that particular game.
Now test if this works out or not.
Fix 6 – Uninstall GeForce Experience and reinstall it
If everything else has failed, uninstalling the GeForce Experience app.
1. At first, press the Windows key+X keys together.
2. Then, click “Apps and Features“.
The settings page will open up. You can see the complete list of installed apps on the right-hand pane.
3. Now, right-click on the “NVIDIA GeForce Experience” app and tap on “Uninstall“.
You can just follow the on-screen instructions to complete the uninstallation process.
After that, close the Programs & Features window.
5. Then, go to the NVIDIA official website.
6. Once it opens up, tap on “Download” to download the latest version of the app.
Allow a little while to complete the downloading process.
7. After downloading the setup file, double click on the “Geforce_Experience” to launch the setup.
Just complete the installation as you prefer.
After installing the latest version of the GeForce Experience app, you should restart the system once to let this change take effect.
After this, check by optimizing one game. This should have solved your issue.
Fix 7 – Clean install the graphics driver
You have to uninstall and clean and install the graphics driver again.
Step 1 – Uninstall the graphics card
Before you uninstall the graphics card from your system, you have to download the latest graphics card driver.
1. At first, go to the NVIDIA Graphics Card driver page.
2. Input your driver specifications correctly and tap “SEARCH” to search for the latest driver.
3. Just, tap “DOWNLOAD” to download the latest version of your graphics card driver.
4. Once the downloading process is complete, press the Win key+R keys together.
5. Type “devmgmt.msc” and hit Enter to open the Device Manager.
6. When the Device Manager appears, expand the “Display adapters” and you will see the NVIDIA driver there.
7. Now, right-tap the driver and tap “Uninstall device” to uninstall it.
Once you have uninstalled the driver, your screen will turn off for a second. Now, follow the next step to reinstall the graphics card.
Step 2 – Reinstall the graphics card
You can reinstall the graphics card now.
1. Simply, double-tap on the installer to launch it.
It will extract the driver. So, you have to wait for a while.
2. When you see the NVIDIA Graphics Driver window, choose the “NVIDIA Graphics Driver and GeForce Experience“.
3. After this, tap the “AGREE AND CONTINUE” option to proceed.
4. After that, opt for the “Custom (Advanced)” option.
5. Then, tap “NEXT” to go to the next and final step.
6. Now, in the final step, make sure that you check the “Perform a clean installation” box on the installer page.
7. Finally, tap on “Next“.
Once the whole installation process is finished, you can close the installer window and restart your computer.
This completes the process. Now, you can optimize all your games.


