Is your Ethernet not working in Windows 10 when you try to access the internet? Well, it is an issue that may occur out of the blue, and hamper your internet connectivity. There could be several reasons behind the issue with ethernet not working on your PC. An issue with the ethernet cable, port issues, ethernet driver issue, or some internal Windows settings could be the reasons why your ethernet is not working in Windows 10.
So, what are the ethernet connectivity issues that can show up?
Ethernet issues can cripple your internet connectivity is several ways. Here are some of them:
- Ethernet Cable not detected
- Ethernet Cable connection fluctuation
- Ethernet cable connected but internet not working
- Ethernet connection established but with limited connectivity
How To Fix Ethernet Not Working in Windows 10
Before we jump on to advanced ways to fix ethernet issue on your PC, it is really important to make sure of certain things. Let us check them out:
Check Ethernet Cable: It is important to make sure that the ethernet cable is working fine. Doing so will help you know if the issue is with your PC or just the ethernet cable. First of all, check physically if the cable has some sort of damages or if the connectors of cable on either side are damaged. Also, check if the ethernet connection is not loose on the connecting ports.
If everything looks fine, try to use another Ethernet cable that is in working condition (from another PC) on your PC. If the other cable is working fine, then the issue is with the cable, else the issue is with your PC.
Change the Ethernet Connection Port in Router: If you are a home based user, your Ethernet cable is most likely to be connected to a port on a router device. There are 2-3 ports on a router usually that can deliver output ethernet connection. Try to change the port of the output ethernet from your router and see if that works to fix the ethernet not working in Windows 10.
Once you have made sure of the above two points, proceed with the solutions to fix Ethernet not working in Windows 10 if the issue is with your PC.
#1 – Disable and Enable Ethernet
If you are trying to use ethernet for the first time, make sure that Ethernet is enabled on your PC. You can do it from your PC’s Control Panel. Here’s how to do it:
Step 1: Search View Network connections in Windows search box.
Step 2 – Now, click on View network connections from the search result.
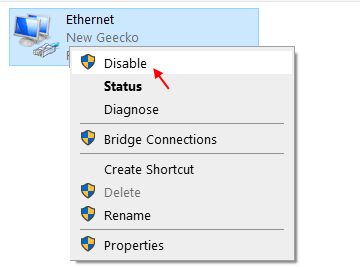
Step 3: A Network Connection window will open up. Here, look for the Ethernet connection, then right click on it. From the right-click menu, select the Enable option.
If it is already enabled, disable it, and then enable it again.

Now, check if the ethernet is working. If not, try next solution to fix Ethernet not working in Windows 10.
#1 – Reinstall Ethernet Driver
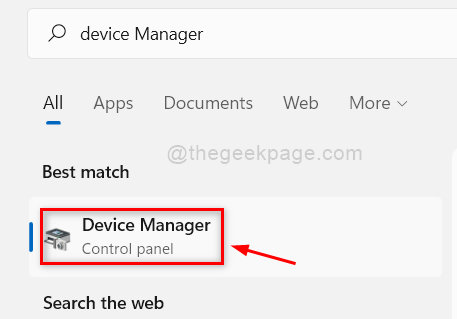
1 – Search Device manager in Windows search box.
2 -Click on Device manager.

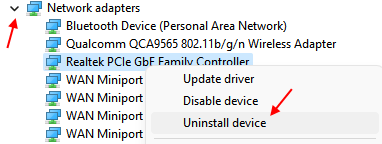
3 – Click on Network adapters to expand it. Now, Locate your ethernet driver.
4 -Right click and click on Uninstall driver.

5 –Restart your computer
#3 – Enable Ethernet Driver in Device manager
If you face the ethernet not working in Windows 10 issue, then you also might want to make sure that the Ethernet Driver is enabled on your PC. In order to do so, follow the steps given below:
Step 1: Press Windows + X keys at a time on your keyboard. A menu will open up; click on the Device Manager option there.

Step 2: The Device Manager window will open up. Expand the Network Adapters option, where you will find the Ethernet driver. Right click on the driver, then from the right-click menu, click on Enable. If the driver is already enabled, disable it and enable again.

After doing so, restart your computer once. See if the ethernet is working. If not, try the next method.
#4 – Change to Google DNS
5. Again, press Windows Key+R, to launch Run window.
6. Now, type “ncpa.cpl” and hit Enter.

7. Now, right-click on the Ethernet adapter you are using and then click on “Properties” to modify the properties.

8. Now, under the section ‘This connection uses the following items:‘ scroll down and then double click on “Internet Protocol Version 4 (TCP/IPv4)“.

9. In Internet Protocol Version 4 (TCP/IPv4) Properties window click on “Use the following IP address:” to select it.
10. Now, input these following DNS servers settings-
Preferred DNS server: 8.8.8.8
Alternate DNS server: 8.8.4.4

11. Now, close the window.
#5 Running network commands
1. Search cmd in windows 10 search box.
2. Now, right click and run as administrator.

3. Now, copy and paste the commands one by one and keep hitting enter key every time to execute them.
ipconfig /release
ipconfig /flushdns
ipconfig /renew
nbtstat –r
netsh int ip reset
netsh winsock reset
netsh winsock reset catalog
netsh int ipv4 reset reset.log
4. Once all commands get executed, close the cmd window.
#6 – Fix Ethernet Not Working In Windows 10 by Updating Ethernet Driver
It may be the case that the Ethernet driver on your PC is not updated, thus causing all the Ethernet not working issue. You can go to Device Manager, and try to update the Ethernet driver from there to see if that works. Follow these steps:
Step 1: Press Win + X buttons on your keyboard to open Win +X menu. Here, click on the Device Manager option.

Step 2: In the Device Manager window that opens, there will be a list of drivers. Go to the Network Adapters and click on it to expand. From its options, right click on the Ethernet driver. Now, click on the Update driver software option from the right-click menu.

Step 3: In the Update Driver window that opens, click on Search automatically for updated driver software. Your PC will begin looking for an updated Ethernet driver. It will be updated once a driver is found.

Once the update process is complete, restart your PC. After that, check if the Ethernet connection is working. If the answer is still no, give the next method a try.
#7 – Use Windows Troubleshooter
Windows has an inbuilt troubleshooter. You can use it to diagnose the ethernet not working issue and fix it for you. To run the troubleshooter, follow these steps:
Step 1: Press Windows + I to open Settings.
Step 2: In the Settings window, click on the Update & security option.

Step 3: Now, in the new window, from the left panel, click on Troubleshoot. Then from the options that show up, click on Run the troubleshooter option.

If there is any problem in your PC related to ethernet, Windows will detect it and fix it. If this method doesn’t work, try the next one.
#8 – Temporarily Disable Antivirus
Antiviruses are notorious to cause problems related to internet connectivity. If not anything, the Antivirus in your PC could also be the reason for Ethernet not working in Windows 10.
Simply disable your Antivirus for a while, then try to access the internet through ethernet. If you are able to access the internet, then you will need to the customer support or check the manual or help book in order to allow Antivirus to let your use internet via Ethernet.
Final Words
You may also get some error messages like Ethernet Doesn’t Have A Valid IP Configuration while connecting to the internet via ethernet. In such scenarios, make sure you are providing apt solution according to the error.
Please let us know, which one of these methods helped you out.