Windows 8, Windows 8.1 and Windows 10 don’t come with .NET Framework 3.5 installed. Though, Windows 10 does come with .NET Framework 3.5 included as an OS component, which is not installed by default. If you need to install something old which requires .NET Framework 3.5 then you will have to install it.
Microsoft is always trying to make Windows free of bugs, but still many of them are always bothering their users. While installing .NET Framework 3.5, many users are getting the error code 0x800F081F. This is one of the four error codes that are all caused by the same problem. The other three error codes are – 0x800F0906, 0x800F0907 and 0x800F0922. These errors occur due to .NET Framework 3.5’s incompatibility while installing it using the installation wizard, Windows PowerShell commands or the DISM (Deployment Image Servicing and Management) tool. The error code 0x800F081F says that the Windows could not find .NET source files. If you are also getting this error, we will help you fix it. Follow the methods mentioned below to fix the error.
How to Fix Error Code 0x800F081F
To fix the error code 0x800F081F, you will have to perform the methods one by one, until the issue is fixed. Users getting error codes 0x800F0906 and 0x800F0907 can also solve it the same way. But, to solve error code 0x800F0922, you will have to skip the first method and jump on to the second one.
#1 – Configure Group Policy
The group policy on your computer could be affecting the installation of .NET Framework 3.5. Follow the steps to configure it.
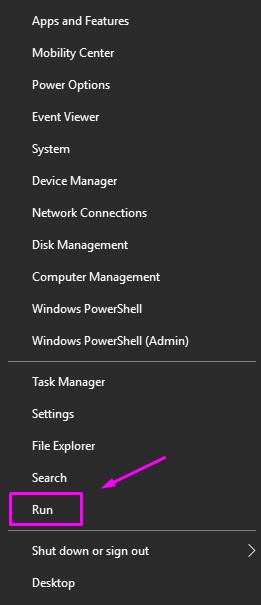
Step 1. Right-click on the Start menu button and select Run.

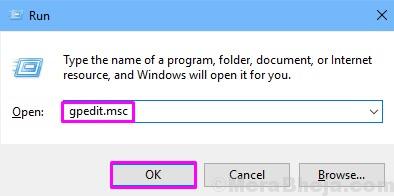
Step 2. Enter gpedit.msc in Run window and click on OK.

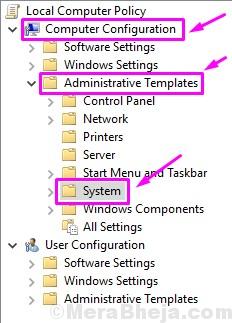
Step 3. The last step will open the Local Group Policy Editor. Here, follow the address mentioned below on the left side.
Computer Configuration > Administrative Templates > System.

Step 4. Now, on the right side, look for Specify settings for optional component installation and component repair. Double-click on it to open the Settings.

Step 5. In the Settings window, click on Enabled to mark it and click on OK.

Now check if you get the error while installing .NET Framework 3.5. If you do, try the method mentioned below.
#2 – Enable .NET Framework 3.5 from the DISM Command
In this method, we will try to install/enable .NET Framework 3.5 using the DISM command. Before beginning this method, you will require Windows Installation Media. And, if you don’t have it, then you will have to get a Windows 10 ISO. Here, the ISO version must match the version of your operating system. So, after getting the ISO media of Windows, mount the ISO image. Now we can begin the method.
Step 1. After mounting the ISO image of Windows Installation Media, open File Explorer and check the Drive’s letter where the ISO image is mounted. For example, if the ISO image is mounted in Drive E, then remember it. It will come in handy later in this method.

Step 2. After performing first step, go to Cortana and type Command Prompt. Now, right-click on Command Prompt from results and select the first option Run as administrator.

Step 3. In the command prompt window, type the following command and press the Enter key.
DISM /Online /Enable-Feature /FeatureName:NetFx3 /All /LimitAccess /Source:<>:\sources\sxs

Here, don’t forget to change “<>” with the drive letter which you remembered in Step 1. If the ISO image is mounted in Drive E, then change “<>” in command with the letter “E”. Also, make sure of the spaces in command, as it is in the command mentioned above.
Now, try to install the .NET Framework 3.5. If you are still getting the same error, perform the method mentioned below.
3. Install .NET Framework 3.5 using Windows PowerShell
In this method, we will try and install .NET Framework 3.5 using Windows PowerShell. Just like the last method, this method also requires Windows Installation Media. So, get the ISO image of Windows Installation Media and mount it on your computer. Also, don’t forget to remember the Drive letter of the mounted ISO image.
Step 1. After mounting the ISO image, go to Cortana and type powershell. Now, right-click on Windows PowerShell in results and click on Run as administrator.

Step 2. The last step will open Administrator: Windows PowerShell window. Here, enter the command mentioned below and press the Enter key. Don’t forget to replace “<>” with the drive letter. Also, mind the spaces as it is shown in the command below.
Enable-WindowsOptionalFeature –Online –FeatureName “NetFx3” –Source <>:\sources\sxs –LimitAccess

This should fix the problem. If it didn’t, try the next method.
4. Remove .NET Framework 4.7 before Installation
.NET Framework 4.7 can cause issues with the installation of .NET Framework 3.5. So, in this method, we will remove .NET Framework 4.7 and then install .NET Framework 3.5. Don’t worry, we will enable .NET Framework 4.7 after successfully installing .NET Framework 3.5. Follow the steps to perform the method.
Step 1. Right-click on the Start menu button and select Settings.

Step 2. Go to Apps.

Step 3. In Apps and Features, look for the Programs and Features. Scroll down to find it under Related Settings. Click on it.

Step 4. In Programs and Features window, click on Turn Windows features on or off. It will be located on the left side of the window.

Step 5. In the Windows Features window, uncheck the box beside .NET Framework 4.7 Advanced Services, and click OK. This will remove .NET Framework 4.7. Wait for its removal process to complete.

Step 6. When the removal process of .NET Framework 4.7 Advanced Services is complete, go back to the Windows Features window and check the box beside .NET Framework 3.5 (includes .NET 2.0 and 3.0). Click OK. This will download and begin the installation process of .NET Framework 3.5. Follow the onscreen instructions to install it.

Step 7. When the installation process of .NET Framework 3.5 is complete, you can check the box beside .NET Framework 4.7 Advanced Services and click OK. This will re-enable the .NET Framework 4.7 on your computer.

We hope we were able to solve your problem by fixing the error code 0x800F081F. If you were able to fix this error code using some other method, or if you have any questions regarding this issus, don’t forget to mention them below in comments.