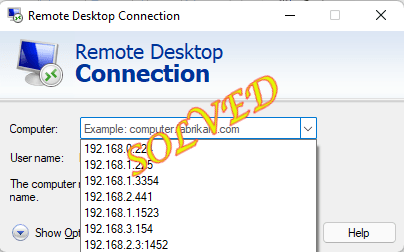
Remote Desktop Connection or RDC stores your previous remote desktop connection information. This is a good feature as you don’t have to bore yourself inputting the IP address, User Name repeatedly. But this can also put you in distress if you have connected multiple remote connections. You can’t even delete these credentials from the RDC panel itself as there aren’t any direct options available! In this article, we have shown you how to remove old IP addresses from the RDC.
Fix 1 – Use the Registry Editor
You can use the Registry Editor to find and remove those values associated with the IP addresses.
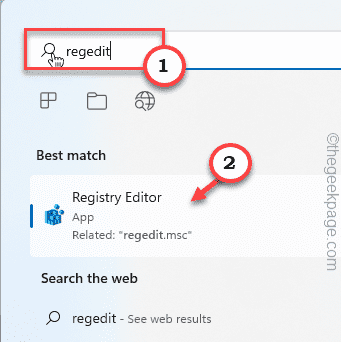
1. After pressing the Windows key once, type “regedit“.
2. Next, just tap “Registry Editor” once in the search results.
NOTE –
Registry edits are dangerous for your system which may sometimes lead to a fatal error. You should create always create a registry backup before you perform a registry edit. Just follow these steps –
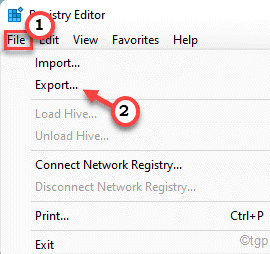
a. After opening the Registry Editor, tap on “File” in the menu bar and then, click on the “Export…” option.
b. Now, just save this backup in a secure location.

3. On the left-hand pane go this way –
HKEY_CURRENT_USER\Software\Microsoft\Terminal Servers Client\Default
4. On the right-hand side, you will notice several MRU binary values.
5. Just select all the MRU values EXCEPT the “Default” value and press the “Delete” key from your keyboard to delete all of them.
6. Now, moving on to the next step, you will notice another sub-key “Servers” on the left pane.
7. Just, right-tap the key and tap “Delete” to remove it. This shall remove every entry in that subkey.
8. Just one more thing left to do is to re-create that delete sub-key.
9. So, just right-tap the “Terminal Servers Client” and tap “New” and “Key>” to create the key.
10. Name this as “Servers“.
Once you have done all these, close the Registry Editor page.
11. Now, open File Explorer.
12. Click on the “Documents” folder to access it.
13. Once you are there, just tap the “View” tab and click on “Hidden items>” and further click on “Hidden items“.
14. Once you have found it, select the “Default.rdp” file and tap the “Delete” icon on the bin icon to remove it from your system.
After that, close everything and reboot the system. Check if this works out for you.
Fix 2 – Create and use a batch file
If you don’t want to get into the Registry Editor, you can just create and use a batch file to clean up the IP addresses.
[NOTE – We have created and uploaded the batch file for you. So, if you just want to download and run the file, scroll down to the bottom of the post to find further instructions.]
1. Just search for “Notepad” using the search box.
2. Click on the “Notepad” once that appears in the search results.
3. On the Notepad page, copy-paste these lines.
echo off
reg delete "HKEY_CURRENT_USER\Software\Microsoft\Terminal Server Client\Default" /va /f
reg delete "HKEY_CURRENT_USER\Software\Microsoft\Terminal Server Client\Servers" /f
reg add "HKEY_CURRENT_USER\Software\Microsoft\Terminal Server Client\Servers"
cd %userprofile%\documents\
attrib Default.rdp -s -h
del Default.rdp
echo "ip addresses have been removed from remote desktop connection, press any key to continue"
pause
4. Just, click on the “File” on the menu bar and tap the “Save as” option.
5. Now, before you make any changes, set the ‘File type:’ to “All files“.
6. Name it “IPremover.bat“.
7. Choose an appropriate location to store the file (like – Desktop) and tap “Save” to save the file on your system.
Once you have saved the file, just close the Notepad window.
8. Just go to the location where you have saved the batch file.
9. Right-click on the batch file and tap “Run as administrator” to run the batch file with administrative rights.
This will run the batch file on your system. Once it is done, open the Remote Desktop Connection panel and check whether this has worked out.
NOTE –
If you don’t want to create the batch file, follow these steps.
1. Download the IPRemover file on your system.
2. Now, you can extract the zip file to any location you want.
3. Just, right-click on the “IPRemover” and tap “Run as administrator“.
This way, you can execute the batch file on your system.
Fix 3 – Run the PowerShell commands
If the previous two methods failed and you can run these powershell commands to try the same thing.
1. Press the Windows key and start to type “powershell“.
2. Once you see the “Windows PowerShell” has appeared on the search results, just right-tap it and click “Run as administrator” to run the powershell.
3. Then, copy-paste these codes into the terminal and hit Enter.
Get-ChildItem "HKCU:\Software\Microsoft\Terminal Server Client" -Recurse | Remove-ItemProperty -Name UsernameHint -Ea 0
Remove-Item -Path 'HKCU:\Software\Microsoft\Terminal Server Client\servers' -Recurse 2>&1 | Out-Null
Remove-ItemProperty -Path 'HKCU:\Software\Microsoft\Terminal Server Client\Default' 'MR*' 2>&1 | Out-Null
$docs = [environment]::getfolderpath("mydocuments") + '\Default.rdp'
remove-item $docs -Force 2>&1 | Out-Null
After running this code, close the PowerShell screen. Then, restart your system.
Fix 4 – Remove from Windows Credentials
You can also remove the old IP credentials using the Windows Credentials Manager.
1. Just right-tap the Windows icon on the taskbar and tap “Run“.
2. Then, paste these terms and hit Enter.
control /name Microsoft.CredentialManager
3. When the Credential Manager page opens up, click on “Windows Credentials” to manage it.
4. Here, you will find several credentials listed. Expand the “Generic Credentials“.
All the remote connections that you have registered on this system, are stored here. So, go through all the credentials one by one and look for those RDC credentials that you don’t want.
5. Now, click on “Remove” to remove the credential.
This way, repeat the steps to ensure that no unnecessary credential is left out.
Once you are done, close the Credential Manager page and open the RDC panel. Check if you are still seeing those old IP addresses or not.
How to prevent Windows from saving RDP Connection History?
Once you have cleared all the credentials, they might be gone for good. But as you log in to more remote computers, Windows will keep on storing those credentials as well. You can actually prevent Windows from storing up RDP Connection history.
1. Press the Win key and the R key.
2. Then, type “regedit” in the pane and click “OK“.
3. Once you land on the Registry Editor page, head on straight to this address –
HKEY_CURRENT_USER\Software\Microsoft\Terminal Servers Client\
4. Now, right-click on the “Terminal Server Client” and tap “Permissions…“.
5. In the Permissions window, click on the “Advanced” settings to access it.
6. On the bottom side of the screen, you have to click “Disable inheritance” to disable the inheritance.
7. You will see a prompt to decide what to do with the already inherited permissions. You may choose “Remove all inherited permissions from this object.” to avoid any conflict.
Or, you can just convert the permissions with the “Convert inherited permissions into explicit permissions on this object.” option.
8. Once you are done, tap “Apply” first to apply the change and click “OK“.
9. Coming back to the original permissions page, select the “Users” account from the list.
[Additionally, you can select your username and proceed if you don’t want to interfere with other users.]
10. Just, tick the ‘Deny‘ box in the “Full Control” option.
11. Finally, just tap “Apply” and “OK” to save all of this.
After doing all these, close the Registry Editor screen. Then, restart the system. MSTC won’t be taking record of the RDP connections any further. This should put a final stop to the issue once and for all.


