CPUs are designed to power your computer in such a way that it runs at its full capacity when there is a heavy load (like when you are playing a game) and it runs at a very low speed when there is no load or little load on your computer. If in your computer CPUs are not running at its full capacity subjected to a heavy processing task, then that is not a matter to neglect. This happens mainly as sometimes your CPUs on your computer are set at less than 100% in the Maximum Processor state option. Go for the fixes to solve the problem, but before moving ahead, don’t forget to run these initial workarounds.
Initial Workarounds-
1. Restart your computer and after rebooting, run a heavy task (like open a video game) check if the CPUs are running at full speed.
2. Check if you have any Windows Update pending on your computer. After updating your Windows check if your problem has solved or not.
3. Run a full scan on your system for malware, viruses. After scanning, reboot your computer and check if the CPUs are running at full speed.
If the problem is still there then go for the fixes-
Fix-1 Set Maximum processor state to 100%
Sometimes it may happen is that the Maximum processor state of the CPUs on your computer is set at less than 100%. To set the maximum processor state to 100% follow these steps-
1. Press Windows Key+R to launch Run, and copy and paste the following and hit Enter:
control.exe powercfg.cpl,,3

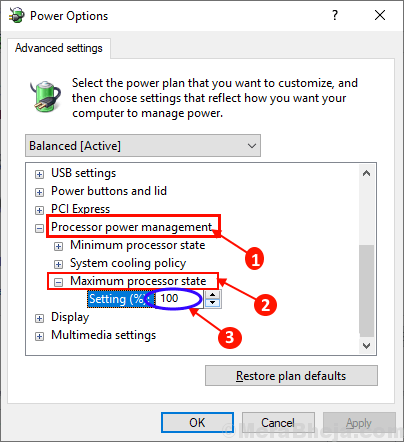
2. Now, in the Power Options window, scroll down and expand “Processor power management” and then expand “Maximum processor state“.
3. Click on the box beside “Settings” and set the value to “100“.

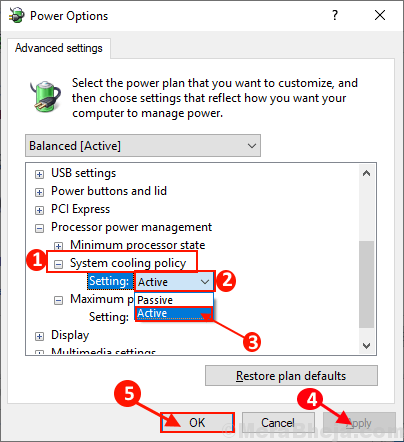
4. After that, expand the “System cooling policy” just above the ‘Maximum processor state’.
5. Click on “Settings” to expand it and set it as “Active“.
6. Then, finally, click on “Apply” and “OK” to save the changes.

Reboot your computer and try running a heavy task on your computer.
Check if the CPUs are working at its full capacity or not. If the problem is still there, then go for the next fix.
Fix-2 Disable Intelppm registry in Registry Editor
You can set your CPU to work at its full capacity all time by changing the value of the ‘start’ key of the ‘Intelppm’ registry. To change the value of ‘Start’ key follow these steps-
1. At first, press the Windows key from your keyboard and then start to type “Registry“.
2. Then, click on the “Registry Editor” in the search result.

The Registry Editor window will open.
3. On the left pane of Registry Editor, navigate to this location-
HKEY_LOCAL_MACHINE\SYSTEM\CurrentControlSet\Services\intelppm
4. Now, on the right pane double click on “Start“.

5. Set the Value data to “4“. Click on “OK” to change the value of the registry.

Reboot your computer and check if the CPU is working at its full capacity or not. If you are witnessing the same problem again then go for the next fix.
3] Disable/Update Intel Power Management Driver
Search Registry editor in the search box and click on registry editor appearing in search result.
Now, go to the path given below
HKEY_LOCAL_MACHINE\SYSTEM\CurrentControlSet\Services\intelppm
Locate start located in the right side and Double-click on it.
No, change the value of Start key to 4.

Close the Registry Editor and restart your computer.
Fix 4 – Disable battery saver mode
If you are facing this problem on a laptop, disable the battery saver mode. After disabling CPUs on your laptop should be running at its full capacity.
Aslo, search POWERCFG.CPL in start search box and click on it.

Now, choose High performance plan.

Fix-5 Disable/Update Intel Power Management Driver
Your CPU runs at a low rpm when there is the low load on your CPU (like when your computer is in Sleep mode), but speeds up-to its capacity whenever it is subjected to heavy load. This system is controlled by Intel Power Management Driver. You can disable the Intel Power Management Driver by following these steps-
1. Click on Windows Icon and click on the “Power” icon. Press Shift and then click on “Restart“. Your computer will boot into Troubleshooting mode.

2. Now, click on “Troubleshoot” and then go to “Advanced Option“.

3. Finally, click on “Command Prompt“.

4. Copy and paste this command and hit Enter to go to the directory C:\Windows\System32\driver.
cd drivers
ren intelppm.sys intelppm.sys.bak

Reboot your computer to Windows 10. Check if CPUs are working at its full capacity or not. Your problem should be fixed.