Are you trying to install Google Chrome on your computer, but for any unknown reason the installation process keeps failing? Some Windows 10 users are complaining about this problem in the forum. If you are one of them, there is no need to worry. In this article we are going to describe some methods, following them you will be able to install Google Chrome on your computer without the error. But, before going ahead for the main fixes, first, you should reboot your computer. After rebooting your computer, try to install Google Chrome again on your computer.
If this process didn’t help, go for the main solutions-
Fix-1 Delete ‘Google’ key from Registry Editor-
Delete ‘Google‘ key from two locations of Registry Editor.
1. Type “regedit” in the Search box which is beside the Windows icon.
2. Now, click on “Registry Editor” in the elevated search results to open the Registry Editor window.

3. In Registry Editor window, navigate to this location-
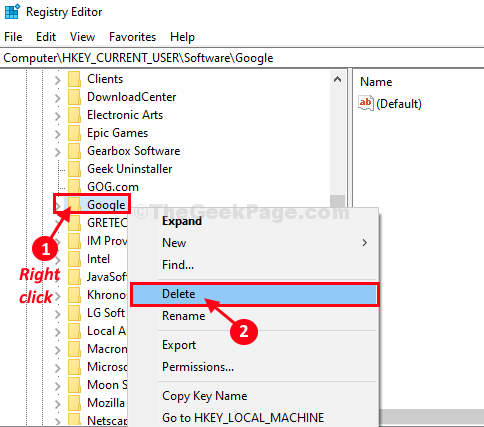
Computer\HKEY_CURRENT_USER\Software\Google
4. Now, on the left-hand side, right-click on “Google” and then click on “Delete” to delete the key from your computer.

5. If you see a message asking for confirmation, click on “Yes“.

6. Now, again navigate to this location on Registry Editor window-
Computer\HKEY_LOCAL_MACHINE\SOFTWARE\Google
7. Same way, scroll down and find “Google“. Right-click on it and then click on “Delete” to delete it.

8. Click on “Yes” if you see a message asking for your consent to delete the key.

Close Registry Editor window.
Restart your computer and after rebooting your computer check if you can install Google Chrome on your computer or not.
Fix-2 Delete Google folder from Localappdata-
1. Press Windows key+R to open Run window on your computer.
2. Type or copy-paste this location and hit Enter.
%localappdata%

3. In the Local folder, scroll down and right-click on “Google” and then click on “Delete” to delete it from your computer.

Once you have deleted the folder from your computer, close the File Explorer window.
Try to install Google Chrome again.
Fix-3 Modify Registry Editor-
Deleting particular keys on your computer may solve the problem.
1. Press Windows key+R to launch Run, and then type “regedit” and hit Enter.
The Registry Editor window will be opened.

2. In the Registry Editor window, click on “File” on the menu bar and then click on “Export” to create a backup of the registry on your computer.

3. Choose a secure location on your computer. Name the backup as “Original Registry” and click to select the “All” option under the Export Range and then click on “Save” to save it on your computer. You can easily import this registry, in case anything goes wrong.

4. In Registry Editor window, navigate to this location-
HKEY_LOCAL_MACHINE\SOFTWARE\Google\Update\Clients
If you are using a machine running on Windows 10 64bit then, navigate to this location–
HKEY_LOCAL_MACHINE\SOFTWARE\Wow6432Node\Google\Update\Clients
Now, on the left-hand side of the Registry Editor window, expand the “Clients” key and then right click on “{430FD4D0-B729-4F61-AA34-91526481799D}” and click on “Delete” to delete the key from your computer.

5. Again, In Registry Editor window, navigate to this location-
HKEY_CURRENT_USER\Software\Google\Update\Clients
Expand the “Clients” key again and then if you see “{430FD4D0-B729-4F61-AA34-91526481799D}” key, right click on it and click on “Delete” to delete the key from your computer.
If you don’t see the key, close the Registry Editor window.
Now, try to install Google Chrome again on your computer. This time the installation will be complete without any error.
Fix-4 Install Google Chrome as an administrator-
Installing Google chrome as an administrator has solved the issue for many users.
Follow these steps to download the setup file on your computer–
( NOTE-If you have already downloaded Google Chrome setup file, then skip straight to step-4)-
1. Open your browser and type “Download Chrome“. Click on “Google Chrome| Download Chrome today“.

2. In order to download the setup file of Google Chrome, click on “Download Chrome“.

3. Click on “Accept and install” and then choose a download location for the file. Now, click on “Save” to save the file.

4. Go to the download location of the setup file. Now, right-click on “ChromeSetup” and then click on “Run as administrator” to run the setup file on your computer.

The installation process will kick in. Follow the on-screen instructions to complete the installation process of Google Chrome on your computer.
You will be able to install Google Chrome without any error. Your problem will be solved.