Starting from Windows 10, Microsoft introduced Encryption File System(EFS) that enables you to encrypt a file or folder. This was one can keep the data private to the Windows Account they are using. To encrypt the files and folders one can access the Advanced Attributes.
However, many users reported that the option Encryption contents to secure data greyed out has been greyed out. This happens if the registry keys, group policies, etc are not configured rightly in the system.
If you’re seeing this on your system, read along. In this article, we have curated a list of working fixes to get the “Encrypt contents to secure the data” option back to the working state.
Note: This option is only available in Windows Pro versions. This feature is not available for other versions of Windows.
Fix 1: Enable EFS using Windows Registry
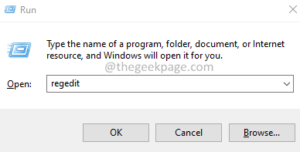
1. Open the Run Dialog using the keys Windows+R.
2. Type regedit and press Enter.
3. If you see a UAC popping up, click on Yes.
4. The Registry Editor window opens.
Note: Editing registries can be risky. Even the slightest mistake can have affected the system’s operation. So, we advise taking the backup of the Registry keys before proceeding. To take the backup, click on File > Export > Give a suitable name > Save the file.
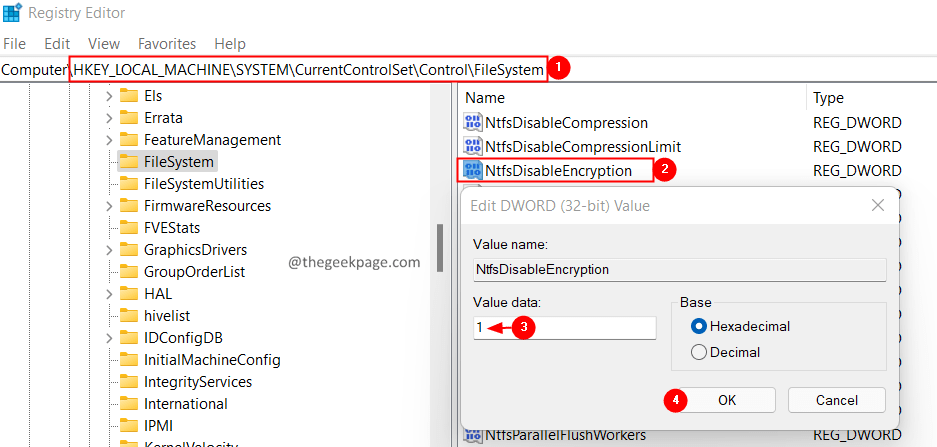
5. In the Registry Editor window, copy-paste the below location on the address at the top and press Enter.
HKEY_LOCAL_MACHINE\SYSTEM\CurrentControlSet\Control\FileSystem
6. From the right-hand side section, locate and double-click on the key named NtfsDisableEncryption
7. Set the value to 1 and press Enter.
8. Close the registry editor and restart your system.
Check if the issue has been resolved.
Fix 2: Enable EFS using Command-Line
Alternatively, you can also enable EFS using the command line. Below are the steps to achieve the same:
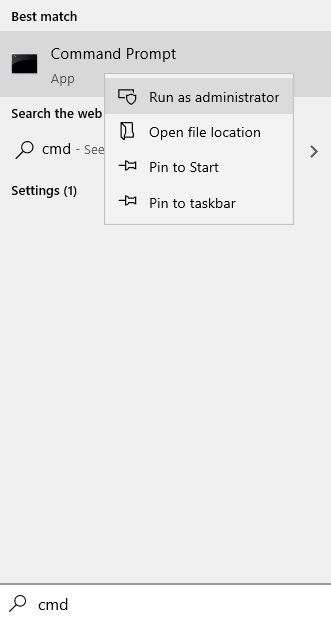
1. Search cmd in Windows search box.
2. Right click and run as administrator

3. In the command prompt window that opens, enter the below command and press Enter.
fsutil behavior set disableencryption 0
4. After executing the command successfully, restart your system.
Now, check if the option “Encrypt contents to secure the data” starts working normally.
Fix 3: Ensure Encryption File System(EFS) service is running
1. Open the Run dialog using Windows+R.
2. Type services.msc and press Enter.
3. In the services window that shows up, scroll down and locate the service named Encryption File System.
4. Once found, double-click on the Encryption File System service to open its properties.
5. From the Startup type drop-down menu, select Automatic.
6. If the service status is not running, click on the Start button. Ensure the service status is Running.
7. Click on Apply and then click on OK.

Check if this helps, if not try the next fix listed below.
Fix 4: Ensure you’re using NTFS drive
Note that the encryption can be done only on NTFS drives. So, if you are using the FAT32 file system, convert the drives to NTFS using the below steps:
1. Open the Run Terminal using the keys Windows+R.
2. Type cmd and hold the keys Ctrl+Shift+Enter to open the Command Prompt in Admin mode.

3. In the User Access Control Prompt that opens, click on Yes.
4. Type the below command and press Enter.
convert <Driver_letter>:/ fs:ntfs
If you want to convert the D drive, then tweak the command as follows:
convert D:/ fs:ntfs
Check if this helps.
Fix 5: Perform an SFC and DISM scan
1. Open the Run Terminal using the keys Windows+R.
2. Type cmd and hold the keys Ctrl+Shift+Enter to open the Command Prompt in Admin mode.

3. In the User Access Control Prompt that opens, click on Yes.
4. Type the below command and press Enter.
sfc /scannow
5. Restart the system and check if the issue has been fixed. If not, then check out the following steps.
6. Open the command prompt with admin rights again(follow the steps 1 to 3)
7. Paste the below command and press Enter.
DISM.exe /Online /Cleanup-image /scanhealth
8. Once done, restart the system.
If the files are being corrupted, they will be repaired.
Now, check if the option shows up.
That’s all.
We hope this article has been informative. Kindly comment and let us know the fix that helped you get the option to a working state.
Thank you for reading.

