Whenever any application does not work properly, the windows users tend to think various causes for it like restarting the application or something. But actually time zone can also be the reason behind it. Initially we had to manually set the time zone in windows system but in windows 11 there is an option where you can allow the windows to set the time zone automatically. Therefore, if you want to enable the set time zone automatically feature on your system, then please refer this post which explains how to do it in 2 methods.
How to Enable or Disable Set Time Zone Automatically in Windows 11 using Settings app
Step 1: Open Settings app by pressing Windows + I keys together on your keyboard.
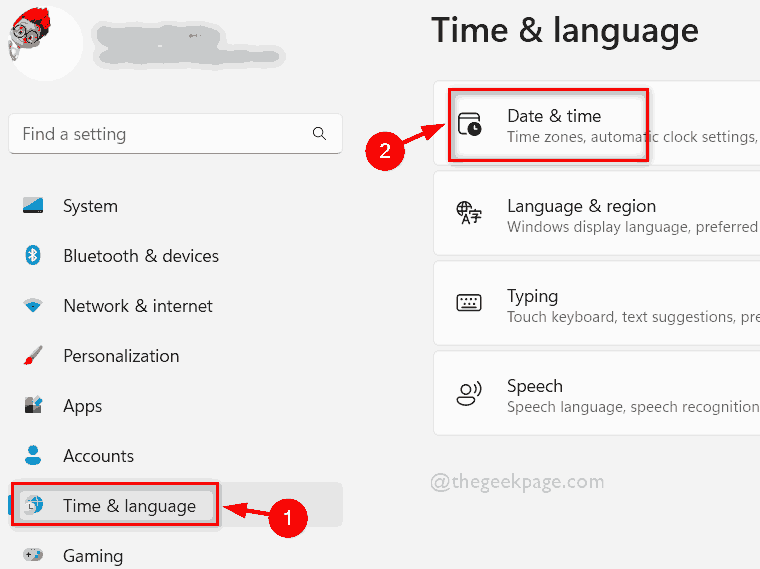
Step 2: Then, Select Time & language option on the left menu of the Settings app as shown below.
Step 3: After selecting Time & language, Click Date & time option on the right side of the Settings window.

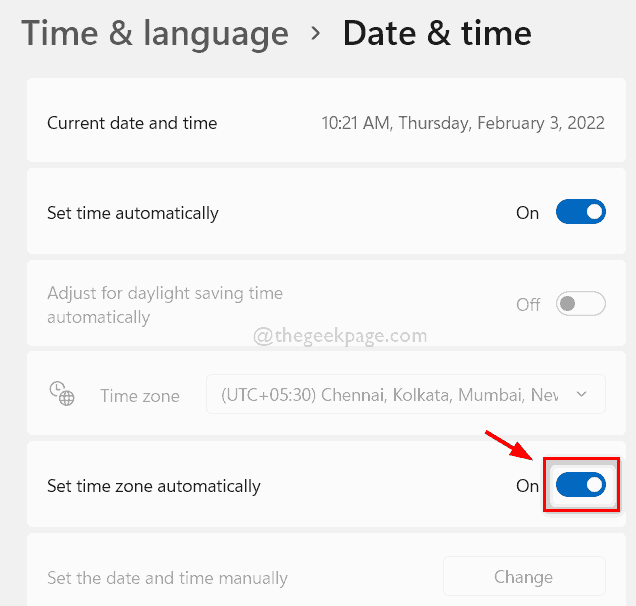
Step 4: In the Date & time page, click on Set time zone automatically toggle button to turn it On if you want to enable it as shown below.

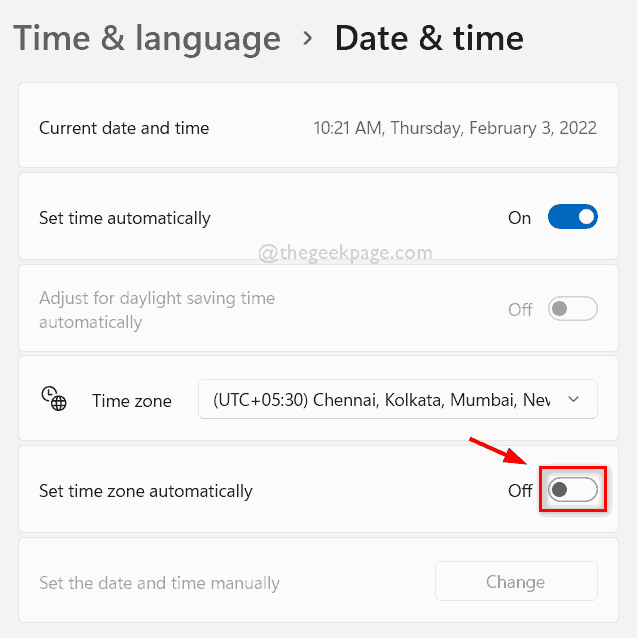
Step 5: Same way, if you want to disable the Set time zone automatically option on your system, then please click on Set time zone automatically toggle button to turn it Off as shown in the below screenshot.

Step 6: After enabling or disabling this feature, Close the Settings window.
That’s all. This is how you can enable or disable the set time zone automatically option on your system via settings app.
How to Enable or Disable Set Time Zone Automatically in Windows 11 using Registry Editor
NOTE : Before proceeding with this method, please keep a backup of your registry file so that you can revert it back if something goes wrong which can totally cause damage to your system.
Step 1: Press Windows + R keys together on your keyboard to open Run dialog box.
Step 2: Then, type regedit in the run box and press Enter key to open Registry Editor.
Step 3: Please accept the UAC prompt to continue by clicking Yes button.

Step 4: Copy and Paste the below given path in the address bar of the Registry Editor and hit the Enter key to reach there.
NOTE: Please make sure address bar is empty before pasting the copied path given below.
HKEY_LOCAL_MACHINE\SYSTEM\CurrentControlSet\Services\tzautoupdate
Step 5: Make sure you have reached tzautoupdate registry key on the left side of the registry editor.
Step 6: Then, on the right side of the registry editor, double click on Start dword value to open it.

Step 7: Enter the value 3 in the Value data field and click OK button to enable the set time zone automatically option on your system as shown in the below.

Step 8: If you want to disable the set time zone automatically, set the Value data field to 4 and tap on OK button as shown below.

Step 9: After turning on or off the set time zone automatically, close the registry editor window.
That’s how one can enable or disable the set time zone automatically through registry editor on your system.
That’s all.
Hope these 2 methods were helpful and informative.
Please leave us comments below for any doubts or clarifications.
Thank you!