Do you want to improve the quality of your voice for your next audio project? or You wish to Podcast something very clearly? or maybe you just want to improve the audio quality of the track you are listening to? I guess you have done your part of research on the internet and discovered Audacity, a useful piece of audio software.
Audacity is an open-source multi-track editing and recording software for different operating systems( Windows, macOS, GNU/Linux) that is very simple to use and is absolutely free. It’s ideal for Podcasting and Audio Recording.
Look no further than this guide on how to increase voice quality if you are a podcaster, a sound recordist, or simply someone who wants to sharpen up any audio they already have. Let me take you through a quick guide on how to use Audacity to improve your audio quality.
Steps to Improve Audio quality using Audacity
Step 1: OPEN THE AUDIO FILE
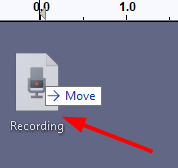
- Drag and drop your audio file into Audacity.

(Or)
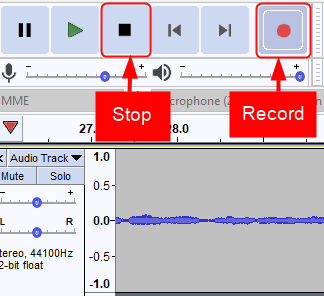
- You can simply record your audio by using the record option present in audacity.

Step 2: NOISE REDUCTION
- Next, it is important to remove any Background unwanted noise present in your recording. Follow the steps given below to remove all the unwanted frequencies.

- Select the unwanted noise part, Click on Effect> Noise Reduction

- Once the Noise Reduction window opens, Click on Noise Profile as shown below for Audacity to know what to filter out.

- Select the entire audio, again open the Noise Reduction Window ( Effect > Noise Reduction ), set the values based on your requirement. ( you can leave the default values also as such),Click preview to check the audio and Click OK.
- That’s it. All the Background unwanted noise is removed from your recording.
If the noise still exists try applying the filter again. Make sure you do not overdo the process many times so that your audio will not be degraded and make your voice sound tinny and robotic.
Step 3: COMPRESS
Now that the audio is free from unwanted noise, it is time to compress it so that the volume of your vocals increases (makes louder parts a little quiet and quiet parts a little louder). To compress your audio
- Select the complete audio track using Cltr+A, now click Effect > Compressor.

- Next, set the values as shown in the figure below

- Once you set the values, click on Preview to check the audio, and once you are happy click OK.
You may need to mess with the compressor’s settings, just remember that the more you raise the threshold to the left, the more background noise you will hear. Keep the threshold between -15 and -18.
- Once you apply the compressor, the audio will look like below.

STEP 4: EQUALISATION
It is a tool used for changing and adjusting the pitch (a good mix of low, mid, high frequencies) of your voice. To do this
- Select the entire audio clip using Cltr+A, go to Effect > Filter Curve.

- Feel free to play around with the curve, and adjust it based on your liking.

- If you want to adjust a particular preset like Bass Boost or Treble boost, Click on Manage > Factory Presets > Bass Cut ( Select depending on your requirement)

- Once you have done with setting the Equalizer values, Click on Preview to monitor them, and once you are satisfied Click OK to save the changes.
- After equalization is applied the audio clip looks as shown below.

STEP 5: NORMALIZE
This step just makes the voice or vocals louder. To do this
- Click on Effect > Normalize

- Set the values to default as shown in the figure and click OK.

- Once the normalization is applied, the audio clip is as shown below

Once all the steps are done, listen to your audio voice or recording. If you are not satisfied you can follow the same steps again till you get your desired output. ( Make sure not to overdo it as it will degrade the audio quality instead of improving )
You will now have lovely and clear audio to enjoy in your projects or Podcasts or any audio/video you wish to watch.
That’s all.
Thanks for Reading.Hope this article has is helpful and informative.
Comment and let us know your experience.