Windows 11 comes with a reserved storage space that it uses to store the temporary files, cache and other system files that are required to keep the performance of the operating system stable. Usually the default size of the reserved storage space is 7GB. However, this can vary. This article explains how you can view your default Windows 11 reserved storage space, disable it if required and enable it back.
Note: It is recommended not to disable the reserved storage space as this might impact system performance.
How to View Reserved Storage Space
Step 1: Click on Start icon in the taskbar.
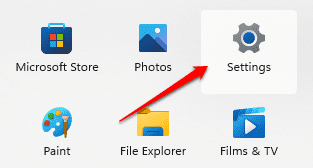
Step 2: Click on Settings option next.
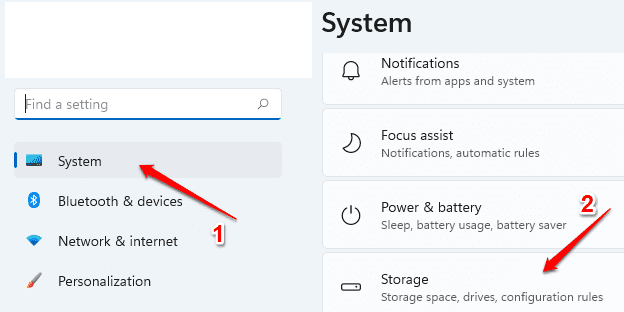
Step 3: In the left window pane, click on System option and in the right window pane, click on the option Storage.
Step 4: Now under Advanced storage settings option, click on the sub option Storage used on other drives.
Step 5: Select your Windows 11 partition drive from the list of drives.
Step 6: Now, click on System & reserved.
Step 7: This will show you the reserved storage space under the header Reserved storage.
How to Disable Reserved Storage Space
If you would like to disable the reserved storage space, then follow the below steps:
Step 1: Click on the Search icon.
Step 2: In the search bar, type in cmd. From the results, right click on Command Prompt and then click on the option Run as administrator.
Step 3: When command prompt opens up, type in the following command and hit Enter key to disable the reserved storage space.
DISM /Online /Set-ReservedStorageState /State:Disabled
Step 4: Wait for a minute and check again. You can now see that your reserved storage space is now freed.
How to Enable Back Reserved Storage Space
If your windows 11 doesn’t have a reserved storage space or if you want to enable the reserved space that you disabled earlier, you can execute the following steps:
Step 1: Just like in the previous step, open command prompt in administrator mode.
Step 2: Now, type in or copy paste the following command to enable back the reserved storage space.
DISM /Online /Set-ReservedStorageState /State:Enabled
Step 3: Wait a minute before you check whether the reserved storage space is back or not. You can see that it is now back.


