While starting up your system over a network, you may see this error message “Start PXE over IPv4” has appeared on the black screen, completely stalling the boot process. This issue is a simple case of boot misconfiguration. You just have to reconfigure it correctly and Windows shall start to boot up normally. Follow these easy instructions to fix the issue.
Fix 1- Turn Off Secure Boot and legacy support in BIOS
Use the following steps to disable both Legacy Support and Secure Boot.
1. Turn off your PC
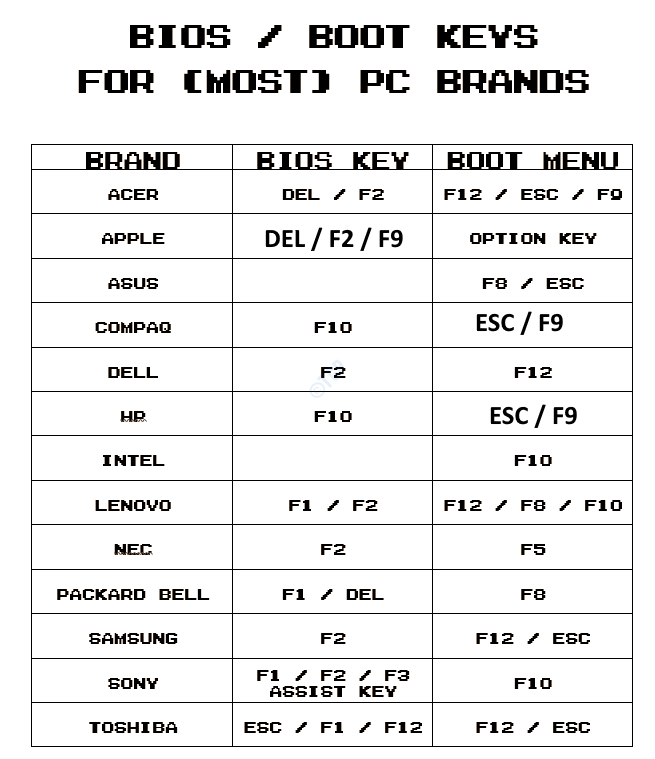
2 – Now, start the PC with start button in PC and then as soon as PC starts , start hitting BIOS key multiple times to Enter BIOS
Below is a screenshot showing BIOS kets of multiple laptop manufacturers.

3. Locate Secure Boot and Disable it.
4. Now locate Legacy Support option and Disable it also.
5. Save settings.
6. Exit the BIOS.
Fix 2 – Reset the boot configuration
You can reset the boot configuration manually.
1. Let your computer start.
2. When the manufacturer’s logo appears, quickly press and hold the “Delete“* key to open the bios setup on your computer.
* NOTE– The actual key to open the BIOS settings can differ from manufacturer to manufacturer. These are the variety of keys –
Esc, F1, F2, F10, F11, F12 or Delete
Pressing the allocated key will bring up the BIOS screen on your computer.

3. In the BIOS setup window, go to the “Boot” tab by arrow key.
4. Now, go down to select “Secure Boot” and then press Enter.
5. Now, choose “Disabled” from the drop-down and then hit Enter to disable UEFI secure boot on your computer.
6. Now, press “F10” from your keyboard to save the settings on your computer.
7. Now, select “Yes” to finally save and exit the bios settings on your computer.
After that, let your computer start up normally.
Fix 3 – Disable the Onboard IPv6
You can easily solve it if you disable the IPv6 in the boot priority settings.
1. Open the BIOS settings on your computer.
2. Once you are there, straight go to the “Boot” section.
Here, you will see the Boot option priorities are listed altogether.
3. Now, you will notice that the boot priority is set to the “Onboard NIC (IPv6)“.
4. Select that with your mouse and hit Enter.
5. Set the boot priority settings to “Disabled“.
6. Once you are done, go to the “Exit” tab.
7. Here, you will find the “Save changes and exit“.
8. Now, tap on “Yes” to confirm it.
This will send you back to the boot screen. Just let it boot normally and it should just work out fine.
This should help you solve the issue.
Fix 3 – Disable the WOL in BIOS
If nothing is working for you, just disable the Wake-on-Lan settings in BIOS.
1. At first, open the BIOS menu following the steps we have discussed in Fix 1.
2. Then, move to the “Advanced Settings” tab (in some computers, you may find the “Power” tab).
3. Here, locate the “Wake-On-LAN” settings from here and set it to “Disabled“.
Now, to save the changes, press F10 and exit.
Let your system startup normally. This should help you resolve the issue once and for all.
