DirectX is the compilation of the different types of APIs that handles gaming processes on Windows. Direct3d is the essential part of the DirectX bundle that is widely used by the video game industry. So, if you are seeing ‘DirectX failed to initialized, Please install the correct drivers’ error message on your system, there is something wrong with the DirectX. Simply, enact these fixes on your device to solve the problem.
Fix 1 – Update the graphics card driver
Updating the graphics card driver should fix the issue with the DirectX.
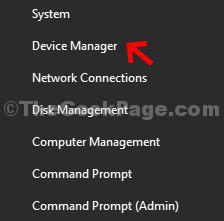
1. First of all, press the Windows key+X keys together.
2. After that, click on the “Device Manager“.

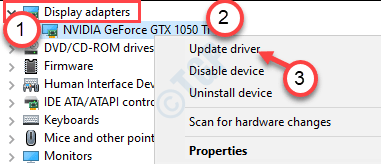
3. Now, once the Device Manager opens up, expand the “Display adapter“.
4. Just right-click on your graphics card adapter and click on “Update driver“.

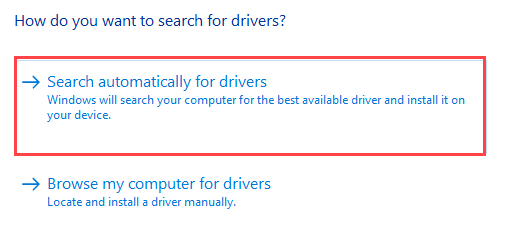
5. To search for the latest build of your graphics driver, click on the “Search for the updated drivers“.

This will allow your device to download and install the latest graphics card driver for your system.
Fix 2 – Install Visual C++ Redistributable
This problem may be occurring due to the absence of some Visual C++ redistributable files on your computer.
1. Click on this link to visit the download page of the Visual C++ Redistributable for Visual Studio 2012.
2. Then, click on “Download” to download it.

3. Then, checkmark the application version according to your system specifications. (Whether your system is a 64bit computer or 32 bit one).
4. Then, click on “Next” to start the download.

In a few seconds, the download process will be complete.
Close the browser window.
5.Then, double click on the “vcredist.exe“.

6. Click on “Run” when the ‘Do you want to run this file?‘ prompt appears.

7. Accept the terms and conditions. Click on “Install” to start the installation process.
8. The installation process will be completed within half a minute.
9. When you see ‘Setup Successful‘ message has appeared on your screen, click on “Close“.

After closing the setup, restart your computer. After rebooting your computer, check if this works.
NOTE–
Here we have given a list of essential redistributable files. Download and install them on your computer (by following the previous steps)~
2008 C++ Redistributable package
2010 C++ Redistributable package
2012 C++ Redistributable package
2015 C++ Redistributable package
Visual Studio 2015, 2017, and 2019 Redistributable packages
Once you have installed all these Visual C++ Redistributable files, try to access the application again.
Fix 3 – Disable Hardware Acceleration
The hardware acceleration switches some graphic-intense processes to the graphics card instead of running it on a CPU. But, this may throw up the DirectX error.
1. Open the Windows Settings.
2. Then, click on the “System” settings to access it.

3. In the System settings, click on the “Display” on the left-hand side pane.
4. After that, scroll down and click on “Advanced Display settings“.

5. You have to click on the “Display adapter properties for Display 1“.

6. Now, go to the “Troubleshoot” tab.
7. Click on “Change settings“.
8. Then, slide the ‘Hardware Acceleration:’ to “None“.
9. Click on “OK” to save the settings.
Once you have disabled the hardware-acceleration feature, try to launch the application again. This should fix the problem on your device.
Fix 4 – Update the DirectX
1. Press the Windows key+R keys together.
2. Then, write “dxdiag” and hit Enter.

This will open up the DirectXDiagnostic Tool on your computer.
3. Then, go to the “System” tab.
4. Next, check the version of the ‘DirectX version:’. If the version is below ‘9’, you have to update the DirectX version.

5. Similarly, go to the “Display” section.
6. Check for the ‘Direct3D Acceleration:’ is set to the “Enabled“.

7. Go to this DirectX End-User Runtime Web Installer.
8. Then, click on “Download” to download the installer.

9. Then, double click on the “dxwebsetup” to install it.

10. Click on “Next” and follow the on-screen instructions to install the latest version of DirectX on your computer.

Restart the system once. This will fix the problem with your computer.