Recently, there have been reports by users that they are seeing an error while trying to install DirectX on their system. DirectX is an important Application Programming Interface (API) that is required to run many multimedia and video applications on the Windows PC. It allows these applications to run smoothly by allocating RAM, Video memory space, and CPU access to them.
Possible causes for this issue are:
- Bad internet connection
- System requirements are not being met
- A problem with the latest Windows update
- You are trying to reinstall DirectX on your PC.
If you are also facing this issue on your Windows PC, then get along and read this article. Here, you will find a list of methods that can be used to overcome the issue with DirectX not installing on your system.
Fix 1 – Repair .Net Framework Using the Repair Tool
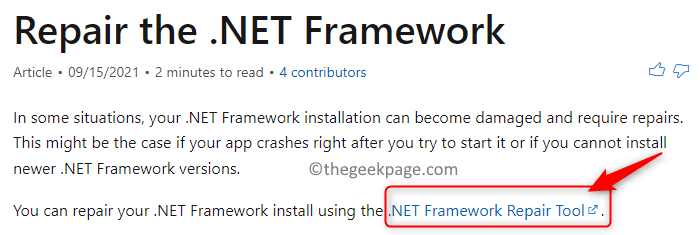
1. Go to Microsoft’s Repair .NET Framework page.
2. Here, click on the link .NET Framework Repair Tool to download the executable file.
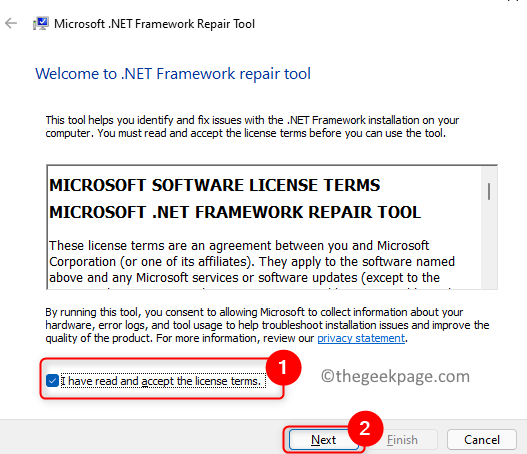
3. Once downloaded, double-click on the file and open it to run the repair tool.
4. Agree and accept the license terms. Click on Next.
5. Wait till it checks for any issue with the .NET Framework.
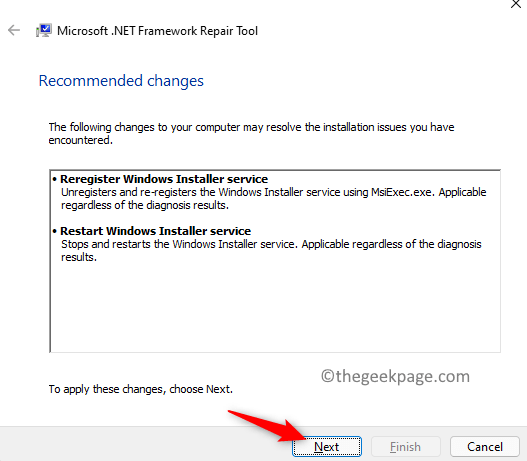
6. It will show any recommended changes that can help resolve the issue. Click on Next to apply these changes.
7. You can now check whether you are able to install DirectX on your PC.
Fix 2 – Check the Recommended System Requirements and the DirectX Version Installed.
At first, you need to check whether your system meets the recommended requirements for installing DirectX without any issues.
The requirements to install DirectX properly are as given below:
- Windows must be the 32-bit operating system
- Graphics Card must be compatible with the version of DirectX
- RAM and CPU must have enough space
- .NET Framework 4 must be installed
1. Press Windows + R to open Run.
2. Type ms-settings:about and hit Enter to open the System Properties page.
3. In the Device Specifications for the system, check whether it fulfills all the basic requirements for installing DirectX.
There are installation issues with DirectX if it is already pre-installed on your Windows PC. Follow the steps below to see if DirectX is present on your system and its version installed.
1. Hit the Windows key and type dxdiag in the search bar.
2. Click on dxdiag in the result to open the DirectX Diagnostic Tool. This means that DirectX is already installed on your PC.
3. Using the System tab, you can find out which version of DirectX is currently installed on your system.
Fix 3 – Install Previous Version of DirectX
At times, it is seen that the older versions of DirectX are needed for some programs running on your PC. In such cases, you need to install the previous version of DirectX manually.
1. Download the previous version installer from this link.
2. Save the file on your system.
3. Run the installer to install the older version of DirectX.
4. Restart your computer and check if the problem with DirectX is fixed.
Fix 4 – Reinstall the Graphics Card Drivers
1. Hit the Windows key and type Device Manager in the search bar.
2. Select Device Manager in the list.
3. Expand the Display adapters section in the list.
4. Right-click on your graphics card driver and click on Uninstall device.
5. Check the box next to Attempt to remove the driver for this device.
6. Click on Uninstall to confirm the uninstallation process.
7. Once you have the graphics card driver uninstalled, restart your PC.
8. On startup, Windows will detect the new device and install the latest drivers for the graphics card.
9. Check if DirectX is installing on your PC.
Fix 5 – Uninstall Previous Windows Update Related to DirectX
1. Use the Windows and R key combination to open Run.
2. Type ms-settings:windowsupdate and hit Enter to open the Windows Update page.
3. Here, select Update history in the More Options section.
4. In the Related settings, click on Uninstall updates.
5. You will see all the updates that have been installed. Here, you need to identify the update that is related to DirectX.
6. Right-click on that update and choose Uninstall.
7. Restart your computer after the update is uninstalled.
Fix 6 – Download and Install Visual C++ Redistributable Package
1. Click on the link to go to the Visual C++ Redistributable Package webpage.
2. Here, select the language and click on the Download button to get the setup file onto your system.
3. Choose the version to be downloaded based on your operating system specification.
- Check the box next to vc_redist.x64.exe if you have a 64-bit system.
- Check the box next to vc_redist.x86.exe for a 32-bit system.
Note: Using the steps in Fix 1 you can find out whether you have a 64-bit or 32-bit OS.
4. Click on Next.
5. Run the downloaded setup file.
6. Check the box next to I agree to the license terms and conditions. Click on Install.
6. Complete the installation of Visual C++ redistributable following the on-screen instructions.
7. Check if this resolved the issue with DirectX installation for you.
Fix 7 – Install the .Net Framework Using Command Prompt
1. Open Run dialog using the Windows and R key combination on your keyboard.
2. Type cmd and press Ctrl + Shift + Enter to open Command Prompt as an administrator.
3. Type the command below and hit Enter.
DISM /Online /Enable-Feature /FeatureName:NetFx3 /All /LimitAccess /Source:D:\sources\sxs
4. Wait for the command to finish execution. This will download the .NET framework and install it automatically.
5. Restart your PC and check if you are able to install DirectX without any errors.
Thanks for reading.
You will now be able to install DirectX on your Windows PC without encountering any errors during the process. We hope this article has been informative enough in resolving this issue for you. Let us know the fix that worked for you in the comments below.


