DHCP or Dynamic Host Configuration Protocol automatically and quickly designates and manages allocation of special IP addresses to different computer networks. It’s aim is to reduce any errors in the configuration like any address incompatibility issue, etc.
In short, your computer needs its own IP address to access the internet and DHCP does the job to automatically allocate IP address for your computer. This helps avoid manual entry of IP address and DNS for your computer each time. And so, when it’s not enabled, you may see errors like, ” DHCP is not enabled for Ethernet“, or ” DHCP is not enabled for WiFi” on your windows 11 or windows 10 PC. How is the DHCP disabled? It can get disabled due to outdated network driver, if you manually added IP address, or DHCP client server not running.
Fortunately, this can be fixed. Let’s see how.
Solution 1 : Through Control Panel
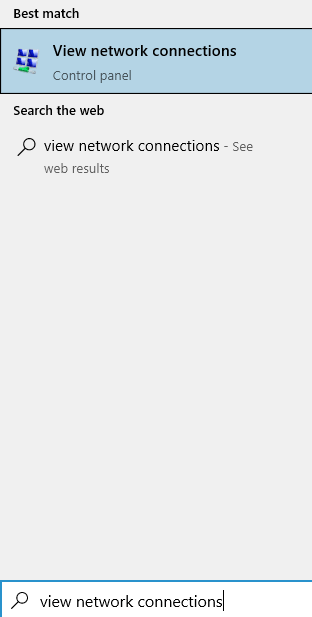
Step 1: Search View network connections in windows search.

Step 2 – Click on View network connections.
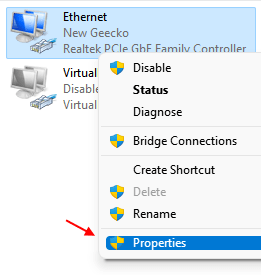
Step 3 – Now, right click on your Ethernet adapter.
Step 4 -Click on Properties.

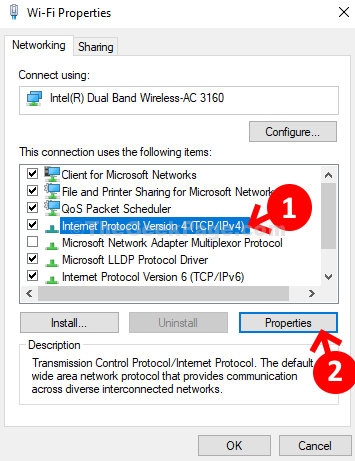
Step 5: In the Wi-Fi Properties dialogue box, go to the “This connection uses the following items section“. Now, select Internet Protocol Version 4 (TCP/IPv4) and click on the Properties button.

Step 6: In the next window, select the radio button next to Obtain an IP address automatically and also click the radio button next to Obtain DNS server address automatically. Now, press OK to save the changes and exit.

Now, you can try running the internet troubleshooter again and fix the issue. It will detect the problem ad select Apply Fix the issue automatically. You can now, start working on with your internet connection once again.
Solution 2 : Start DHCP Client Service
1- Press Windows key + R key together to open run.
2 -Now, write services.msc in it and click OK.

3 – Now, Locate DHCP client
4 – Now, double click on DHCP client service.
5 -Make sure that it is running , if not then click on start to start the service.
6- Also, set startup type to automatic.

Solution 2 : Reset Network
1- Press Windows key+ R key together to open run.
2- Now, type cmd in it and click OK.

3- Now, Press CTRL + SHIFT + Enter keys together to open command prompt as admin.
4 – now, type the commands given below one by one and hit enter key.
ipconfig /flushdns
ipconfig /renew
Now, restart PC and try again.
Solution 4 : Restart the router
1 – Turn off your router
3 -Wait for 30 seconds
4 – Start your router again and Try again
If this does not work, then Try to disconnect other devices from the WiFi and let your device connect only to the router. Some routers have a device limit about how many devices can connect to them.