Have you every thought why your big downloads which takes a bit more time, get interrupted and you have to keep it for downloading once again? Well! DHCP lease time is to blame here. DHCP is a dynamic protocol set by the router server which is configured that renews the DHCP lease time after certain intervals. Every device that is connected to the Wi-Fi router gets s dynamic IP address and this is needed to connect to the internet. But after certain time set in the router configuration, your device’s IP address is changed or renewed. This is the cause for fluctuation of internet connection which leads to downloads interruption. In this post, we are going to show you how you can check the lease time details and renew it and change it using router configuration settings on your Windows 11 system.
Check DHCP Lease Time details using Command Prompt
Step 1: Press Windows + R keys on your keyboard to open Run dialog box.
Step 2: Then, type cmd in the run box and press CTRL + SHIFT + ENTER keys on your keyboard to open Command Prompt as admin.
Step 3: Accept the UAC prompt by clicking Yes to continue.

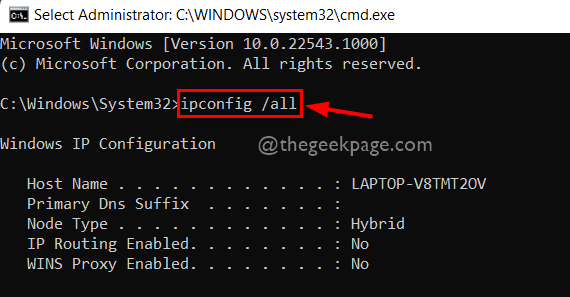
Step 4: Type ipconfig /all in the command prompt and hit the Enter key to see all the network adapter’s configuration details as shown below.

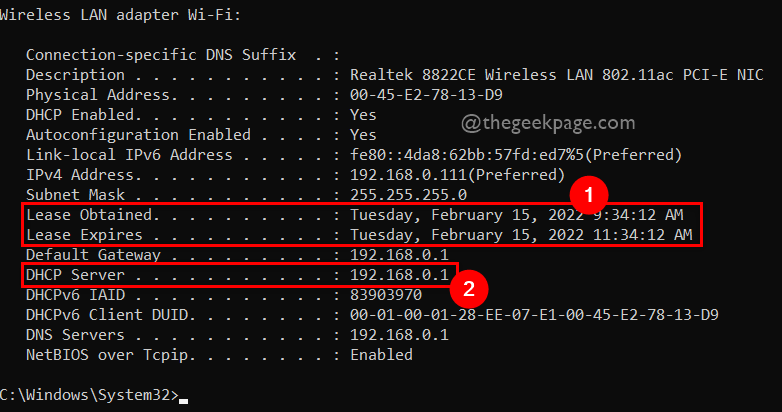
Step 5: Scroll down the command prompt output and see Wireless LAN adapter Wi-Fi‘s details as shown below.
Step 6: Here Lease Obtained is the time when the new IP address is set to the device by the router.
Step 7: Lease Expires is the time when device releases its ip address. Also, DHCP Server is the ip address of the router which is used to login as an admin to change its configurations.

That’s all.
How to Renew the DHCP Lease time
Sometimes, the user will not be having any details or he is not authorized to change the router configuration settings. Therefore, renewal of DHCP lease time can be helpful before starting any downloads because most of the time, router lease time is set to 2 hours (120 minutes). Here are a few simple steps on how to do it.
Step 1: Press Windows + R keys on your keyboard to open Run dialog box.
Step 2: Then, type cmd in the run box and press CTRL + SHIFT + ENTER keys on your keyboard to open Command Prompt as admin.
Step 3: Accept the UAC prompt by clicking Yes to continue.

Step 4: Type the below given command and press the Enter key to execute it as shown below.
ipconfig /release | ipconfig /renew

Step 5: After renewing the DHCP lease time, execute ipconfig /all command to see the details of the DHCP Lease time on your system as shown below.

Step 6: In the below shown screenshot, you can see the Lease Obtained and Lease Expires time is renewed.

Step 7: You can now close the Command prompt.
That’s all.
How to Change DHCP Lease Time
NOTE : The DHCP Lease time change using Router credentials needs the credentials of the admin of your router. Please continue reading if you have username and password for the admin of your wi-fi router.
Step 1: Open a new tab on your browser.
Step 2: Copy and paste the ip address (192.168.0.1 ) and press the Enter key to reach the home page of the router.
NOTE : 192.168.0.1 which is mostly common for most of the router. If you want to know or confirm the IP address of your router, please follow few steps given below.
- Open Command Prompt as admin by pressing Win + R for launching Run box and type cmd and press CTRL + SHIFT + ENTER keys.

- Then, Execute ipconfig /all in the command prompt and see the DHCP Server details which is the ip address of your router.

Step 3: After reaching the router homepage in the new tab, Enter the Username and Password of the router to login by clicking on Log In button as shown in the below image.

Step 4: After logging in, go to DHCP at the left side panel of the router configuration.
Step 5: Then, make sure DHCP Settings option is chosen which is just below DHCP as shown below.

Step 6: On the right side of the page, you will get to see the DHCP settings page.
Step 7: Look for Lease Time field and update it to time length in minutes.
NOTE: The default is set to 120 minutes i.e., 2 hours.
Step 8: Once done, you need to click on Save button to change the Lease Time settings for your router as shown in the below screenshot.

Step 9: Close the router page tab if you want.
This is how you can change the DHCP lease time for your wi-fi router on your windows 11 system.
That’s all guys. Hope you found this post informative and helpful.
Please let us know in the comments section below which one you found useful.
Thank you!