How many times you have tried to print your document and found out that the printer you were using earlier is set to default instead of your regular one? Like you, many other users are also complaining about this issue on their system. There is nothing to worry about this small issue. Just enact these exact steps on your computer to solve the problem very easily.
Fix 1 – Modify printer settings
You can disallow Windows from setting up the default printer device on your computer.
Step 1 – Adjust settings
1. First of all, press the Windows key+I keys together to open the Settings.
2. Then, click on the “Devices” settings.

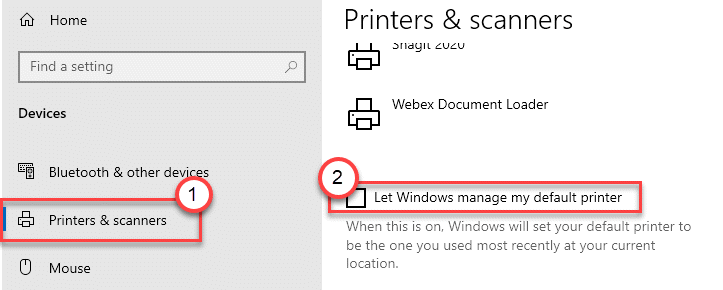
3. In the Devices settings, click on the “Printers & scanners” settings on the left-hand side.
4. Then, uncheck the “Let Windows manage my default printer” setting.

This will prohibit Windows to set any random printer as default.
For Windows 11 Users
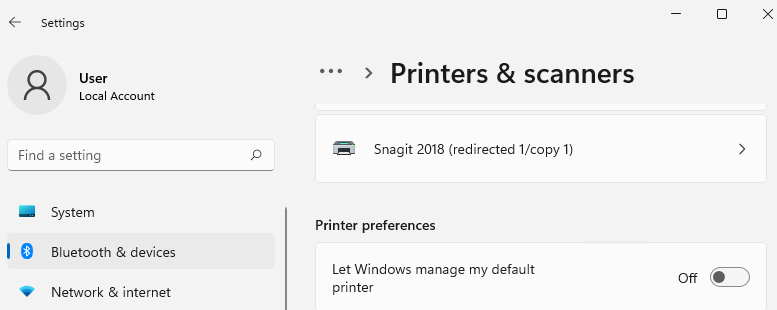
1 – Open settings by pressing Jointly Windows and I key
2 -Now, Click on Bluetooth & Devices
3 – Click on Printers & Scanners
4 – Turn Off Let windows manage my default printer

Step 2 – Set the printer to the default device
Now, you have to set the printer of your choice to default settings. There are two methods to do this –
Method 1
1. Right-click on the Windows key and click on “Run“.
2. Type “control printers” and hit Enter.

3. Here you will see your printer device.
4. Right-click on the printer device that you want to set as default and click on “Set as default device“.

That’s it! The printer will set to default and won’t be changed automatically.
Method 2
You can set the printer as the default device by following another method.
1. Open the Settings window.
2. After that, click on the “Devices” settings to modify it.

3. Now, click on the “Printers & scanners” settings.
4. After that, on the left-hand side, click on your printer to select it.
5. Next, click on “Manage“.

6. Then just click on “Set as default“.

This way you can set the printer to default settings.
Fix 2 – Adjust the LegacyDefaultPrinterMode key
If adjusting the settings didn’t work out for you, try modifying the registry.
1. At first, just press the Windows key+R keys together.
2. Then, type “regedit” and click on “OK“.

NOTE –
Once you have opened the Registry Editor, click on “File“. Then click on “Export” to make a new backup on your computer.

In case if anything goes wrong while altering the registry, you can easily retrieve the registry.
3. Next, proceed to this location on the Registry Editor screen –
HKEY_CURRENT_USER\SOFTWARE\Microsoft\Windows NT\CurrentVersion\Windows
4. Now, on the right-hand side, double click on “LegacyDefaultPrinterMode“.

5. Then, set the ‘Value data:’ to “1“.
6. Finally, click on “OK” to save the change.

After doing all the steps, you can close the Registry Editor screen. Restart your computer once to let the changes take effect.
Windows will not interfere with your default printer settings. This should have fixed your problem.
Fix 3 – Delete old printer settings
If changing the value of the key didn’t work out for you, try deleting the printer settings key.
1. Press the Windows key+R keys together.
2. Here “regedit” and hit Enter key to access the Registry Editor window.

3. After you have opened it, just go to the location –
Computer\HKEY_USERS\%User SID%\Printers\Connections
4. Right-click on any printer connection and click on “Delete“.

NOTE –
In the Computer\HKEY_USERS header, you will notice several SIDs on your computer.
The longest SID key is your current SID.
(Example – In this computer, the actual user SID is “S-1-5-21-3620773455-1947684263-1023720982-1002” as it is the longest in length. )

4. After that, go to this location –
Computer\HKEY_USERS\%User SID%\Printers\Settings
5. On the right-hand side you will notice a number of printers you have connected with your system.
6. Now, right-click on each of the printer keys (those you don’t want as your default printer) and click on “Delete” to remove all the unwanted printer keys.

Once you have done that, close the Registry Editor screen. Restart your computer.
This will solve your problem for sure.