How to create shortcut for creating system restore point in Windows and create restore point with single click: – So there is this new game that you so badly want to try on your system. But most of your friends tell you that their systems crashed right after the installation of this new game. But some of your friends had positive experiences as well. This is what leaves you in dilemma. You definitely want to give it a shot, but at the same time you are afraid to endanger your system’s stability. Well, System restore is totally the feature that you are looking for, here. Even after the trouble-maker software is removed, sometimes the sytem remains in the unstable state. System restore does the function of restoring your computer system files to an earlier point of time, which was mostly stable. You need not worry about any of your personal files like documents, photos etc being altered as these are let untouched by the System restore. Read on, to learn how to do a system restoration with just a single click.
STEP 1
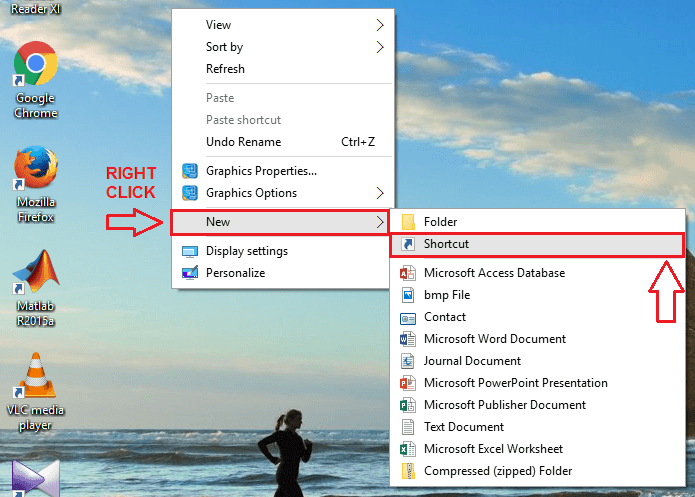
- Right click in an empty space on your Desktop to discover the context menu. We need to create a shortcut item. For that, click on New and then on Shortcut.
STEP 2
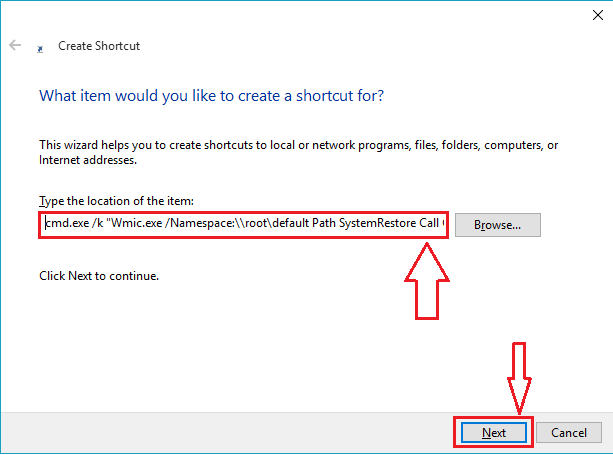
- As next, we need to give a destination location for the shortcut just created. For that, type in the following path in the text filed named Type the location of the item.
cmd.exe /k "Wmic.exe /Namespace:\\root\default Path SystemRestore Call CreateRestorePoint "%DATE%", 100, 7"
STEP 3
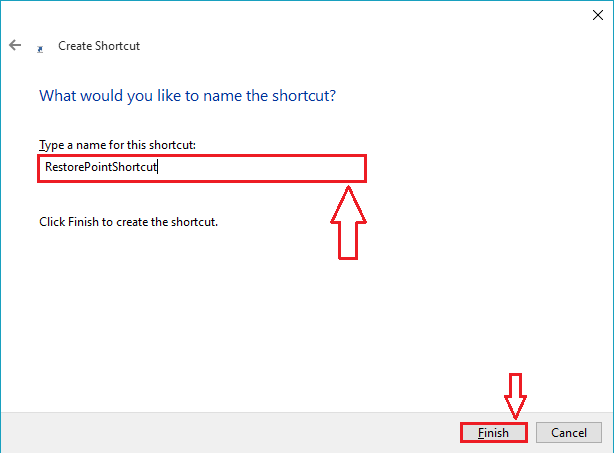
- Next a name is to be given for the shortcut. Type a name of your choice under the text field named Type a name for this shortcut. Once you are done, click on Finish button for the changes to take over.
STEP 4
- Now if you have a look at your Desktop, you will see that the new shortcut has been created successfully.
STEP 5
- As next, right click on the newly created shortcut to find and click on Properties from the context menu.
STEP 6
- This results in the opening up of a new window for customizing the properties of the newly created shortcut. Click on the tab named Shortcut. Down there, you will find a button named Advanced. Click on it.
STEP 7
- A new window named Advanced Properties opens up. Check the cell corresponding to Run as Administrator option. Finally, click on Apply and OK buttons for both the Windows.
STEP 8
- To create the restore point, now you just need to give a double-click on the shortcut icon just created. That will result in the opening up of a command prompt window as shown in the following screenshot. The statement Method execution successful indicates that you have successfully executed the steps to create a system restore point.
If you are someone who uses the feature of system restoration every now and then, you definitely wouldn’t want to go through a 100 clicks every single time when you want to restore your system to a stable point of time. Hope the article was found useful.


