Microsoft Store has a feature that allows users to store the appdata of applications (mainly, the games that are very large in size) in separate locations. But while setting up the default location to download your favorite game you may notice this error message – ‘We couldn’t set your default save location. Error code – 0x80070005‘. This problem usually occurs due to the absence of proper permission for the particular folder (WindowsApp folder in this case).
Workaround
1. Log in to your system using an administrative account. Then, try to set the default location in MS Store again.
2. If trying to set an external device as the default storage, make sure it is properly connected.
Fix 1 – Rename the WindowsApps folder
Renaming the WindowsAppds folder should fix the issue.
1. Press the Windows key+E keys to open the File Explorer screen.
2. Next, click on “View” on the menu-bar.
3. Then click on “Options“.

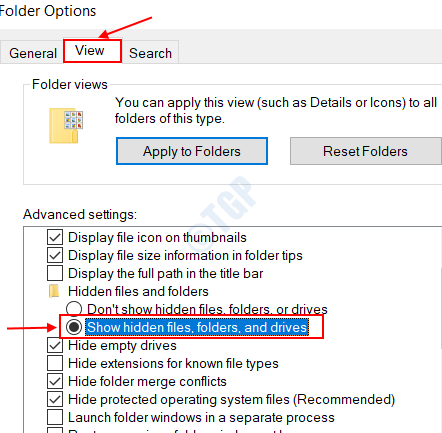
4. In the Folder Options window, go to the “View” tab.
5. Henceforth, check the option “Show hidden files, folders, and drives“.

6. After that, click on “Apply” and then on “OK“.

Now you can see the hidden folders on your computer.
7. Go to this location in the File Explorer –
C:/Program Files
8. Check out the “WindowsApps” folder.
9. Right-click on the folder and then click on “Rename“.

10. Name the folder as “WindowsAppsOld“.

11. If there is a prompt, click on “Continue“.
Close the File Explorer. Then, try to set the default location for the files on your computer.
Windows won’t recognize the folder and create a fresh one in the process. This will fix the issue for sure.
Note: – If it does not work, restart your PC in safe mode and then delete the WindowsApps folder. Now, start your PC normally.
Fix 2 – Own the WindowsApps folder
One of the reasons this problem may occur is if the WindowsApps lacks proper permission.
1. Press the Windows key+R keys together.
2. Then, paste this address and hit Enter.
C:\Users\%username%\AppData\Local

3. Once the Local folder opens, right-click on the “Packages” folder and click on “Properties“.

4. After that, go to the “Security” tab.
5. Then, click on “Advanced” to check the advanced settings.

6. You will see that the current owner of the folder is ‘TrustedInstaller’.
7. To change it, click on “Change“.

8. Then, click on “Advanced“.

9. To view the list of groups., just click on “Find Now”
10. Here you will find a list of users and groups. Scroll down through the list of groups or users and select your user name.
(For me, it is “Sambit” as it is my account name. )
11. Click on “OK“.

10. Finally, click on “OK” to alter the ownership.

11. Now, check the box beside “Replace owner on subcontainers and object“. Click on “Apply” to save the changes up to this point.

12. Now, you have to give full control of the folder to your account.
13. You have to choose a principal. Click on “Add“.

13. After that, click on “Select a principal“.

14. Again, click on “Advanced“.

14. Again, click on “Find Now“.
15. Next, scroll down and select your user name. (For this computer it is “Sambit“.)
16. Save the change by clicking on “OK“.

17. Click on “OK” to add this object.

18. Next, check the box beside the “Full control” option.
19. Then, click on “OK“.

20. Finally, click on “Apply” and then on “OK“.

21. In the Advanced Security settings click on “Enable inheritance“.

22. Coming back to the Advanced Security settings, click on “Apply” and “OK” to save it.

Close File Explorer screen. Restart your computer.
NOTE–
If you are still seeing the issue on your computer, follow these instructions –
1. First of all, open File Explorer.
2. Then, go to this location –
C:/Program Files
3. Next, right-click on the “WindowsApps” folder and click on “Properties” to modify it.

4. Now, follow the instructions mentioned in step – 4 to step – 22 of Fix 2 to own the folder.
This will solve the problem for sure.
Open the Store window and try to set the default location on your system. The error message won’t appear further.