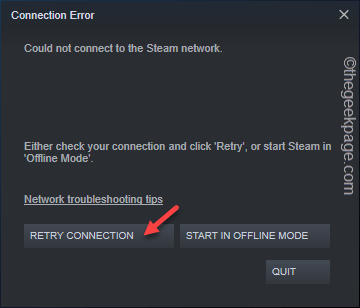
When the Steam client on your computer can’t connect to the Steam servers, the “Could not connect to the Steam network” message appears on the client page. This can be a server-side issue or an issue with your network as well. Whatever the reason, you must solve it and go online to enjoy the games fully.
Workarounds –
1. The first and foremost thing you should try is to tap on the “RETRY CONNECTION” option to retry reaching Steam. Usually, if some bugs or glitches have caused this problem, this may fix it.
2. Just restart your PC from where you are. A simple system reboot may help you resolve the problem.
Fix 1 – Close and relaunch Steam
If you can’t reach Steam at all, we suggest you force-exit Steam and relaunch it.
1. Close the Steam prompt.
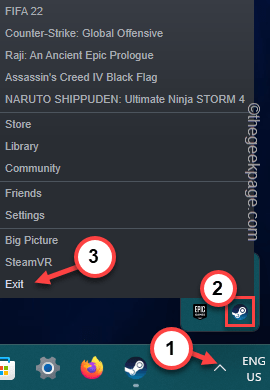
2. Then, click on the arrow sign on the taskbar and right-tap the “Steam” icon, and tap “Exit“.
This way, you can completely close Steam. Wait for a few seconds as Windows terminates all the running Steam processes.
Then, double-tap Steam to open the Steam client on your computer. Wait for it to load up. Now, test if this works.
Fix 2 – Add TCP to Steam client
Add the TCP to the Steam application shortcut.
1. At first, you have to open the Task Manager.
2. Right-tap the Windows icon and tap “Task Manager” to open it.
3. Then, look for any Steam processes. Just, right-tap the Steam process there and tap “End task” to terminate it.
3. This way, kill all the Steam processes one by one. Make sure not even a single Steam process is running.
After this, close Task Manager.
4. Now, go back to your Desktop and look for the “Steam” shortcut.
5. Then, right-tap that icon and tap “Properties“.
6. Head on to the “Shortcut” tab.
7. After that, go to the end of the “Target:” box. There, put a space and write this
-tcp
8. Then, click “Apply” to apply the change.
8. A warning message may appear on your screen. So, tap “Continue“.
9. Finally, click “OK” to save the changes.
After this, launch Steam and check.
Fix 3 – Turn off the firewall
A firewall on your system can block incoming or outgoing connections to the Steam client.
1. At first, press the Win key and the R keys together.
2. Then, write this in the box and hit Enter.
firewall.cpl
3. This will take you Firewall page in Control Panel.
4. There, on the left-hand pane, tap the “Turn Windows Defender Firewall on or off” feature to access that.
5. Now, here you can find the Private network settings and Public network settings.
6. Next, choose “Turn off Windows Defender Firewall (not recommended)” for both network types. If you know which network type you are using, you can change it specifically as well.
7. Finally, tap “OK“.
Next, try to reach Steam as well. Check if this helps.
Fix 4 – Check the Steam server status
First, test, whether the Steam servers, are up or taking a maintenance break. You can easily do it from SteamStat. It not only shows the current status of the Steam client, along with the state of the Steam community, Dota 2, TF2, CSGO, etc.
Fix 5 – Continue in Offline mode
If you can’t just go online, you can continue to use Steam in offline mode.
1. Launch Steam, if you have closed it already.
2. Wait for the Steam updater package to complete the package update check and then, if you see this option, tap “START IN OFFLINE MODE” to start it in Offline mode.
Now, Steam should start in offline mode. In this mode, you can’t access any online features of Steam as well as can’t play any games online.
3. When Steam launches in offline mode, tap “Steam” on the menu bar and tap “Go online“.
4. When you see the prompt, tap “LEAVE OFFLINE MODE” to leave the offline mode of Steam.
Now, close the Steam client and reconnect to the network.
Then, restart Steam and check whether you can go online or not.
Fix 6 – Clean the Steam client
You can force-repair Steam as it always performs an integrity check before it launches. So, just follow these steps to repair it.
1. Go to the Desktop.
2. Now, right-tap the “Steam” client and tap “Open file location” to directly reach the Steam installation directory.
3. Once you reach that, delete these folders from there.
Steamapps

Userdata

Skins

Steam.exe

Ssfn files
4. After this, go to your desktop and launch Steam again. When you do so, Steam will automatically fix the Steam package and test.
Check if this solves your problem.
Fix 7 – Change the network adapter setting
Change the network adapter setting and fix it.
1. Open a Run box by pressing the Win key and the R keys together.
2. Then, type this in the box and hit Enter.
ncpa.cpl
3. When you reach the list of networking devices, look for the network device you are using currently.
4. Then, right-tap the network adapter and tap “Properties“.
4. Then, select the “Internet Protocol Version 4 (IPv4)” properties to access it.
5. Next, tap “Properties” to open that.
6. Now, don’t change the IP settings.
7. So, choose the “Use the following DNS server addresses:” box.
8. Then, set the DNS servers this way –
Preferred DNS server -1.1.1.1

Alternate DNS server -1.0.0.1
9. Finally, tap “OK” to save it.
Now, close all the windows that you have opened and test. Check if this solves the network issue you are facing.
Fix 8 – Flush the DNS setting
Clearing out the DNS cache may resolve this situation.
1. At first, press the Win key and write “cmd” in the elevated search box.
2. Then, right-tap the “Command Prompt” in the search results and then, tap “Run as administrator” to open the terminal as an administrator.
3. On the terminal page, write down all these codes one by one and hit Enter to run the commands.
ipconfig/release
ipconfig/all
ipconfig/flushdns
ipconfig/renew
netsh int ip set dns
netsh winsock reset
After that, close the Command Prompt window. You must restart the system after this.
Then, try reconnecting Steam once more.
Fix 9 – Use the internet troubleshooter
If you still can’t solve the internet connection issue in Steam, you can run the internet troubleshooter and test it.
1. You can directly reach Settings using Win key+I keys together.
2. Then, tap “System” on the left-hand pane.
3. After that, click “Troubleshoot” to open it.
4. Then, tap “Other troubleshooters” to find the complete list of troubleshooters.
5. Next, look for the Internet Connection troubleshooter.
6. There, tap “Run” to run it.
Follow the steps on the troubleshooter and fix the network issue.
Fix 10 – Reset the Network
Resetting the network comes at the end of the rope when nothing else works.
1. Write “network reset” in the search box.
2. Then, tap “Network reset” in the search results to open it.
3. This will directly lead you to the Network Reset page in Settings.
4. Once you are there, tap “Reset now” to reset it immediately.
5. Next, tap “Yes” to completely reset the network.
After this, close Settings and relaunch Steam. Test if this works out for you.


