In order to make changes to system files or folders under the root C drive like replacing or deleting or renaming, you will need to have ownership of the drive. It is seen that from Windows 7 onwards, TrustedInstaller owns the system files and folders. Even the Administrator group members are not allowed to make modifications or change any permissions unless they have ownership. If you want to gain full access permissions to files and folders in C Drive, then you need to take ownership, auditing, and effective access control of the drive.
If you are looking to make modifications to your C drive and don’t have the full permissions to do so, then read this post. Here, we have detailed the method to gain full access permission to C Drive on your Windows PC.
Steps to Gain Full Access Permissions to C Drive
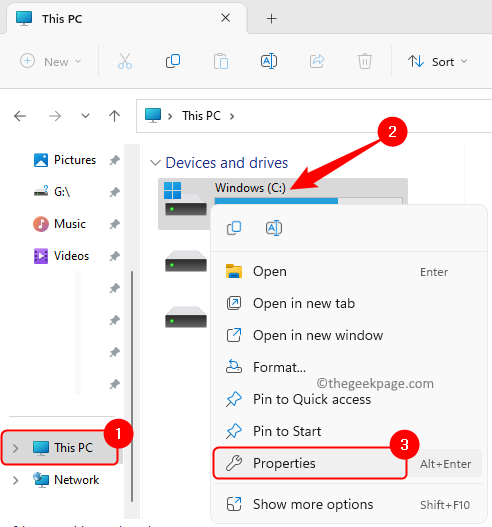
Step 1. Open your File Explorer (Windows + E).
In the left pane, click on This PC.
Step 2. Now, right-click on your C Drive (here it is Windows (C:)) and choose Properties.
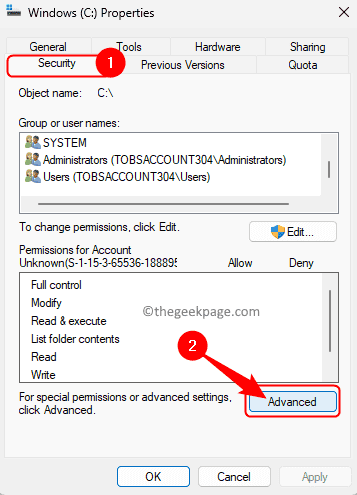
Step 3. In the Properties window, go to the Security tab.
Click on the Advanced button at the bottom of the window.
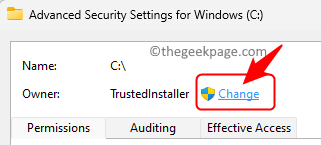
Step 4. In the Advanced Security Settings window, click on the Change link next to the Owner TrustedInstaller.
Step 5. Click on the Advanced button in the Select User or Group window.
In the window that opens, click on Find Now.
Scroll and select your user account from the search result listed below.
Note: If you select Users then all users of your PC will have access and if you select Everyone then every user and TrustedInstaller will have full access permission.
Then, click on OK.
Step 6. You will see your user account in the box below Enter the object name to select.
Click on OK.
Step 7. Back in the Advanced Security Settings window, you will see that the Owner has changed to your user account.
Check the box next to Replace owner on sub-containers and objects below Owner.
Also, check the option Replace all child object permission entries with inheritable permission entries from this object.
Step 8. Click on Apply.
Then, click on Yes in the Windows Security dialog.
Note: If you see any prompts indicating Error Applying Security as some system files will not be having access, then click on Continue.
Wait for some time until this process completes.
In between this process if you see any prompts saying that the permissions will be replaced, then click on Yes.
Step 9. Click on OK once the ownership of the object has been transferred to the user.
You will see your user account in the Permission entries with Full control access.
Click on OK to close the Advanced Security Settings window.
Step 10. Now you will be in the Security tab of the C Drive Properties window.
Click on the Advanced button to open the Advanced Security Settings window.
Step 11. Go to the Auditing tab.
Then, click on Continue to view the auditing properties of the object.
Step 12. Now, click on the Add button at the bottom.
Step 13. In the Auditing Entry window, click on the Select a principal link next to Principal.
Step 14. Here, you have to enter your user name in the box below Enter the object name to select.
Click on the Check Names button.
Then, click on OK once you see your user account name.
Note: You can follow Step 5 above if you are not sure of your user account name.
Make sure that you add the same user account that you added in the permissions above.
Step 15. Back in the Auditing Entry window, check the box next to Full Control under Basic permissions.
Then, click on OK.
Step 16. Click on Apply in the Advanced Security Settings window.
If you see any prompts indicating Error Applying Security, then click on Continue.
Once this process is done, you will see your user account in the Auditing entry.
Step 17. Select the Effective Access tab.
Click on Select a user link next to User/Group.
Step 18. Follow the same process as indicated in Step 14 to add your user account.
Step 19. Once the user account is added, click on the View effective access button.
It will list all the permissions available for the user account that you have selected.
Click on OK.
Step 20. Go back to the C drive Properties window and select the Security tab.
Here, click on the Edit button to change the permissions.
In the Permissions window, click on Add.
Enter the same user account as mentioned in Step 14 or Step 5 above.
You will see that the user account has been added and has full access.
Click on OK to close all the windows one after the other.
Using this method you will have full access permissions to the C Drive for your user account or any other target user account. You can verify this by going to C:\Windows\System32 and trying to delete any system file from here.
Did you find this article informative enough in gaining full access permissions to the C Drive on your Windows PC? Please let us know your thoughts and opinions on the same in the comments section below.


