Microsoft introduces a variety of new features every time they release an upgraded version of the Windows operating system and one of the features is Color calibration. This is predefined in the windows system and the users need not download any third-party tool. The user can adjust the colours, brightness, contrast, and gamma of the display as per their requirement.
But recently some windows users reported that the adjustments made in the colour calibration tool keep getting reset all the time. For a few other windows users, the color calibration settings get reset every time the screen is refreshed.
If this is the problem that keeps happening in the system, the user cannot completely utilise the great feature of color calibration on their windows system. As per our research on this issue, we came to know about these findings and which are listed below.
- There might be some software which is a third-party tool already installed on the system for color adjustments.
- An outdated graphics driver.
- Calibration properties get scheduled every time the system restarts.
- The Windows display calibration option is disabled.
We are here with some great fixes in this article, which will assist you in resolving this problem if you are also facing it.
Fix 1 – Enable Use Windows display calibration setting
The user might have made the custom adjustments as per their requirements and created different profiles for many users. But we need to enable the setting in the color management wizard which lets the system know that it has to use the windows display calibration set by the user. If this setting is disabled by any chance, it might cause the color calibration to reset every time.
Here are the steps below on how you can enable windows display calibration using the color management wizard.
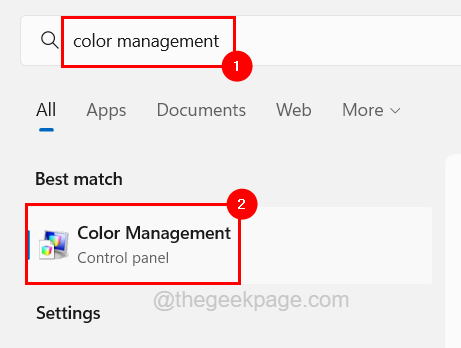
Step 1: To open Color Management, press the Windows key and type color management.
Step 2: Next, select Color Management from the search results by clicking on it as shown in the below screenshot.

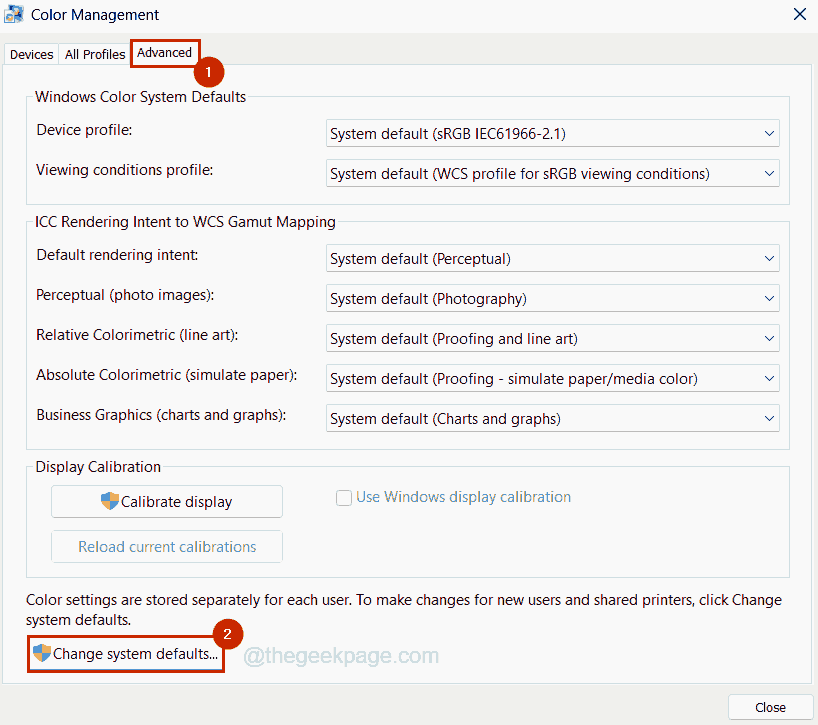
Step 3: Once the Color Management window opens, go to the Advanced tab option as shown in the below screenshot.
Step 4: Then click the Change system defaults button present at the bottom of the Color Management window.

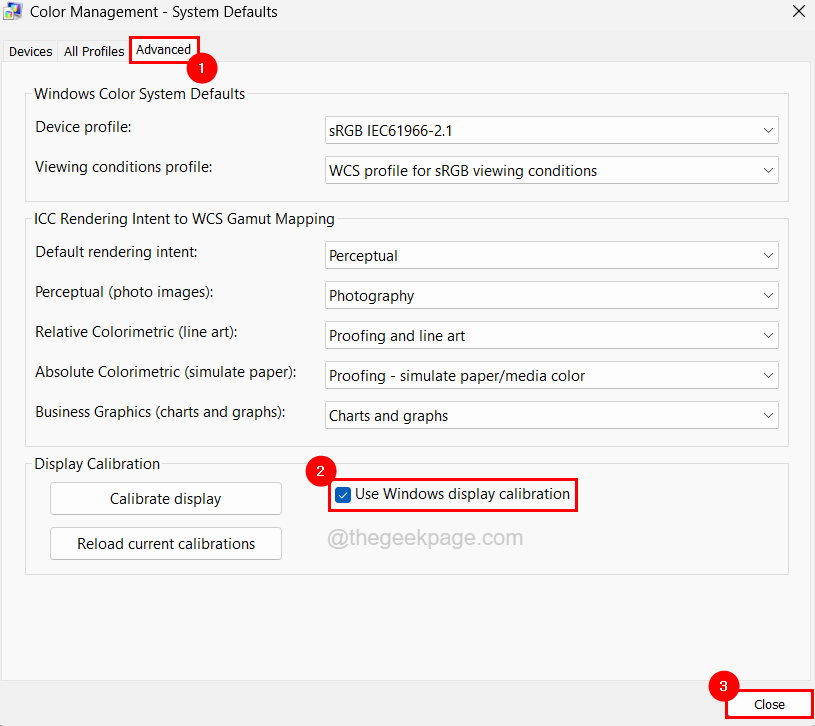
Step 5: This will open the Color Management – System Defaults window.
Step 6: Click the Advanced tab and under the Display Calibration section, click on the Use Windows display calibration checkbox to select it.
Step 7: Once done, click Close.

Step 8: Finally, close the Color Management window on the system.
Fix 2 – Uninstall any third-party software for display calibration
The system always prefers to give first priority to the third-party tool/software for any purpose. If the users have installed any display calibration tool from some reliable third-party sources like Nightlight, F.lux, QuickGamma, Calibrize and so on, the system will prioritize it first over the windows default display calibration feature.
Therefore, we suggest our users uninstall or disable the third-party display calibration software installed on the windows system.
Follow these steps on how to uninstall them.
Step 1: Press the Win+R keys together to open the Run command box.
Step 2: Then type appwiz.cpl in it and press Enter key.

Step 3: This opens the Programs and Features wizard.
Step 4: Locate the display calibration software from the list of programs in the wizard, like f.lux, etc. and select it.
Step 5: After selecting it, click Uninstall on top as shown below.

Step 6: Please follow the on-screen instructions to perform the software uninstallation.
Step 7: After the software is completely uninstalled successfully, close the Programs and Features wizard.
Fix 3 – Use NVIDIA’s control panel to set Color calibration
This can be the alternate solution for those users who are having NVIDIA graphics cards installed on their windows system. The NVIDIA graphic card comes along with the NVIDIA control panel installed on the system.
Just like how the system prioritizes third-party tools over windows, the same goes with the NVIDIA control panel. The system retains the setting adjustments done to color, brightness, etc. by the user in the NVIDIA control panel.
So we suggest users with NVIDIA graphics cards adjust their color calibration requirement using the NVIDIA control panel instead of the default windows color calibration feature.
Fix 4 – Disable the Calibration Loader Schedule
The calibration loader properties is a schedule set in the task scheduler window, which resets the color calibration on the system every time the system restart and the users log in. So if this calibration loader is disabled for, At log on and On connection to user session, this problem could be resolved easily.
Let us see how this can be done using the task scheduler tool on your system using the steps below.
Step 1: Open the task scheduler on the system by pressing the Windows key and typing task scheduler.
Step 2: Then select the Task Scheduler from the search results as shown below.

Step 3: After the task scheduler opens, browse to the WindowsColorSystem folder on the left side of the window using the path given below.
Task Scheduler Library > Microsoft > Windows > WindowsColorSystem
Step 4: Upon selecting the folder WindowsColorSystem, you can see the Calibration Loader scheduler on the right side of the window.
Step 5: Now open the Calibration Loader properties window by right-clicking on it and selecting Properties from the context menu.

Step 6: In the Properties window, click the Triggers tab and double-click on At log on from the list of triggers.

Step 7: In the Edit trigger window, uncheck the Enabled checkbox at the bottom and click OK.

Step 8: Now make sure you are still in the Triggers tab and then double-click on the On connection to user session from the triggers list.

Step 9: Disable it by unchecking the Enabled checkbox and clicking OK.

Step 10: After it is done, close the Task Scheduler on the system.
Fix 5 – Update the Graphics Driver using Device Manager
Some windows users have claimed to resolve this issue by simply updating the graphics driver on the system. So let us also try this method by updating the graphics driver using the device manager as explained in the steps below.
Step 1: Press the Win+X keys together and then press the M key once.
Step 2: This opens the Device Manager window on the system.
Step 3: Now expand the Display adapters option by double-clicking on it.
Step 4: Then right-click on the graphics driver and select Update driver from the context menu as shown below.

Step 5: Next click the Search automatically for drivers option and this will start checking for any new updates for the graphics driver.

Step 6: After it finishes updating, close the device manager.
Step 7: If this did not work out, you can roll back to the older version of your graphics card by downloading it manually from its website and installing them on your system.
Step 8: After doing so, please restart the system once and see if this helped.