You are browsing the internet and you want to open a website, when all of a sudden you see an error message, “Your clock is ahead“, or “Your clock is behind“. It fails to load the website due to this error that can be either due to incorrect date and time settings on your PC, or it may show the error despite the date and time being correct.
This can be frustrating, especially when you want to browse something really important. However, this can be fixed quite easily. Let’s see how.
Method 1: Make sure you are on Correct Time & Time Zone
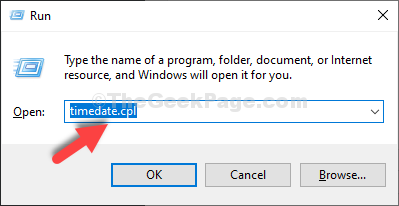
Step 1: Press the Windows key + R together on your keyboard to open the Run command box. Now, type timedate.cpl in the search field and hit Enter.

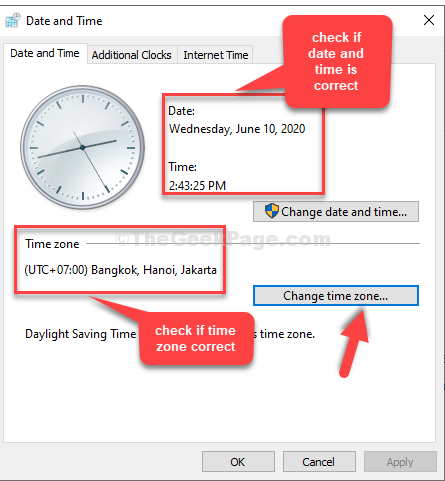
Step 2: In the Date and Time window that opens, you can check if the Time zone, Date and Time are correct. If the Time zone shows incorrect, click on the Change time zone button to select the correct time zone.

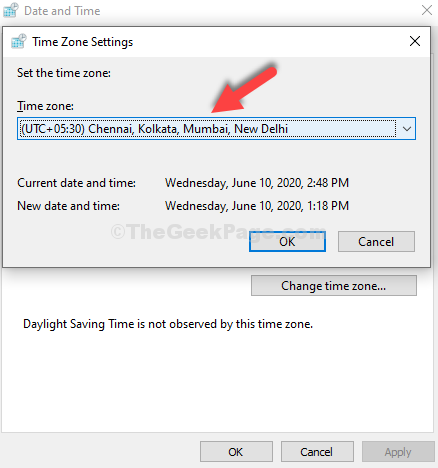
Step 3: In our case, the Date, Time, and the Time zone is showing incorrect. Select the correct time zone from the drop-down list and press OK.

Step 4: Now, back in the Date and Time window, click on the Change date and time button.

Step 5: Now, set the current date and time of your country here. Press OK to save the changes.

Now, you can go back and try loading the website again. It should work fine. But, if problem persists the 2nd method.
Method 2: Turn on Set time Automatically option
1 – Press Windows key + R key together to Open RUN command box.
2 – Type ms-settings:dateandtime in the ext field and click OK.

3 -Now, turn on Set time automatically.

Method 3: Update through a different time server
Step 1: Follow the Step 1 in Method 1 to open the same Date and Time window. Now, click on the Internet Time tab.
Click on the Change settings button.

Step 2: In the Internet Time Settings window, check the box next to Synchronize with an internet time server, and set the Server field to time.windows.com. Note that , if time.windows.com is already selected there , choose time.nist.gov.
Step 3 – Click on Update Now.

Step 4 – Click OK to save the changes. Click OK again in the Date and Time window to exit.
Method 4: By Trying With Different Time Zone
Step 1: Repeat the Step 1 and Step 2 as shown in Method 1. Now, select a different time zone from the drop-down list that’s closest to your country.
For instance, we selected here (UTC-08:00) Pacific Time (US & Canada).

Now, change the date and time settings as shown in the Step 4 and Step 5 in Method 1.
You can also try the 3rd method for automatic Date, Time, and Time Zone settings.
Method 5: Clear Chrome Browsing data
1 -Open Chrome Browser
2 -Now, Press CTRL + Shift + Delete Keys from your keyboard together at once.
3 -Now, select All time from time range and click on clear data.

That’s it. Your Date, Time, and the Time Zone is set to the correct settings for your system and you should be able to browse without any issues now.