Have you ever wondered while customizing the Taskbar on your computer, that you can’t hide that ugly clock and date from the taskbar? But what if we say it is quite possible and it will take just a few minutes to do it? In this article, we have elaborated on how to hide Clock and Date feature from Taskbar in Windows 11/10 machines.
How to hide Clock and Date from the taskbar in Windows 10/11
There are several methods you can hide the clock and date from the taskbar. We have listed all of them. Use the method you prefer the most to hide the clock from the taskbar on your computer.
Method – 1 Using Settings
[FOR WINDOWS 10 USERS ONLY ]
The easiest way you can do this is by using Settings. But, this trick only works on Windows 10, as this feature is missing in Windows 11. So, if you are using that, jump to Method 2.
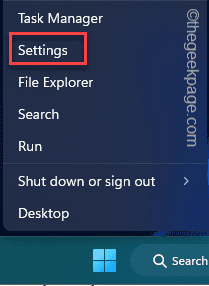
1. If you right-tap the Windows icon, you can view the context menu.
2. On that menu, tap “Settings” to open that.
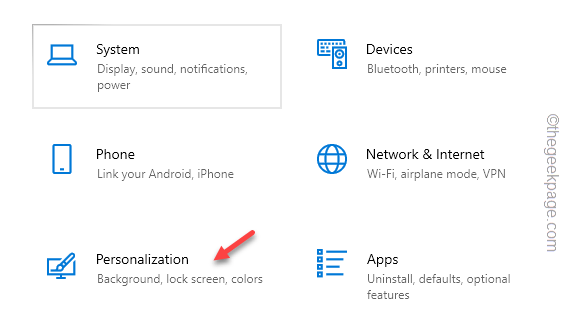
3. On the Settings page, click the “Personalization” option to access that setting.
4. Now, go ahead to the “Taskbar” settings on the left-hand pane.
5. Next, scroll down and click “Turn system icons on or off” to open it.
6. Just simply, toggle the “Clock” settings to “Off“.
That’s it! It’s that easy to toggle the clock and time settings.
Method – 2 Using the Registry Editor tool
You can use the Registry Editor tool to modify this setting very easily.
NOTE – Before you tweak the registry settings, you should create a registry backup. This is because even a small registry modification can lead to a fatal, irreversible error. In that case, this backup registry will be a lifesaver for you.
After opening the Registry Editor, tap “File” and then, click “Export” to create a registry backup.
Name this backup something and save it somewhere safe.
1. At first, press the Win key and the R keys together.
2. Then, type this and hit Enter.
regedit
3. Now, visit this place once you are on the Registry Editor page –
HKEY_CURRENT_USER\Software\Microsoft\Windows\CurrentVersion\Policies\
4. Next, look for the “Explorer” sub-key here.
If you can’t find this key, right-tap the “Policies” once again and tap “New” to create a new key.
5. Then, name the new key “Explorer“.
6. After this, go to the right-hand pane. There, right-tap on the space and tap “New>” and further, click “DWORD (32-bit) Value” to create a new value.
7. Name this value “HideClock“. You are going to use this value to block the date and time feature.
8. Now, double-tap this value to edit it.
9. Setting this value to “1” should do the trick.
10. After that, click “OK” to save the changes.
Close the Registry Editor after this. This change won’t take effect until you restart your system.
So, reboot the machine. After that, you won’t see the date and time on your taskbar.
What if you want to get back the Date and Time settings on the taskbar?
You can easily retrieve the original date and time settings on the taskbar.
1. Open Registry Editor.
2. Now, reach the location where you have created the “HideClock” value before.
Computer\HKEY_CURRENT_USER\Software\Microsoft\Windows\CurrentVersion\Policies\Explorer
3. Here, right-tap the “HideClock” value and tap “Delete” to delete the value.
4. A warning message will appear. Tap “Yes” to remove the value.
After deleting the value, you have to restart your system. This will reset the date and time settings on the taskbar.
Method 3 – Using the group policy
The Group Policy Editor is another tool that you can use to block date and time settings on your computer.
[
NOTE – This won’t work on Windows Home Edition as the Group Policy feature isn’t available.
]
1. Pressing the Windows key and the R key should bring up the Run box.
2. There, type this in the box and click “OK“.
gpedit.msc
3. When you land on the Local Group Policy Editor page, get up to this point –
User Configuration\Administrative Templates\Start Menu and Taskbar\
4. Then, look for the “Remove Clock from the system notification area” policy.
5. Once you have found it, double-tap it to edit the policy.
6. You can see set the policy “Enabled” to enable the policy.
7. Hit “Apply” and “OK” to save the policy change.
Usually, close the Group Policy Editor. After that, restart the system so that this policy can be applied to your computer.
The date and time will be gone from the taskbar.
How to reset the date and time settings on Windows
Just like the Registry Editor, you can modify the policy to get back the date and time settings.
1. Open the Local Group Policy.
2. Then, reach here –
User Configuration\Administrative Templates\Start Menu and Taskbar\
3. Then, open the “Remove Clock from the system notification area” policy.
4. Then, set it to the “Not configured” or “Disabled” setting.
When you apply & save the policy change and restart your computer, you can retrieve the date and clock on the taskbar.


