Quick Access is a cool feature in the File Explorer that was introduced in Windows 10 in place of the Favorites option that was present in the older versions. The Quick Access feature stays in the Windows 11 OS and continues to make it easier for you to access the frequently used files and folder, despite its location.
The Quick Access feature not just improves your workflow speed, but also your overall productivity. It’s more like a shortcut feature guiding you straight to your favorite file or folder that’s located deep inside a directory. But, sometimes you may want to delete the Quick Access history to start all over, clear the clutter, or to simply hide some files or folders to maintain privacy.
Whatever may be the reason, you can use the below methods to clear Quick Access history in File Explorer on your Windows 11 PC.
How to View the Quick Access History or the Recent Files
The algorithm for recent files in the Quick Access shortcut works in such a way that it shows 10 recent files in a chronological order. However, the user has the liberty to increase the number of recent files displayed, by changing the settings manually. So, the most recent file is placed at the top, followed by the ones before that.
The Quick Access shortcut also lists the pinned items in the same chronology with the latest at the top, but they do not disappear and rather keep changing their positions. As soon as the number of pinned items reach the limit specified in the settings (10 by default), you would need to unpin items to add more, or increase the limit in settings.
But, how to delete the recent files? Let’s see how..
Method 1: Delete Recent Files using File Explorer Options
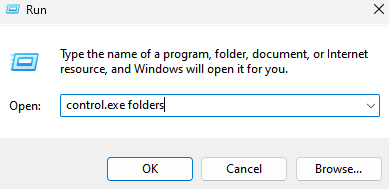
Step 1: Press the Win + R keys simultaneously on your keyboard to launch the Run command window.
Step 2: In the Run command search bar, type control.exe folders and hit Enter to open the File Explorer Options (Folder Options) window.

Step 3: In the File Explore Options window, under the General tab, go to the Privacy section and click on the Clear button.

Once done, press OK to exit.
The Recent Files in your Quick Access history are now all deleted.
Method 2: Delete Recent Files using File Explorer and This PC
Step 1: Press the Win + E shortcut keys on your keyboard to open the File Explorer window.
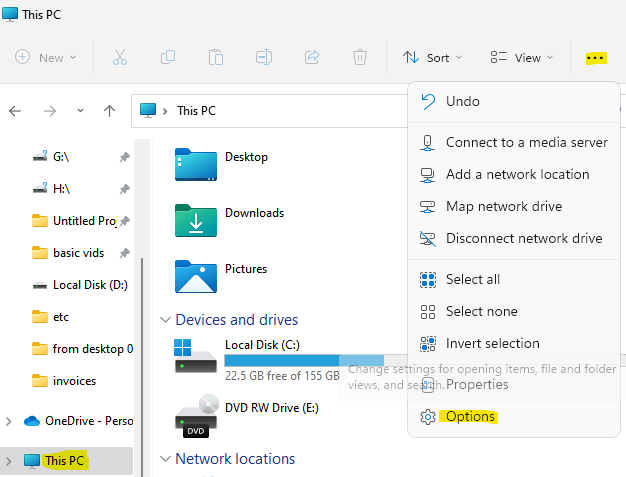
Step 2: In the File Explorer window, go to the left side of the pane and select This PC.
Step 3: Now, on the right side of the window, navigate to the three parallel dots located at the upper right side, click on it and select Options from the menu.

Step 4: In the File Explore Options dialogue box that opens, under the General tab, navigate to the Privacy field and click on Clear.

Now, you have successfully deleted all the recent files from the Quick Access history.
Method 3: Delete Recent Files using the AppData Folder
Step 1: Go to Start, right-click on it and select Run.
Step 2: this will open the Run command window.
Here, copy and paste the below path in the search field and press OK:
%AppData%\Microsoft\Windows\Recent\
Step 3: This will open the Recent folder for all the recent files and folders in your user profile.
Select all the apps, files and folders and hit Delete.
All the recent files, folders and apps are no deleted from the Quick Access history.