Windows gives an option to the users so that they can choose to get their apps from ‘Anywhere‘ to ‘Microsoft Store only‘. But, in some cases, Windows users have reported an issue where they can’t find the “Choose where to get apps” option missing from the Settings page. This can be a nightmarish situation for you, as if it is set to the Store only mode, you can’t sideload any application from anywhere! Don’t worry. There is a registry fix that you can apply to fix the issue.
Workarounds –
1. Restart the system. If this is a one-time glitch, a fresh restart should fix it.
2. You need an administrator account for these changes. So, make sure that you are using one.
Fix 1 – Get out of the S Mode
If you have Windows 11/10 S Mode, you won’t be able to install any app except Store. So, you have to upgrade to Windows Home, Pro, or Enterprise Edition.
Step 1 – Launch the Settings window. You can easily do that using the Win key and the I keys together.
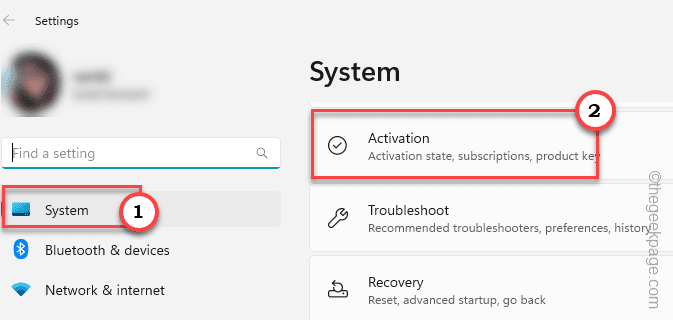
Step 2 – On the left-hand pane, head on to the “System” settings.
Step 3 – On the other side of the screen, you can see the “Activation” menu. Now, open it.
Step 4 – Find the Switch to Windows 11 Pro section once you get there. If you are using a Home edition, you will find the option to use Windows Home edition.
[But, do not click the Upgrade your edition of Windows option.]
Step 5 – On the next page, you can find the Microsoft Store (Switch out of S mode) and click the “Get” option in Store.
Once you confirm this process, you can easily sideload other apps from other locations in the Store.
So, open Settings and check whether you can find the Choose Where to Get Apps option.
Fix 2 – Delete the AppInstallControl value
This Where to Get Apps option can be toggled directly from the Windows Registry page. This trick can be used on any Windows 10, or 11 computer.
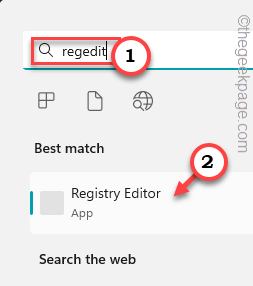
Step 1 – You can find this value in your system registry. So, type “regedit” in the search bar.
Step 2 – When you can see “Registry Editor” again, click it to open it.

Warning – Registry fixes sometimes can damage your system in the wrong way. A single mistake and the machine may brick! So, before moving on to the main solution, you have to create a registry backup –
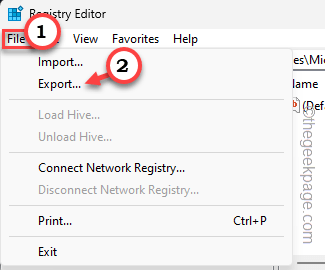
a. On the Registry Editor page, click “File“, and then, tap “Export“.
Just name this backup something you prefer and store it somewhere safe.
Step 3 – After creating the backup, head on to this point following the left-hand section of the Registry Editor –
HKEY_LOCAL_MACHINE\SOFTWARE\Policies\Microsoft\Windows Defender\SmartScreen
Step 4 – Now, if you take a look on the other side of the page, you may find these two values –
ConfigureAppInstallControl
ConfigureAppInstallControlEnabled
Step 5 – Select these two values together and click the “Delete” key to remove the values from Registry Editor.
Step 6 – Now, click “Yes” in the warning message to completely remove the value.
Exit Registry Editor. Now, if you go and try to find the Choose where to get apps, you won’t find it on the Settings page immediately.
You have to restart your computer. Restarting the system will bring back the missing option again on the Settings page.
Fix 3 – Configure the app install control policy
[ NOT FOR WINDOWS HOME users]
There is a group policy called App Install Control Policy that you can enact or revoke to take control of the Choose where to get apps option in Settings.
NOTE – Your domain administrator may have enforced this setting on your computer due to organization policies and safeguarding the system. So, before you make any changes, we request you get a confirmation from their end before
Step 1 – Just use the Windows Key+S keys together to pull up the search box. There, you write “group policy“.
Step 2 – Now, tap “Edit group policy” to open it.

Step 3 – When you get to that app, head to this point –
Computer Configuration > Administrative Templates > Windows Components > Windows Defender SmartScreen > Explorer
Step 4 – Once you reach that point, you will see these two particular policies –
Configure App Install Control
Configure Windows Defender SmartScreen
Step 5 – Double-click the “Configure app install control” policy to update it.
Step 6 – In Configure App Install Control page, set it to the “Not Configured” setting.
Step 7 – After this, click “Apply” and “OK” both options to enact this.
This way, the policy won’t be enacted on your system. Then, restart your computer.
Exit the policy control page. After this, reboot the machine once. This way, after the system restarts and comes back online, you will find the Choose where to get apps option once again.
Fix 4 – Reset Store
If all the other options have failed to sort out the issue, you can reset the Store.
Step 1 – Just right-click the Windows icon. This will pull up the context menu.
Step 2 – There, choose the first option “Installed apps“.
Step 3 – Use your mouse to go down until you found “Microsoft Store“.
Step 4 – What you have to do next is to click the ⁝ and click “Advanced options“.
Step 5 – This step is very important. Scroll down until you find the Reset options. There, click “Repair” to repair the app.
When Windows has repaired it, you will notice a tick has appeared.
Go and try to find the missing option in the Choose where to get apps option once more.
Can’t find the missing option on the Settings page? Don’t worry.
Step 6 – Again, get to the Advanced options page of the Store.
Step 7 – There, click the “Reset” option once and then, click the “Reset” option again to reset the app.
This time, close everything and perform a system reboot.
You will get back the missing Choose where to get apps option again.
This should have fixed your issue.
Fix 5 – Run file checker tools
You can run these file checker tools to fix this if it is happening due to some corrupted system files.
Step 1 – After hitting the Windows key, search this from the search bar.
cmd
Step 2 – Then, you can just right-click the best match “Command Prompt“, and tap “Run as administrator“.
Step 3 – To start the SFC scan, copy-paste this line on the terminal and hit the Enter key from your keyboard.
sfc /scannow

Windows will now look for the corrupted files and replace them. During this process, do not close the terminal.
But, you can minimize it.
Step 4 – Once the SFC check is over, you have to run this test.
DISM.exe /Online /Cleanup-image /Restorehealth
Once the DISM scan is complete, close the terminal.
Then, restart the computer for the final step. You will find the Choose where to get your apps again in its designated space.

